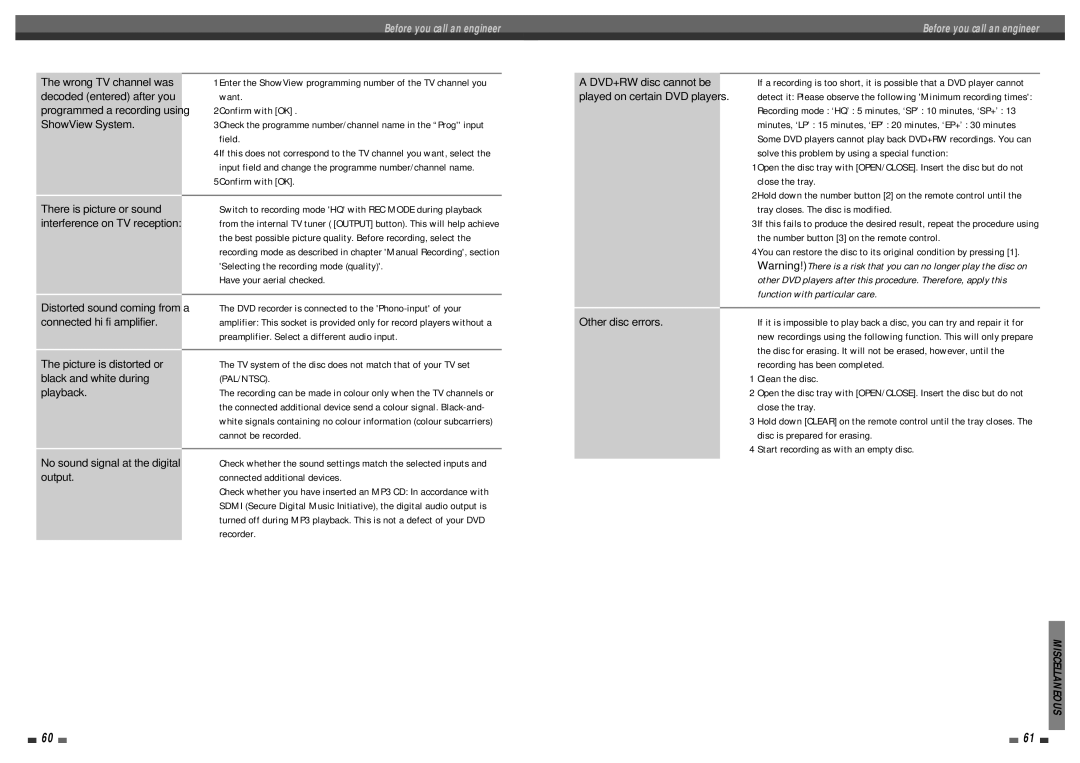
The wrong TV channel was decoded (entered) after you programmed a recording using ShowView System.
There is picture or sound interference on TV reception:
Distorted sound coming from a connected hi fi amplifier.
The picture is distorted or black and white during playback.
No sound signal at the digital output.
Before you call an engineerBefore you call an engineer
➠ 1Enter the ShowView programming number of the TV channel you |
| A DVD+RW disc cannot be |
| ➠ If a recording is too short, it is possible that a DVD player cannot |
| ||||
want. | played on certain DVD players. | detect it: Please observe the following 'Minimum recording times': | ||
2Confirm with [OK] . |
|
| Recording mode : ‘HQ’ : 5 minutes, ‘SP’ : 10 minutes, ‘SP+’ : 13 | |
3Check the programme number/channel name in the “Prog'' input |
|
| minutes, ‘LP’ : 15 minutes, ‘EP’ : 20 minutes, ‘EP+’ : 30 minutes | |
field. |
|
| ➠ Some DVD players cannot play back DVD+RW recordings. You can | |
4If this does not correspond to the TV channel you want, select the |
|
| solve this problem by using a special function: | |
input field and change the programme number/channel name. |
|
| 1Open the disc tray with [OPEN/CLOSE]. Insert the disc but do not | |
5Confirm with [OK]. |
|
| close the tray. | |
|
|
|
| 2Hold down the number button [2] on the remote control until the |
➠ Switch to recording mode 'HQ' with REC MODE during playback |
|
| ||
|
| tray closes. The disc is modified. | ||
from the internal TV tuner ( [OUTPUT] button). This will help achieve |
|
| 3If this fails to produce the desired result, repeat the procedure using | |
the best possible picture quality. Before recording, select the |
|
| the number button [3] on the remote control. | |
recording mode as described in chapter 'Manual Recording', section |
|
| 4You can restore the disc to its original condition by pressing [1]. | |
'Selecting the recording mode (quality)'. |
|
| Warning!) There is a risk that you can no longer play the disc on | |
➠ Have your aerial checked. |
|
| other DVD players after this procedure. Therefore, apply this | |
|
|
|
| function with particular care. |
➠ The DVD recorder is connected to the |
|
| ||
|
|
| ||
Other disc errors. |
| |||
amplifier: This socket is provided only for record players without a | ➠ If it is impossible to play back a disc, you can try and repair it for | |||
preamplifier. Select a different audio input. |
|
| new recordings using the following function. This will only prepare | |
|
|
|
| the disc for erasing. It will not be erased, however, until the |
➠ The TV system of the disc does not match that of your TV set |
|
| ||
|
| recording has been completed. | ||
(PAL/NTSC). |
|
| 1 Clean the disc. | |
➠ The recording can be made in colour only when the TV channels or |
|
| 2 Open the disc tray with [OPEN/CLOSE]. Insert the disc but do not | |
the connected additional device send a colour signal. |
|
| close the tray. | |
white signals containing no colour information (colour subcarriers) |
|
| 3 Hold down [CLEAR] on the remote control until the tray closes. The | |
cannot be recorded. |
|
| disc is prepared for erasing. | |
|
|
|
| 4 Start recording as with an empty disc. |
➠ Check whether the sound settings match the selected inputs and |
|
| ||
|
|
| ||
connected additional devices.
➠ Check whether you have inserted an MP3 CD: In accordance with SDMI (Secure Digital Music Initiative), the digital audio output is turned off during MP3 playback. This is not a defect of your DVD recorder.
MISCELLANEOUS
60 |
|
|
| 61 |
|
|
