WARNUNG: Um elektrische Schläge zu vermeiden, trennen Sie vor dem Entfernen der Abdeckung den Computer immer von der Steckdose.

VORSICHT: Bevor Sie Bauteile im Computer berühren, erden Sie sich, indem Sie eine unbeschichtete Metalloberfläche (beispielsweise die Metallrückseite des Computers) berühren. Diese Erdung während der Arbeit am System regelmäßig wiederholen, um statische Elektrizität abzuleiten, die interne Bauteile beschädigen könnte.

7.Die Computerabdeckung öffnen.

8.Die beiden grünen Kunststoffschienen aus dem Festplattenlaufwerkschacht entfernen. Die Schienen dabei vorsichtig nach oben aus dem Schacht herausheben.

9.Die Schienen mit Hilfe der beiden Schrauben, die an den Schienen angebracht sind, am Festplattenlaufwerk befestigen.

Sicherstellen, dass sich die Klammern der Schienen an der Rückseite des Festplattenlaufwerks befinden.

VORSICHT: Entfernen Sie die grünen Laufwerkschienen aus dem Festplattenlaufwerkträger, bevor Sie ein Laufwerk im unteren Festplattenlaufwerkschacht installieren.

10.Das erste Festplattenlaufwerk aus dem oberen Schacht entfernen und in den unteren Schacht einsetzen.

a.Das Netzkabel und das Festplattenlaufwerkkabel von der Rückseite des ersten Festplattenlaufwerks abziehen.

b.Die beiden grünen Schienenklammern zusammendrücken und das erste Festplattenlaufwerk aus dem oberen Schacht entfernen.

c.Das Festplattenlaufwerk vorsichtig in den unteren Schacht schieben, bis es mit einem Klicken einrastet.

d.Das Netzkabel und das Festplattenlaufwerkkabel wieder an der Rückseite des ersten Festplattenlaufwerks anschließen.

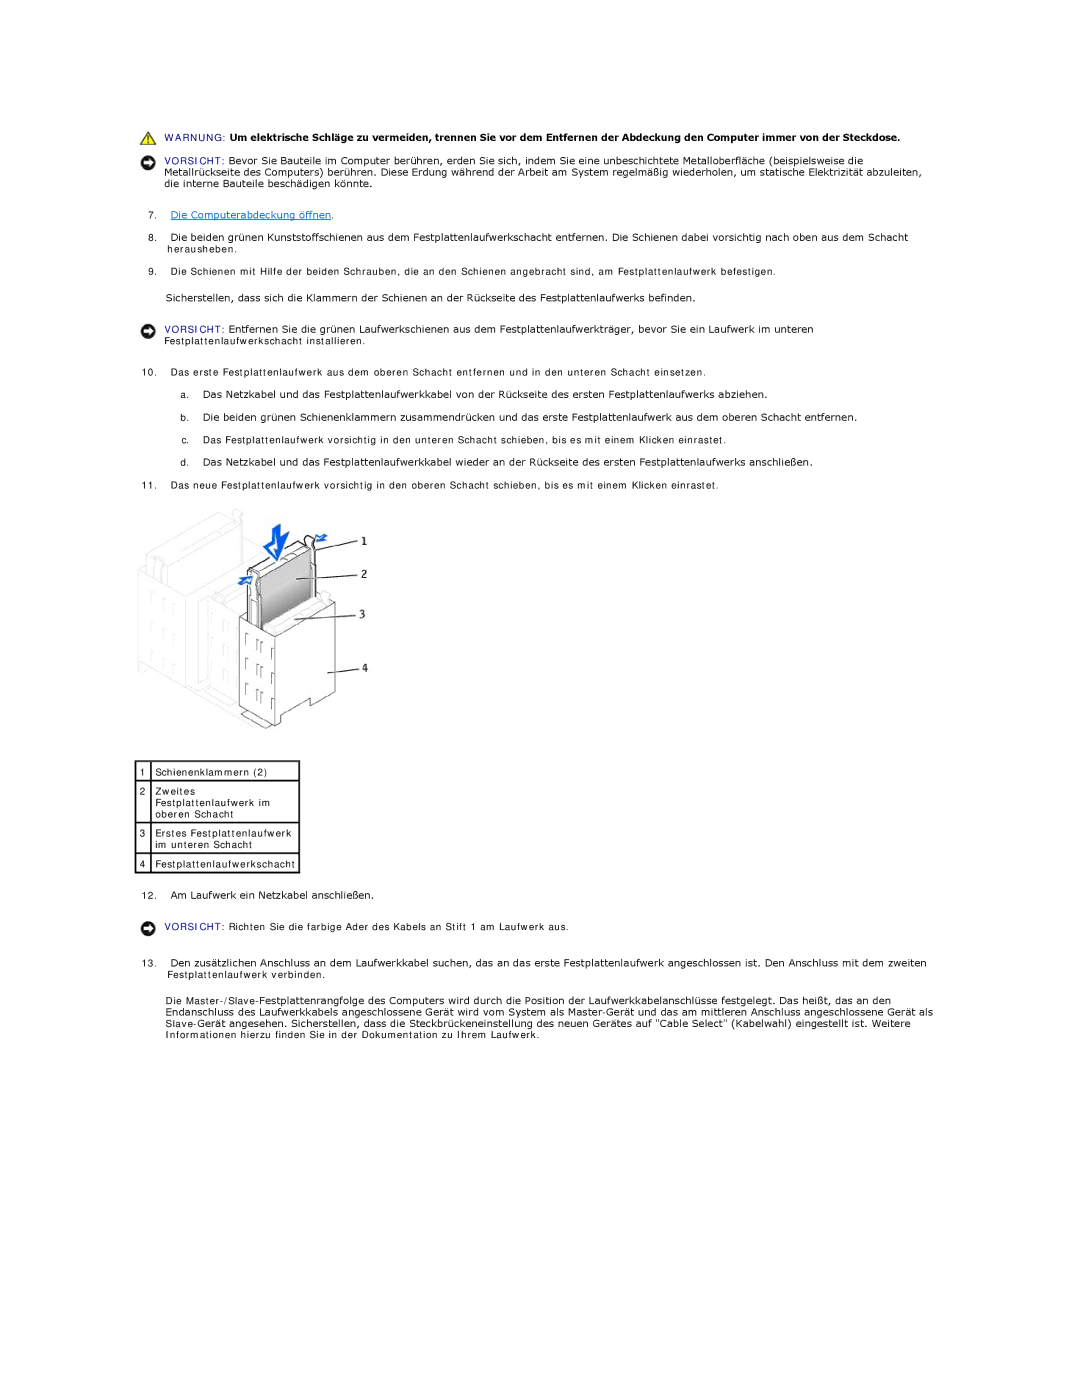
11.Das neue Festplattenlaufwerk vorsichtig in den oberen Schacht schieben, bis es mit einem Klicken einrastet.

1Schienenklammern (2)

2Zweites Festplattenlaufwerk im oberen Schacht

3Erstes Festplattenlaufwerk im unteren Schacht

4Festplattenlaufwerkschacht

12.Am Laufwerk ein Netzkabel anschließen.

VORSICHT: Richten Sie die farbige Ader des Kabels an Stift 1 am Laufwerk aus.

13.Den zusätzlichen Anschluss an dem Laufwerkkabel suchen, das an das erste Festplattenlaufwerk angeschlossen ist. Den Anschluss mit dem zweiten

Festplattenlaufwerk verbinden.

Die Master-/Slave-Festplattenrangfolge des Computers wird durch die Position der Laufwerkkabelanschlüsse festgelegt. Das heißt, das an den Endanschluss des Laufwerkkabels angeschlossene Gerät wird vom System als Master-Gerät und das am mittleren Anschluss angeschlossene Gerät als Slave-Gerät angesehen. Sicherstellen, dass die Steckbrückeneinstellung des neuen Gerätes auf "Cable Select" (Kabelwahl) eingestellt ist. Weitere Informationen hierzu finden Sie in der Dokumentation zu Ihrem Laufwerk.

Page 74
Image 74
Dell 350 manual Die Computerabdeckung öffnen

350 specifications

The Dell 350 is a versatile and compact desktop computer designed to cater to the needs of both personal and professional users. Whether you're a student, a home office worker, or a small business owner, the Dell 350 is engineered to deliver reliable performance and efficient multitasking capabilities.

One of the standout features of the Dell 350 is its powerful processor options. Users can choose from a range of Intel Core or AMD Ryzen processors, ensuring that they can get the computing power needed to tackle demanding applications or handle multiple tasks simultaneously. This flexibility allows users to select the configuration that best suits their workload, from light browsing and document editing to more resource-intensive applications.

In terms of memory, the Dell 350 supports up to 32GB of RAM, enabling smooth performance when running multiple applications or large files. This ample memory ensures that users can work with demanding software without experiencing lag or slowdowns, making it an ideal choice for students and professionals alike.

Storage options on the Dell 350 are designed to keep up with the needs of modern users. It features combinations of fast SSD storage and traditional HDD options, providing users with a balance of speed and capacity. The SSDs offer quicker boot times and faster data access, while HDDs provide ample storage for large files such as videos, photos, and projects.

Another notable aspect of the Dell 350 is its compact design, making it suitable for environments with limited space. Its sleek exterior allows it to blend inconspicuously within any workspace, while still providing all the necessary ports for connectivity. Users will find multiple USB ports, HDMI outputs, and audio jacks, ensuring that peripherals like monitors, keyboards, and headphones can be easily connected.

Reliability and security are also key considerations in the design of the Dell 350. The machine comes equipped with Dell's suite of software solutions focused on protecting user data and ensuring the longevity of the machine. Features like TPM (Trusted Platform Module) enhance security by providing hardware-based encryption capabilities, making it a solid choice for users concerned about data integrity.

The Dell 350 is not just a functional desktop; it represents a blend of performance, efficiency, and security, making it a practical choice for a wide range of users. Whether for academic pursuits, home entertainment, or office tasks, the Dell 350 stands out as a dependable piece of technology tailored to meet diverse needs.