7

8

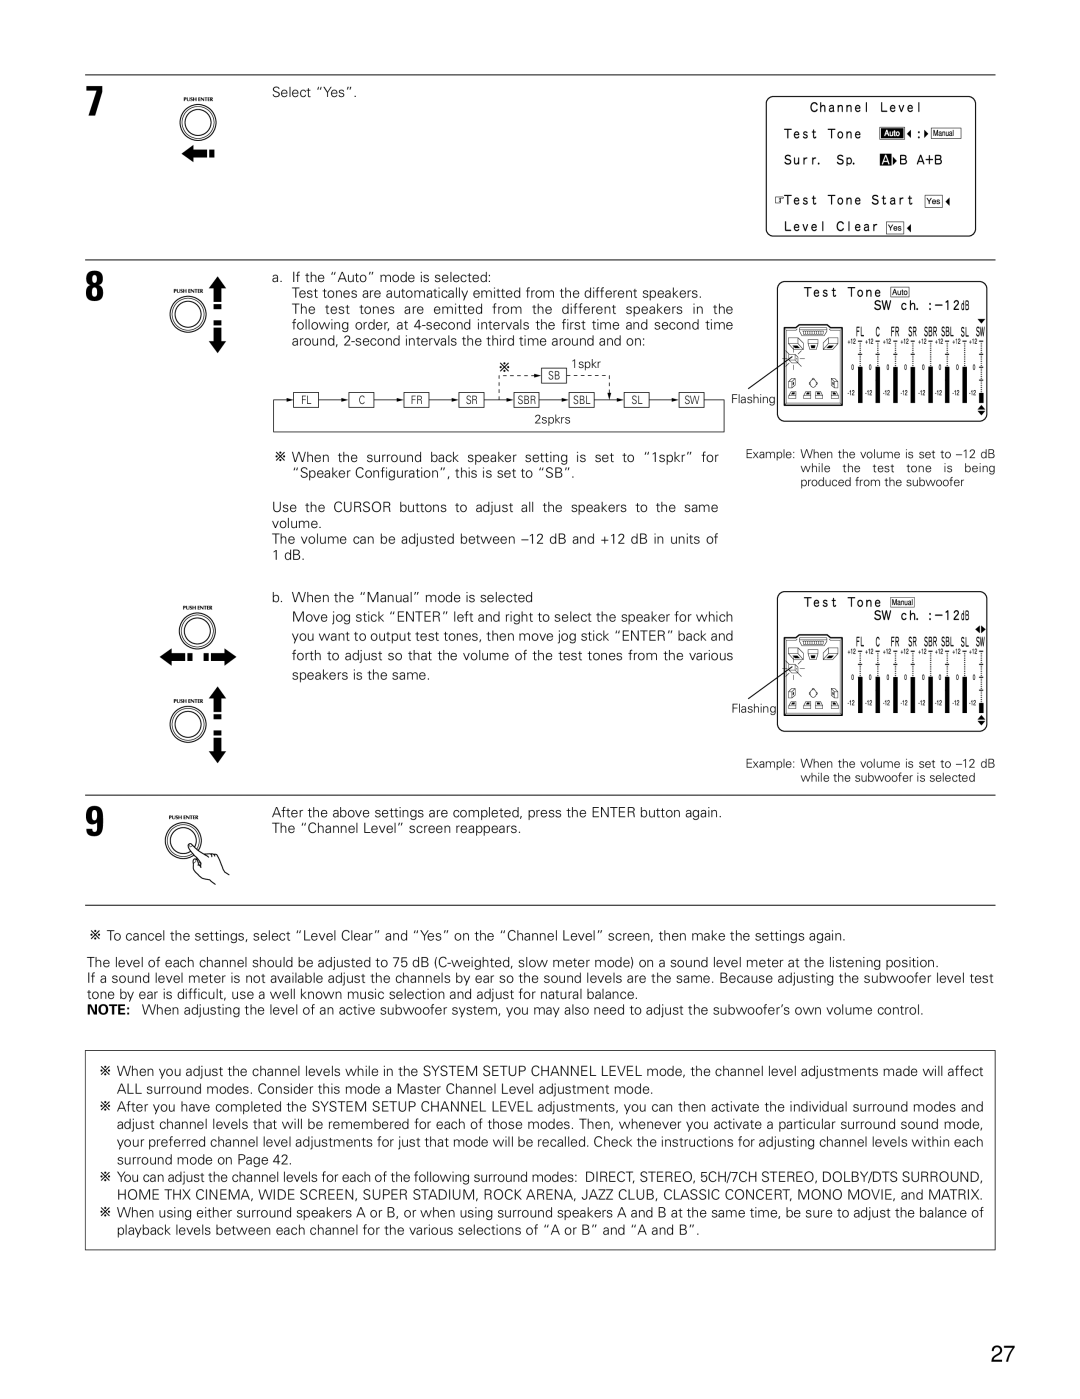
Select “Yes”.

a.If the “Auto” mode is selected:

Test tones are automatically emitted from the different speakers.

The test tones are emitted from the different speakers in the following order, at 4-second intervals the first time and second time around, 2-second intervals the third time around and on:

1spkr

SB

FL C FR SR SBR SBL SL SW Flashing

2spkrs

When the surround back speaker setting is set to “1spkr” for “Speaker Configuration”, this is set to “SB”.

Use the CURSOR buttons to adjust all the speakers to the same volume.

The volume can be adjusted between –12 dB and +12 dB in units of 1 dB.

b.When the “Manual” mode is selected

Move jog stick “ENTER” left and right to select the speaker for which you want to output test tones, then move jog stick “ENTER” back and forth to adjust so that the volume of the test tones from the various speakers is the same.

Example: When the volume is set to –12 dB while the test tone is being produced from the subwoofer

Flashing

Example: When the volume is set to –12 dB while the subwoofer is selected

9

After the above settings are completed, press the ENTER button again.


The “Channel Level” screen reappears.

To cancel the settings, select “Level Clear” and “Yes” on the “Channel Level” screen, then make the settings again.

The level of each channel should be adjusted to 75 dB (C-weighted, slow meter mode) on a sound level meter at the listening position.

If a sound level meter is not available adjust the channels by ear so the sound levels are the same. Because adjusting the subwoofer level test tone by ear is difficult, use a well known music selection and adjust for natural balance.

NOTE: When adjusting the level of an active subwoofer system, you may also need to adjust the subwoofer’s own volume control.

When you adjust the channel levels while in the SYSTEM SETUP CHANNEL LEVEL mode, the channel level adjustments made will affect ALL surround modes. Consider this mode a Master Channel Level adjustment mode.

After you have completed the SYSTEM SETUP CHANNEL LEVEL adjustments, you can then activate the individual surround modes and adjust channel levels that will be remembered for each of those modes. Then, whenever you activate a particular surround sound mode, your preferred channel level adjustments for just that mode will be recalled. Check the instructions for adjusting channel levels within each surround mode on Page 42.

You can adjust the channel levels for each of the following surround modes: DIRECT, STEREO, 5CH/7CH STEREO, DOLBY/DTS SURROUND, HOME THX CINEMA, WIDE SCREEN, SUPER STADIUM, ROCK ARENA, JAZZ CLUB, CLASSIC CONCERT, MONO MOVIE, and MATRIX.

When using either surround speakers A or B, or when using surround speakers A and B at the same time, be sure to adjust the balance of playback levels between each channel for the various selections of “A or B” and “A and B”.

27

Page 27
Image 27
Denon AVR-4802 manual Channel Level screen reappears

AVR-4802 specifications

The Denon AVR-4802 is a premium home theater receiver that has garnered a reputation for delivering exceptional audio and video performance. Launched as part of Denon's celebrated line of A/V receivers, the AVR-4802 exemplifies the brand's commitment to quality and innovation in the realm of home entertainment.

One of the key features of the AVR-4802 is its robust amplification capability. It provides a powerful 110 watts per channel, allowing users to enjoy a dynamic and impactful soundstage. The receiver is equipped with multiple channels, which facilitates a fully immersive surround sound experience, accommodating various speaker configurations, including traditional 5.1 and more advanced setups like 7.1 surround sound.

The AVR-4802 incorporates cutting-edge surround sound processing technologies, including Dolby Digital and DTS, ensuring high-fidelity audio reproduction for both movies and music. Additionally, it supports 24-bit/192kHz audio playback, which enhances the detail and clarity of sound, making it suitable for both casual listeners and audiophiles.

In terms of video capabilities, the AVR-4802 supports high-quality video formats, including progressive scan for smoother images, and it features multiple video inputs, including S-Video and composite connections. This versatility allows users to connect various devices, such as DVD players and gaming consoles, simplifying the integration of a comprehensive home theater system.

The receiver also comes with advanced DSP (Digital Signal Processing) algorithms that optimize audio output based on the environment, providing an improved listening experience regardless of the room's acoustics. This feature further enhances the AVR-4802's appeal to home theater enthusiasts looking for customizability.

Another outstanding characteristic of the AVR-4802 is its user-friendly interface, featuring a comprehensive on-screen display that simplifies setup and operation. It includes a remote control that offers convenient access to all functionalities, making navigation through various settings intuitive.

Additionally, the AVR-4802 is equipped with multiple digital and analog inputs, which provides flexibility in connecting other audio and video components. The receiver's build quality is also noteworthy, reflecting Denon's attention to detail, ensuring durability and performance.

Overall, the Denon AVR-4802 is a well-rounded A/V receiver that combines power, advanced technologies, and user-friendly features to create an ideal centerpiece for any home theater system, offering an unparalleled entertainment experience for users who appreciate high-quality sound and video.