5PART NAMES, FUNCTIONS AND DISPLAYS
RECEIVER
ENGLISH
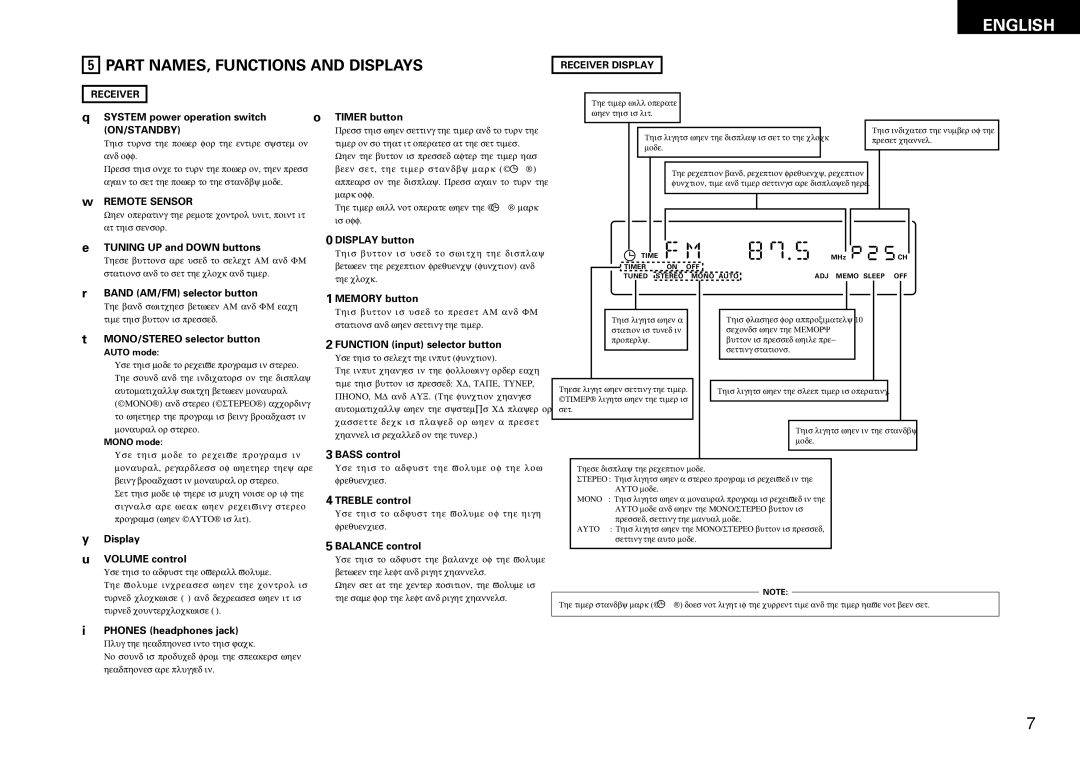
RECEIVER DISPLAY
q SYSTEM power operation switch | o TIMER button | |
(ON/STANDBY) | Press this when setting the timer and to turn the | |
This turns the power for the entire system on | timer on so that it operates at the set times. | |
and off. | When the button is pressed after the timer has | |
Press this once to turn the power on, then press | been set, the timer standby mark (” “) | |
again to set the power to the standby mode. | appears on the display. Press again to turn the | |
w REMOTE SENSOR | mark off. | |
The timer will not operate when the ” “ mark | ||
When operating the remote control unit, point it | ||
is off. | ||
at this sensor. | ||
| ||
e TUNING UP and DOWN buttons | !0 DISPLAY button | |
|
The timer will operate when this is lit.
This lights when the display is set to the clock mode.
The reception band, reception frequency, reception function, time and timer settings are displayed here.
This indicates the number of the preset channel.
| These buttons are used to select AM and FM | This button is used to switch the display |
| between the reception frequency (function) and | |
| stations and to set the clock and timer. | |
| the clock. | |
|
| |
r | BAND (AM/FM) selector button | !1 MEMORY button |
| The band switches between AM and FM each | |
| This button is used to preset AM and FM | |
|
|
|
| TIME |
|
|
| MHz |
| CH | ||||||
TIMER | ON | OFF |
|
|
|
|
|
|
|
| ||||
TUNED | STEREO | MONO AUTO | ADJ MEMO SLEEP | OFF | ||||||||||
|
|
|
|
|
|
|
|
|
|
|
|
|
|
|
|
|
|
|
|
|
|
|
|
|
|
|
|
|
|
time this button is pressed. | stations and when setting the timer. |
|
This lights when a station is tuned in
This flashes for approximately 10 seconds when the MEMORY
t MONO/STEREO selector button |
AUTO mode: |
Use this mode to receive programs in stereo. |
The sound and the indicators on the display |
automatically switch between monaural |
(”MONO“) and stereo (”STEREO“) according |
to whether the program is being broadcast in |
monaural or stereo. |
MONO mode: |
Use this mode to receive programs in |
!2 FUNCTION (input) selector button
Use this to select the input (function).
The input changes in the following order each time this button is pressed: CD, TAPE, TUNER, PHONO, MD and AUX. (The function changes automatically when the system’s CD player or cassette deck is played or when a preset channel is recalled on the tuner.)
!3 BASS control
properly.
These light when setting the timer. ”TIMER“ lights when the timer is set.
button is pressed while pre- setting stations.
This lights when the sleep timer is operating.
This lights when in the standby mode.
monaural, regardless of whether they are |
being broadcast in monaural or stereo. |
Set this mode if there is much noise or if the |
signals are weak when receiving stereo |
programs (when ”AUTO“ is lit). |
yDisplay
uVOLUME control
Use this to adjust the overall volume.
The volume increases when the control is turned clockwise (,) and decreases when it is turned counterclockwise (.).
Use this to adjust the volume of the low frequencies.
!4 TREBLE control
Use this to adjust the volume of the high frequencies.
!5 BALANCE control
Use this to adjust the balance of the volume between the left and right channels.
When set at the center position, the volume is the same for the left and right channels.
These display the reception mode.
STEREO : This lights when a stereo program is received in the AUTO mode.
MONO : This lights when a monaural program is received in the AUTO mode and when the MONO/STEREO button is pressed, setting the manual mode.
AUTO : This lights when the MONO/STEREO button is pressed, setting the auto mode.
NOTE:
The timer standby mark (” ![]() “) does not light if the current time and the timer have not been set.
“) does not light if the current time and the timer have not been set.
iPHONES (headphones jack)
Plug the headphones into this jack.
No sound is produced from the speakers when headphones are plugged in.
7