Fireplace

Installation

Continued

WARNING: If fireplace has been running, turn off and let cool before accessing or servic- ing the unit.

WARNING: Handle glass door panelwithcare.Donot strike,slam, or otherwise abuse glass. Do not operate fireplace with glass door removed, cracked, or broken.

Removing Glass Door

If replacement of glass is necessary, the entire assembly, glass and frame, must be replaced. If glass is broken, wear gloves and tape the remaining fragments onto the frame.

1.Remove the lower louver panel (see Remov- ing Lower Louver Access Panel and Figure 55, page 29).

2.Remove the top louver trim panel (see Re- moving Top Louver Trim Panel and Figure 56, page 29).

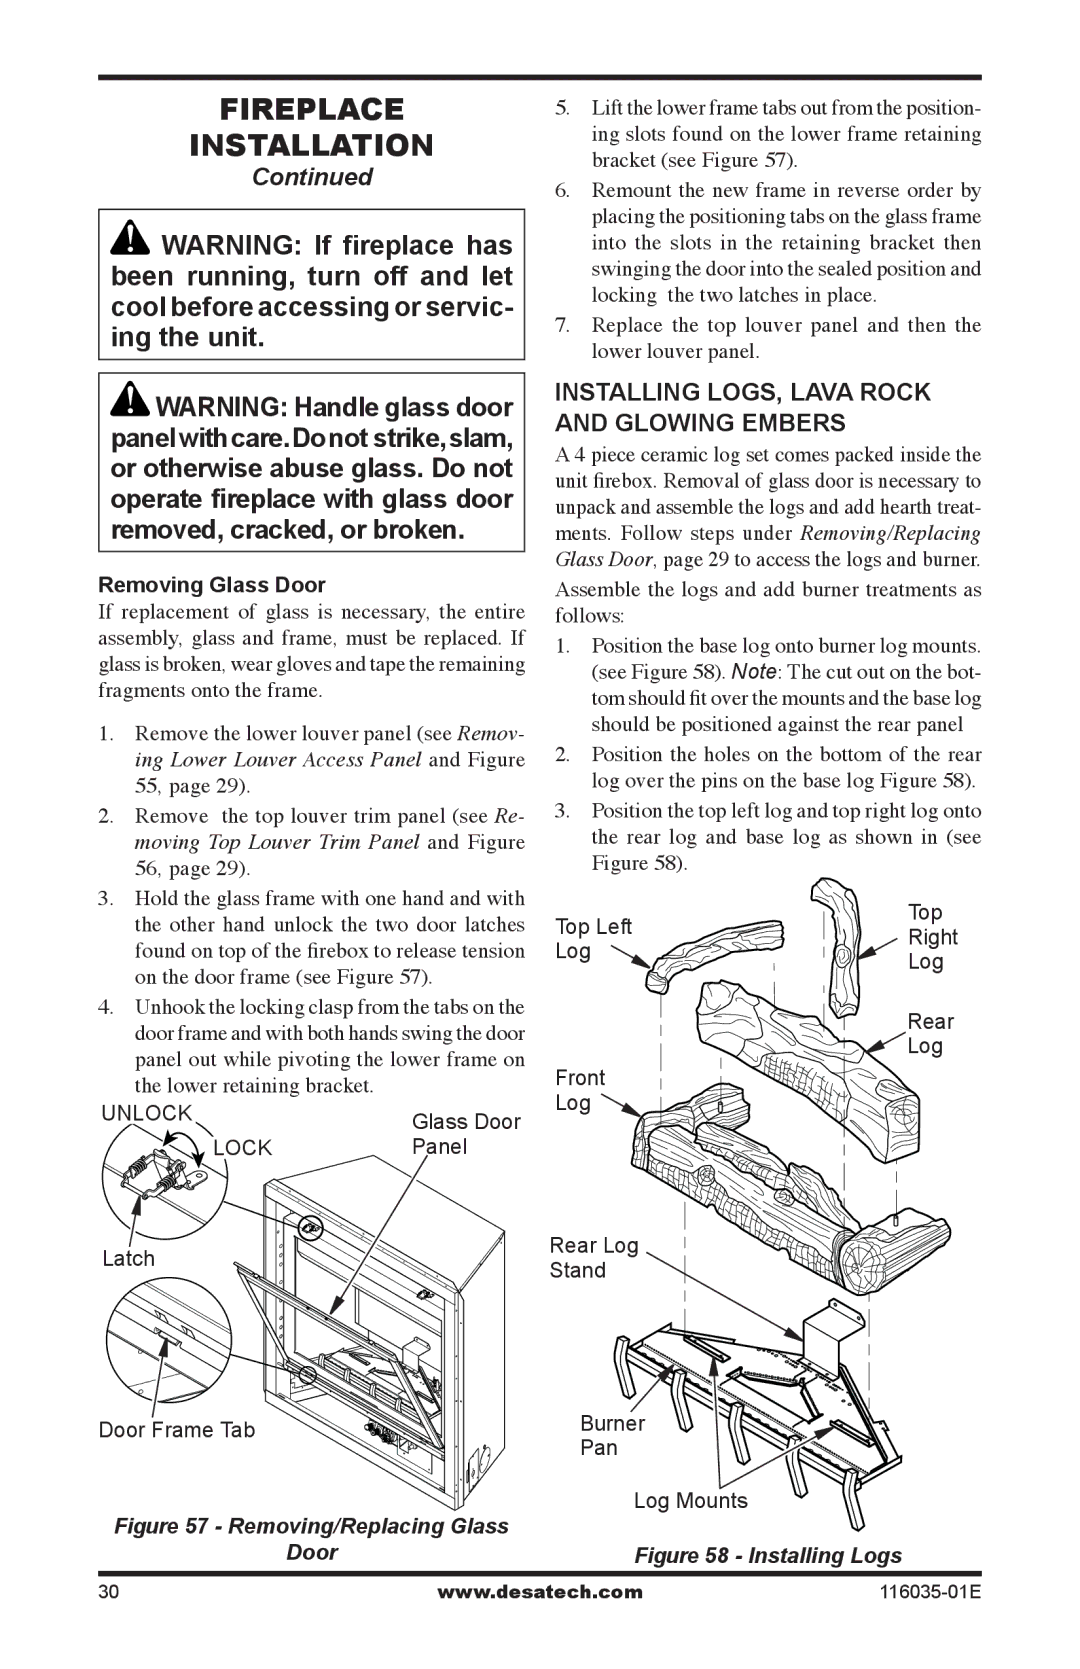
3.Hold the glass frame with one hand and with the other hand unlock the two door latches found on top of the firebox to release tension on the door frame (see Figure 57).

4.Unhook the locking clasp from the tabs on the door frame and with both hands swing the door panel out while pivoting the lower frame on the lower retaining bracket.

UNLOCK

Glass Door


LOCK

Panel

Latch


Door Frame Tab

Figure 57 - Removing/Replacing Glass

Door

5.Lift the lower frame tabs out from the position- ing slots found on the lower frame retaining bracket (see Figure 57).

6.Remount the new frame in reverse order by placing the positioning tabs on the glass frame into the slots in the retaining bracket then swinging the door into the sealed position and locking the two latches in place.

7.Replace the top louver panel and then the lower louver panel.

Installing LOGS, lava rock and glowing embers

A 4 piece ceramic log set comes packed inside the unit firebox. Removal of glass door is necessary to unpack and assemble the logs and add hearth treat- ments. Follow steps under Removing/Replacing Glass Door, page 29 to access the logs and burner. Assemble the logs and add burner treatments as follows:

1.Position the base log onto burner log mounts. (see Figure 58). Note: The cut out on the bot- tom should fit over the mounts and the base log should be positioned against the rear panel

2.Position the holes on the bottom of the rear log over the pins on the base log Figure 58).

3.Position the top left log and top right log onto the rear log and base log as shown in (see Figure 58).

Top Left

Top

Right

Log

Log


Rear

Log

Front

Log

Rear Log

Stand

Burner

Pan

Log Mounts

Figure 58 - Installing Logs

30

www.desatech.com

116035-01E

Page 30
Image 30
Desa (V)CD36RNE, (V)CD36RPE, (V)CD36TP, (V)CD36TNE Installing LOGS, lava rock and glowing embers, Removing Glass Door

V)CD36RN, (V)CD36TN, (V)CD36RPE, (V)CD36RNE, (V)CD36RP specifications

The Desa (V)CD36TPE, (V)CD36TP, (V)CD36TNE, (V)CD36RP, and (V)CD36RNE represent a series of cutting-edge heating solutions designed to meet the diverse needs of modern users. These models stand out for their efficiency, user-friendly features, and advanced technologies that ensure optimal performance and comfort.

One of the main features of these Desa models is their impressive heating capacity. Each unit provides a reliable source of warmth, making them suitable for various environments, from residential homes to larger commercial spaces. The versatility of these models ensures that they can accommodate different room sizes and heating requirements effortlessly.

The Desa models incorporate advanced heating technologies, including efficient radiant heating systems. This technology allows for quicker heat distribution and a more comfortable ambient temperature. Users can enjoy the benefits of even heat coverage, eliminating cold spots and ensuring a pleasant living or working environment.

Energy efficiency is another critical characteristic of the Desa models. Designed with modern energy-saving features, these units help reduce energy consumption while maintaining powerful heating capabilities. This aspect not only leads to cost savings on energy bills but also contributes to a more sustainable approach to heating.

Convenience is paramount in the design of the (V)CD36 series. Many of these models come equipped with programmable thermostats and remote control options, enabling users to set their desired heating schedule with ease. This flexibility allows for personalized comfort and lets users maintain their preferred temperatures without unnecessary manual adjustments.

Safety features are also a top priority in the (V)CD36 series. Each model is equipped with essential safety mechanisms, including automatic shut-off systems and tip-over protection, ensuring peace of mind when the units are in operation.

The aesthetic design of the Desa (V)CD36 series complements various interior styles. With sleek finishes and a modern silhouette, these heating solutions blend seamlessly into any décor while providing essential functionality.

In summary, the Desa (V)CD36TPE, (V)CD36TP, (V)CD36TNE, (V)CD36RP, and (V)CD36RNE models exemplify innovation in heating technology, offering energy efficiency, safety, and user convenience. These features make them an excellent choice for anyone seeking reliable and effective heating solutions.