Quick Start — SW RGB and YUV A Switchers, cont’d
Step 7 — Remote Control | 7 | |
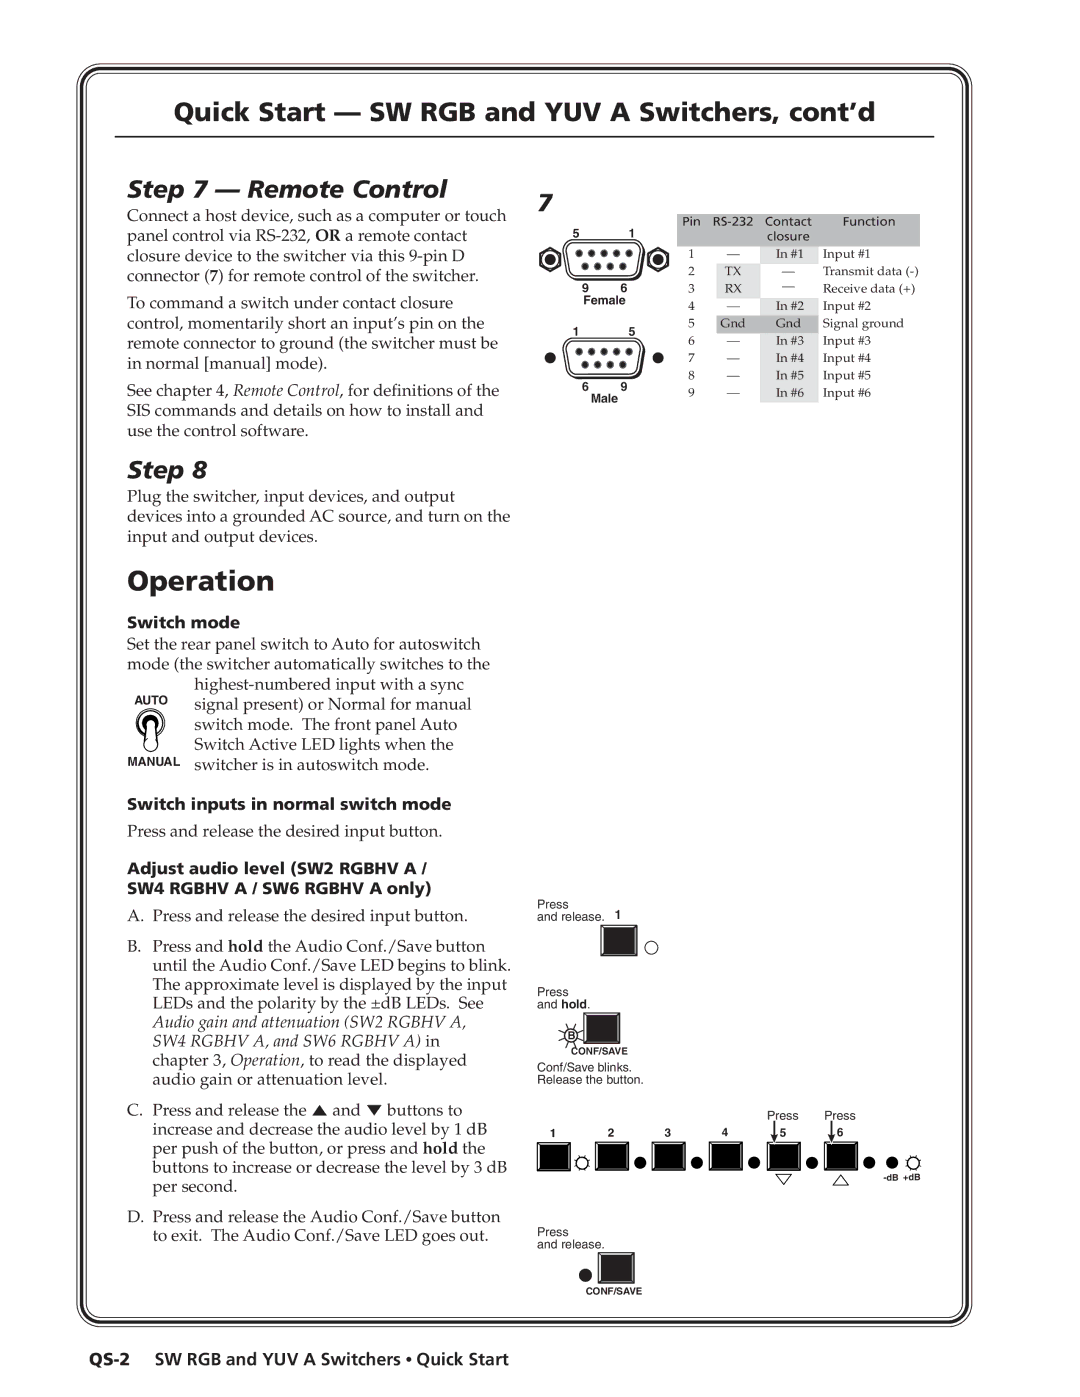
Connect a host device, such as a computer or touch | ||
| ||
panel control via |
|
51
Pin | Function |
closure |
|
|
|
closure device to the switcher via this |
connector (7) for remote control of the switcher. |
To command a switch under contact closure control, momentarily short an input’s pin on the remote connector to ground (the switcher must be in normal [manual] mode).
See chapter 4, Remote Control, for definitions of the SIS commands and details on how to install and use the control software.
96 Female
15
69
Male
1 | — | In #1 |
2 | TX | — |
3 | RX | — |
4 | — | In #2 |
5 | Gnd | Gnd |
6 | — | In #3 |
7 | — | In #4 |
8 | — | In #5 |
9 | — | In #6 |
|
|
|
Input #1 Transmit data
Step 8
Plug the switcher, input devices, and output devices into a grounded AC source, and turn on the input and output devices.
Operation
Switch mode
Set the rear panel switch to Auto for autoswitch mode (the switcher automatically switches to the
AUTO | |
signal present) or Normal for manual | |
| switch mode. The front panel Auto |
MANUAL | Switch Active LED lights when the |
switcher is in autoswitch mode. |
Switch inputs in normal switch mode
Press and release the desired input button.
Adjust audio level (SW2 RGBHV A / SW4 RGBHV A / SW6 RGBHV A only)
A.Press and release the desired input button.
B.Press and hold the Audio Conf./Save button until the Audio Conf./Save LED begins to blink. The approximate level is displayed by the input LEDs and the polarity by the ±dB LEDs. See Audio gain and attenuation (SW2 RGBHV A, SW4 RGBHV A, and SW6 RGBHV A) in chapter 3, Operation, to read the displayed audio gain or attenuation level.
Press
and release. 1
Press and hold.
B
CONF/SAVE
Conf/Save blinks. Release the button.
C.Press and release the ![]() and
and ![]() buttons to increase and decrease the audio level by 1 dB per push of the button, or press and hold the buttons to increase or decrease the level by 3 dB per second.
buttons to increase and decrease the audio level by 1 dB per push of the button, or press and hold the buttons to increase or decrease the level by 3 dB per second.
D.Press and release the Audio Conf./Save button to exit. The Audio Conf./Save LED goes out.
|
|
|
| Press | Press |
1 | 2 | 3 | 4 | 5 | 6 |
Press
and release.
CONF/SAVE