Remote Access
remote surveillance
Configuring ActiveX Control in Internet Explorer 8:
1.Open Internet Explorer 8
2.Click on Tools
3.Select Internet Options in the
4.Click on the Security Tab
5.Select Trusted Sites
6.Click on the Sites button
7.Uncheck the “Require server verification (https:) for all sites in this zone” button.
8.Type the DVR’s IP address (obtained during Network Setup) or DDNS domain name (obtained through DynDNS.com setup) into the “Add this website to the zone:” box.
9.Click the Add button
10.Close the window.
11.Back in the “Security Tab” screen, click the “Custom level…”button.
12.Pull down the “Reset to:” menu button and select “Low”
13. | Click the “Reset...” button | Internet | |
14. | Click “Yes” when asked, “Are you | ||
| |||
| sure you want to change the setting |
| |
| for this zone?” |
| |
15. | Click OK |
| |
16. | Click Apply |
| |
17. | Click OK |
| |
18. | Close Internet Explorer. You are | Trusted Sites | |
| now ready to access the DVR using | ||
|
|
Internet Explorer 8.
Using Remote Surveillance:
With your system connected to your local area network, you can now log in to your |
|
system using Internet Explorer. | Security Settings |
|
Setup Required Prior to Remote Access
NOTE: Your system must be connected to your LAN or WAN, Windows and Internet Explorer must be configured as described in the previous sections Configuring Windows “User Account Control” and Configuring Active X Control in Internet Explorer 8 and the DVR settings must have been setup properly as described in the Network Setup for Remote Access section before attempting remote access.
The software from the DVR will install the first time you access the DVR through Internet Explorer and will allow you to operate the network remotely. The DVR supports access over LAN and WAN, also supports IP and domain name access.
Logging Into Your System Remotely
With your IP address, you can now log in to your system over your local or wide area network.
1.Open Internet Explorer. In the address bar, enter the IP address of your system (i.e. 192.168.3.97).
2.You must install the ActiveX® in order to access your system. Click the atten- tion bar at the top of the main page and select Install ActiveX Control. DVR Net viewer will reset.
3. | In the warning box click Install. The login page appears. Leave the password | Remote |
| field blank (default). NOTE: If you have enabled passwords on your system, | |
|
| |
| enter your USER or ADMIN password. However, only the ADMIN can change |
|
| settings and options on the system. |
|
4. | Select LAN or INTERNET from the |
|
Remote Access
remote surveillance
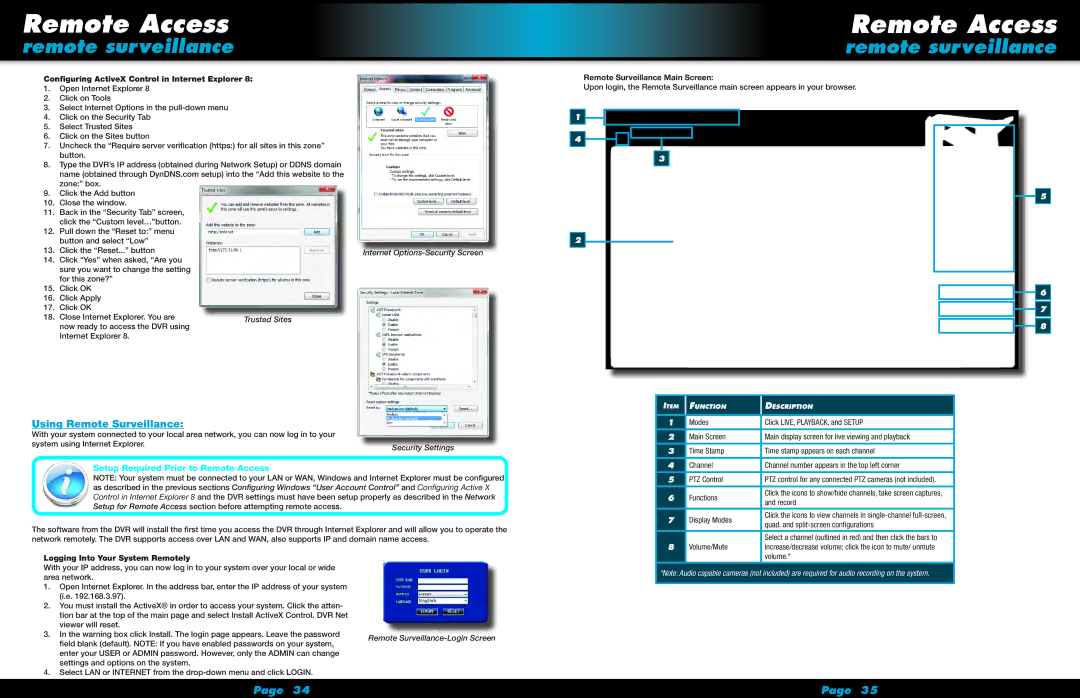
Remote Surveillance Main Screen:
Upon login, the Remote Surveillance main screen appears in your browser.
1
4
3
5
2
6
7
8
Item | Function | Description | |
|
|
| |
1 | Modes | Click LIVE, PLAYBACK, and SETUP | |
2 | Main Screen | Main display screen for live viewing and playback | |
3 | Time Stamp | Time stamp appears on each channel | |
4 | Channel | Channel number appears in the top left corner | |
5 | PTZ Control | PTZ control for any connected PTZ cameras (not included). | |
|
|
| |
6 | Functions | Click the icons to show/hide channels, take screen captures, | |
and record | |||
|
| ||
7 | Display Modes | Click the icons to view channels in | |
quad, and | |||
|
| ||
|
|
| |
|
| Select a channel (outlined in red) and then click the bars to | |
8 | Volume/Mute | increase/decrease volume; click the icon to mute/ unmute | |
|
| volume.* |
*Note: Audio capable cameras (not included) are required for audio recording on the system.
Page 34 | Page 35 |