Graco 262005, 262004 important safety instructions Light Regulator

Models: 262005 262004

1 62
Download 62 pages 28.3 Kb
Page 33
Image 33

Repair / Réparation / Reparación / Reparatie / Reparatur

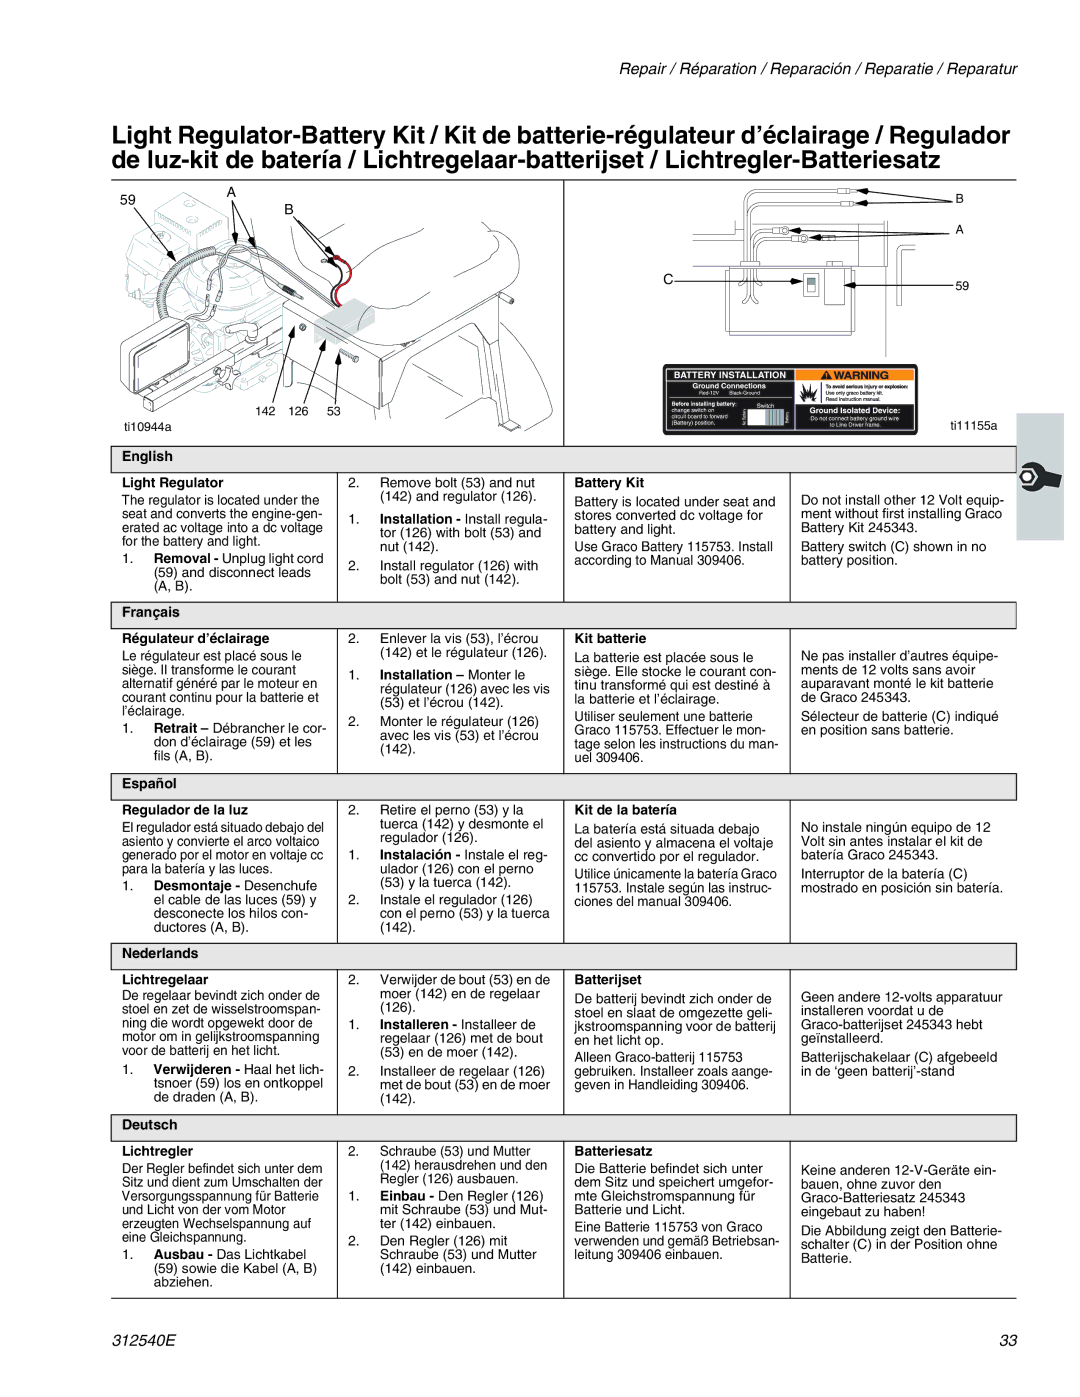
Light Regulator-Battery Kit / Kit de batterie-régulateur d’éclairage / Regulador de luz-kit de batería / Lichtregelaar-batterijset / Lichtregler-Batteriesatz

59

A


B


B


A


C

59


142

126

53


ti11155a


ti10944a


English


Light Regulator


2.

Remove bolt (53) and nut

Battery Kit


The regulator is located under the


(142) and regulator (126).

Battery is located under seat and

Do not install other 12 Volt equip-


seat and converts the engine-gen-


1.

Installation - Install regula-

stores converted dc voltage for

ment without first installing Graco


erated ac voltage into a dc voltage


tor (126) with bolt (53) and

battery and light.

Battery Kit 245343.


for the battery and light.


nut (142).

Use Graco Battery 115753. Install

Battery switch (C) shown in no


1.

Removal - Unplug light cord


2.

Install regulator (126) with

according to Manual 309406.

battery position.


(59) and disconnect leads


bolt (53) and nut (142).


(A, B).


Français


Régulateur d’éclairage


2.

Enlever la vis (53), l’écrou

Kit batterie


Le régulateur est placé sous le


(142) et le régulateur (126).

La batterie est placée sous le

Ne pas installer d’autres équipe-


siège. Il transforme le courant


1.

Installation – Monter le

siège. Elle stocke le courant con-

ments de 12 volts sans avoir


alternatif généré par le moteur en


régulateur (126) avec les vis

tinu transformé qui est destiné à

auparavant monté le kit batterie


courant continu pour la batterie et


(53) et l’écrou (142).

la batterie et l’éclairage.

de Graco 245343.


l’éclairage.


2.

Monter le régulateur (126)

Utiliser seulement une batterie

Sélecteur de batterie (C) indiqué


1. Retrait – Débrancher le cor-


Graco 115753. Effectuer le mon-

en position sans batterie.


avec les vis (53) et l’écrou


don d’éclairage (59) et les


tage selon les instructions du man-


(142).


fils (A, B).


uel 309406.


Español


Regulador de la luz


2.

Retire el perno (53) y la

Kit de la batería


El regulador está situado debajo del


tuerca (142) y desmonte el

La batería está situada debajo

No instale ningún equipo de 12


asiento y convierte el arco voltaico


regulador (126).

del asiento y almacena el voltaje

Volt sin antes instalar el kit de


generado por el motor en voltaje cc


1.

Instalación - Instale el reg-

cc convertido por el regulador.

batería Graco 245343.


para la batería y las luces.


ulador (126) con el perno

Utilice únicamente la batería Graco

Interruptor de la batería (C)


1.

Desmontaje - Desenchufe


(53) y la tuerca (142).


115753. Instale según las instruc-

mostrado en posición sin batería.


el cable de las luces (59) y


2.

Instale el regulador (126)

ciones del manual 309406.


desconecte los hilos con-


con el perno (53) y la tuerca


ductores (A, B).


(142).


Nederlands


Lichtregelaar


2.

Verwijder de bout (53) en de

Batterijset


De regelaar bevindt zich onder de


moer (142) en de regelaar

De batterij bevindt zich onder de

Geen andere 12-volts apparatuur


stoel en zet de wisselstroomspan-


(126).

stoel en slaat de omgezette geli-

installeren voordat u de


ning die wordt opgewekt door de


1.

Installeren - Installeer de

jkstroomspanning voor de batterij

Graco-batterijset 245343 hebt


motor om in gelijkstroomspanning


regelaar (126) met de bout

en het licht op.

geïnstalleerd.


voor de batterij en het licht.


(53) en de moer (142).

Alleen Graco-batterij 115753

Batterijschakelaar (C) afgebeeld


1.

Verwijderen - Haal het lich-


2.

Installeer de regelaar (126)

gebruiken. Installeer zoals aange-

in de ‘geen batterij’-stand


tsnoer (59) los en ontkoppel


met de bout (53) en de moer

geven in Handleiding 309406.


de draden (A, B).


(142).


Deutsch


Lichtregler


2. Schraube (53) und Mutter

Batteriesatz


Der Regler befindet sich unter dem


(142) herausdrehen und den

Die Batterie befindet sich unter

Keine anderen 12-V-Geräte ein-


Sitz und dient zum Umschalten der


Regler (126) ausbauen.

dem Sitz und speichert umgefor-

bauen, ohne zuvor den


Versorgungsspannung für Batterie


1.

Einbau - Den Regler (126)

mte Gleichstromspannung für

Graco-Batteriesatz 245343


und Licht von der vom Motor


mit Schraube (53) und Mut-

Batterie und Licht.

eingebaut zu haben!


erzeugten Wechselspannung auf


ter (142) einbauen.

Eine Batterie 115753 von Graco

Die Abbildung zeigt den Batterie-


eine Gleichspannung.


2.

Den Regler (126) mit

verwenden und gemäß Betriebsan-

schalter (C) in der Position ohne


1.

Ausbau - Das Lichtkabel


Schraube (53) und Mutter

leitung 309406 einbauen.

Batterie.


(59) sowie die Kabel (A, B)


(142) einbauen.


abziehen.


312540E

33

Page 33
Image 33
Graco 262005, 262004 important safety instructions Light Regulator

262005, 262004 specifications

Graco 262004 and 262005 are advanced airless paint sprayers designed for professionals seeking efficiency and precision in their painting tasks. These models belong to Graco's renowned lineup, known for their reliability and innovation, making them ideal choices for contractors, DIY enthusiasts, and homeowners alike.

One of the standout features of the Graco 262004 and 262005 is their robust motor, which delivers consistent pressure for an even and fine finish. With a powerful engine, these sprayers can handle a wide range of coatings, from thin stains to thick paints, ensuring versatility for various projects. One of the key technologies incorporated into these models is the Pro Connect system, which allows users to quickly change out the pump without needing tools, thereby minimizing downtime on the job.

Both models offer an adjustable spray pattern, which enables users to customize the width and intensity of the spray according to their specific needs. This feature is particularly useful for achieving detailed work on intricate surfaces or for covering large areas swiftly. The Graco 262004 is designed primarily for smaller projects, while the Graco 262005 caters to larger tasks, offering a higher capacity for paint.

Durability is another hallmark of these spray guns. Constructed with high-quality materials, they are built to withstand the rigors of frequent use. The EasyMax Travel Cart is an additional accessory that provides portability and stability, making it easier to transport the sprayer across job sites without the hassle.

Furthermore, Graco integrates advanced design elements for user comfort and safety. The ergonomic handle reduces fatigue, allowing users to operate the sprayer for extended periods without discomfort. Additionally, the built-in tip guard enhances safety by preventing accidental sprays and ensuring precision during application.

Both models are equipped with Graco's Smart Control technology. This feature regulates fluid pressure for consistent spray patterns at all times, reducing the likelihood of issues such as overspray or runs. As a testament to their engineering, these sprayers can be used with a variety of tips, allowing for customized spray results depending on the project.

In summary, Graco 262004 and 262005 stand out for their powerful motor, ease of use, durability, and sophisticated technologies, making them reliable tools for any painting task. Their innovative features cater to both novice and experienced users, offering unparalleled performance and versatility for achieving professional-quality results.