Repair / Réparation / Reparación / Reparatie / Reparatur

125

129

130

131

ti10933a

5

34

141

A

ti11123a

125

129

130

131

ti10933a

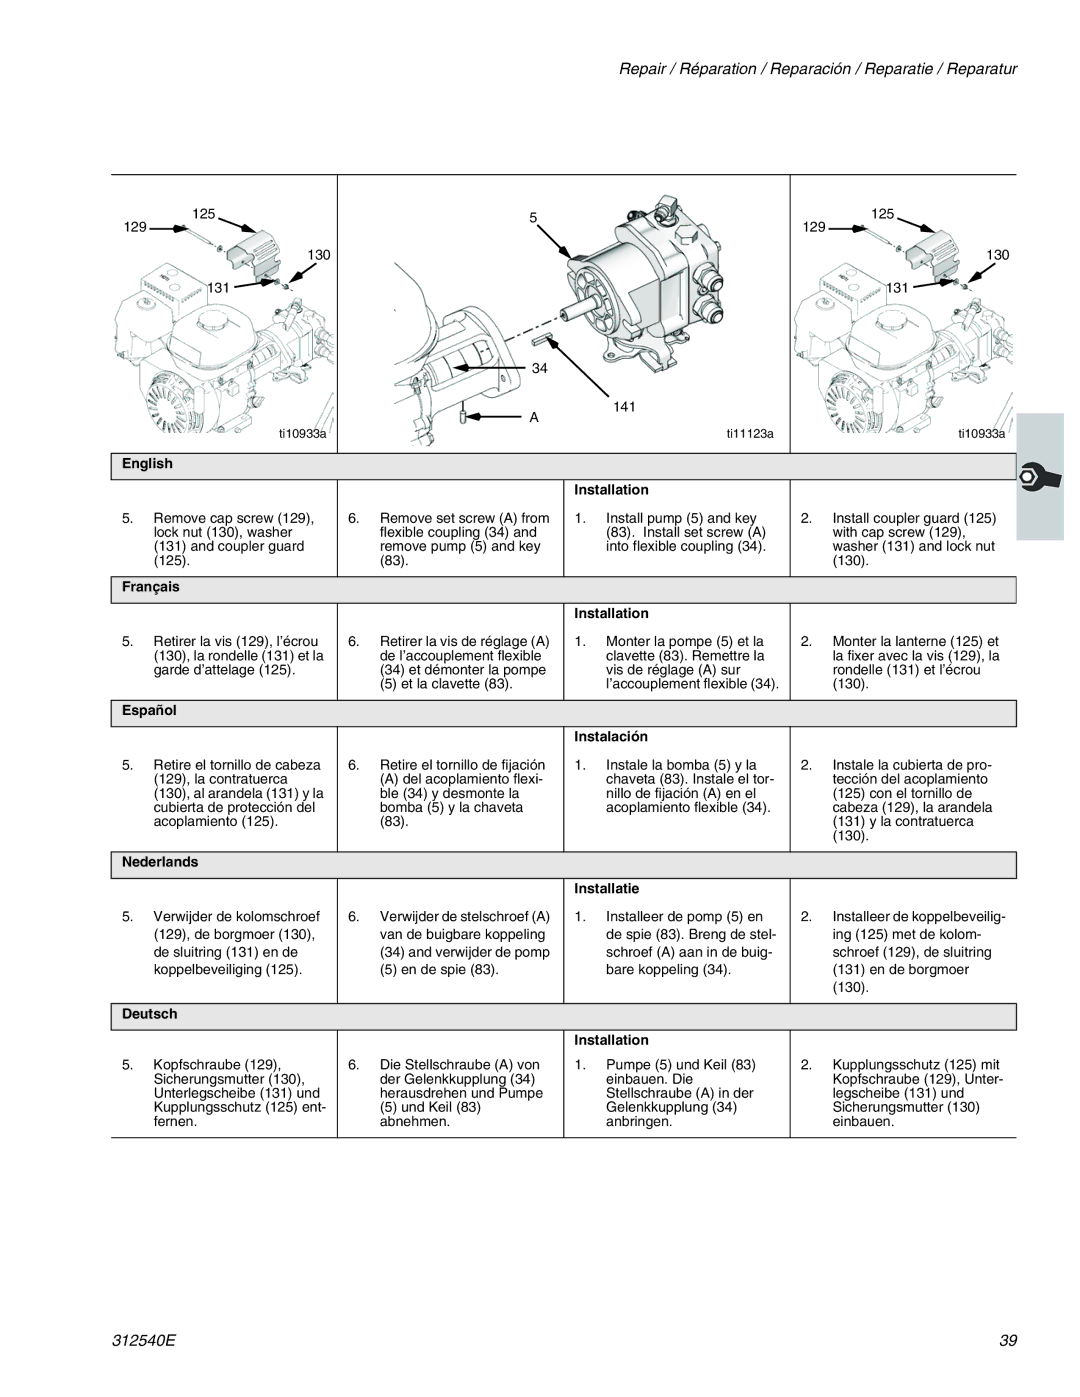
English


Installation


5. Remove cap screw (129),

6. Remove set screw (A) from

1. Install pump (5) and key

2. Install coupler guard (125)


lock nut (130), washer

flexible coupling (34) and

(83). Install set screw (A)


with cap screw (129),


(131) and coupler guard

remove pump (5) and key

into flexible coupling (34).


washer (131) and lock nut


(125).

(83).


(130).


Français


Installation


5. Retirer la vis (129), l’écrou

6. Retirer la vis de réglage (A)

1. Monter la pompe (5) et la

2. Monter la lanterne (125) et


(130), la rondelle (131) et la

de l’accouplement flexible

clavette (83). Remettre la


la fixer avec la vis (129), la


garde d’attelage (125).

(34) et démonter la pompe

vis de réglage (A) sur


rondelle (131) et l’écrou


(5) et la clavette (83).

l’accouplement flexible (34).


(130).


Español


Instalación


5. Retire el tornillo de cabeza

6. Retire el tornillo de fijación

1. Instale la bomba (5) y la

2. Instale la cubierta de pro-


(129), la contratuerca

(A) del acoplamiento flexi-

chaveta (83). Instale el tor-


tección del acoplamiento


(130), al arandela (131) y la

ble (34) y desmonte la

nillo de fijación (A) en el


(125) con el tornillo de


cubierta de protección del

bomba (5) y la chaveta

acoplamiento flexible (34).


cabeza (129), la arandela


acoplamiento (125).

(83).


(131) y la contratuerca


(130).


Nederlands


Installatie


5.

Verwijder de kolomschroef

6. Verwijder de stelschroef (A)

1. Installeer de pomp (5) en

2.

Installeer de koppelbeveilig-


(129), de borgmoer (130),

van de buigbare koppeling

de spie (83). Breng de stel-


ing (125) met de kolom-


de sluitring (131) en de

(34) and verwijder de pomp

schroef (A) aan in de buig-


schroef (129), de sluitring


koppelbeveiliging (125).

(5) en de spie (83).

bare koppeling (34).


(131) en de borgmoer


(130).


Deutsch


Installation


5.

Kopfschraube (129),

6. Die Stellschraube (A) von

1. Pumpe (5) und Keil (83)

2.

Kupplungsschutz (125) mit


Sicherungsmutter (130),

der Gelenkkupplung (34)

einbauen. Die


Kopfschraube (129), Unter-


Unterlegscheibe (131) und

herausdrehen und Pumpe

Stellschraube (A) in der


legscheibe (131) und


Kupplungsschutz (125) ent-

(5) und Keil (83)

Gelenkkupplung (34)


Sicherungsmutter (130)


fernen.

abnehmen.

anbringen.


einbauen.


312540E

39

Page 39
Image 39
Graco 262005, 262004 important safety instructions 125 129 130 131

262005, 262004 specifications

Graco 262004 and 262005 are advanced airless paint sprayers designed for professionals seeking efficiency and precision in their painting tasks. These models belong to Graco's renowned lineup, known for their reliability and innovation, making them ideal choices for contractors, DIY enthusiasts, and homeowners alike.

One of the standout features of the Graco 262004 and 262005 is their robust motor, which delivers consistent pressure for an even and fine finish. With a powerful engine, these sprayers can handle a wide range of coatings, from thin stains to thick paints, ensuring versatility for various projects. One of the key technologies incorporated into these models is the Pro Connect system, which allows users to quickly change out the pump without needing tools, thereby minimizing downtime on the job.

Both models offer an adjustable spray pattern, which enables users to customize the width and intensity of the spray according to their specific needs. This feature is particularly useful for achieving detailed work on intricate surfaces or for covering large areas swiftly. The Graco 262004 is designed primarily for smaller projects, while the Graco 262005 caters to larger tasks, offering a higher capacity for paint.

Durability is another hallmark of these spray guns. Constructed with high-quality materials, they are built to withstand the rigors of frequent use. The EasyMax Travel Cart is an additional accessory that provides portability and stability, making it easier to transport the sprayer across job sites without the hassle.

Furthermore, Graco integrates advanced design elements for user comfort and safety. The ergonomic handle reduces fatigue, allowing users to operate the sprayer for extended periods without discomfort. Additionally, the built-in tip guard enhances safety by preventing accidental sprays and ensuring precision during application.

Both models are equipped with Graco's Smart Control technology. This feature regulates fluid pressure for consistent spray patterns at all times, reducing the likelihood of issues such as overspray or runs. As a testament to their engineering, these sprayers can be used with a variety of tips, allowing for customized spray results depending on the project.

In summary, Graco 262004 and 262005 stand out for their powerful motor, ease of use, durability, and sophisticated technologies, making them reliable tools for any painting task. Their innovative features cater to both novice and experienced users, offering unparalleled performance and versatility for achieving professional-quality results.