SYSTEM CONFIGURATION
Speaker Size Menu
Although most listeners will prefer to take advantage of the accuracy and speed of EzSet/EQ to make all of the necessary speaker adjustments, advanced users may wish to experiment with how different combina- tions of settings sound in their home theater environ- ment or to use settings other than those calculated by EzSet/EQ, to accommodate personal listening preferences.
The menu system used in your AVR 445 differs somewhat from conventional speaker setup menus in that it consolidates the speaker “size” and crossover into one convenient menu. Even if you are familiar with making these adjustments, it is strongly recommended that you read the following section of this manual.
On the SPEAKER SIZE menu (Figure 18) you have the option to change the type of speaker config- ured for each of the four position groups, to change the crossover setting for any one of those speakers, to adjust the setting point for the
Speaker Size
At each of the four speaker group positions, you have the ability to select the speaker “size” and, when a “Small” speaker is selected, the frequency below which
to the owner’s manual for a particular speaker, you should be able to obtain the needed information from the Web site or customer service department of the speaker’s manufacturer.
To manually adjust the speaker settings, go to the SPEAKER SIZE menu by pressing the OSD Button U∫ on the remote and when the MASTER MENU (Figure 1) appears, press the ⁄/¤ Navigation Button n© until the cursor is on the EZSET/EQ line and press the Set Button pœ. Navigate to the EZSET/EQ MANUAL SETUP line and press the Set Button pœ. When the EZSET/EQ MANUAL SETUP menu (Figure 17) appears, press the ⁄/¤ Navigation Button n© again until the cursor is on the SPEAKER SIZE line and press the Set Button pœ.
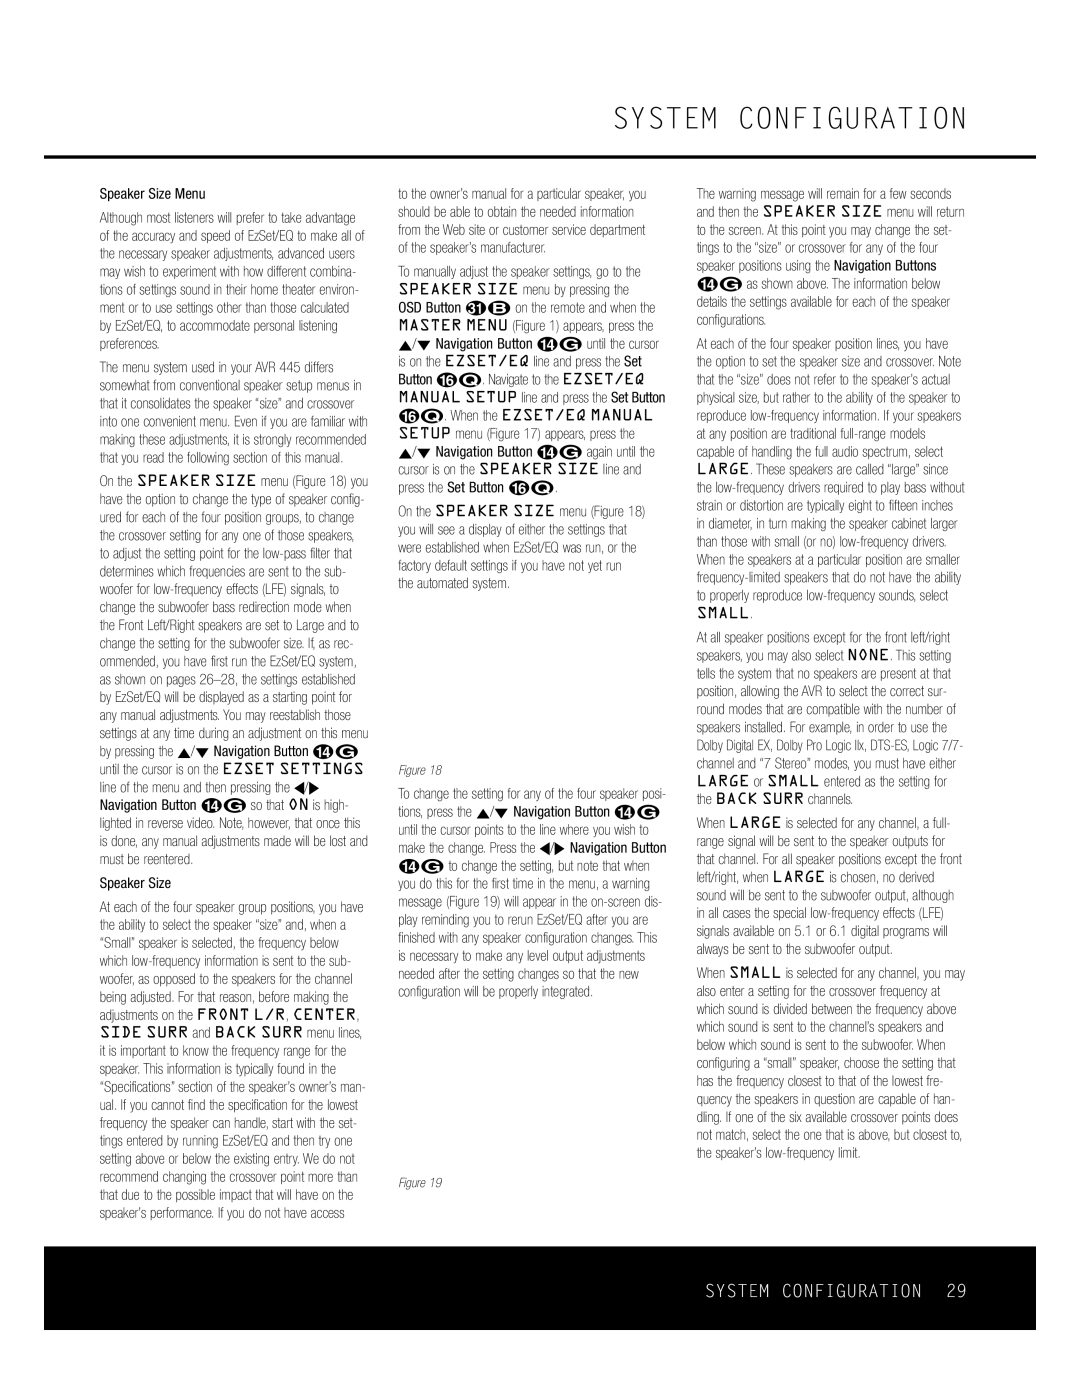
On the SPEAKER SIZE menu (Figure 18) you will see a display of either the settings that were established when EzSet/EQ was run, or the factory default settings if you have not yet run the automated system.
* SPEAKER | SIZE * | |||
→ FL/FR | :SM - 100Hz | |||
CENTER | :SM - 100Hz | |||
SL/SR | :SM - 100Hz | |||
SBL/SBR | :SM - 100Hz MULTI | |||
LFE | LP FLT | :120Hz | ||
SUB | MODE | :SUB | ||
SUB | SIZE | :10in/250mm | ||
EZSET SETTINGS: | OFF | ON | ||
BACK | TO MANUAL SETUP | |||
Figure 18
To change the setting for any of the four speaker posi- tions, press the ⁄/¤ Navigation Button n© until the cursor points to the line where you wish to make the change. Press the ‹/› Navigation Button n© to change the setting, but note that when you do this for the first time in the menu, a warning message (Figure 19) will appear in the
* X - O V E R C H A N G E W A R N I N G *
S p e a k e r X - o v e r F r e q o r
S i z e h a s b e e n | c h a n g e d . |
P l e a s e r e - r u n | E Z S E T / E Q |
Figure 19
The warning message will remain for a few seconds and then the SPEAKER SIZE menu will return to the screen. At this point you may change the set- tings to the “size” or crossover for any of the four speaker positions using the Navigation Buttons n© as shown above. The information below details the settings available for each of the speaker configurations.
At each of the four speaker position lines, you have the option to set the speaker size and crossover. Note that the “size” does not refer to the speaker’s actual physical size, but rather to the ability of the speaker to reproduce
SMALL.
At all speaker positions except for the front left/right speakers, you may also select NONE. This setting tells the system that no speakers are present at that position, allowing the AVR to select the correct sur- round modes that are compatible with the number of speakers installed. For example, in order to use the Dolby Digital EX, Dolby Pro Logic IIx,
When LARGE is selected for any channel, a full- range signal will be sent to the speaker outputs for that channel. For all speaker positions except the front left/right, when LARGE is chosen, no derived sound will be sent to the subwoofer output, although in all cases the special
When SMALL is selected for any channel, you may also enter a setting for the crossover frequency at which sound is divided between the frequency above which sound is sent to the channel’s speakers and below which sound is sent to the subwoofer. When configuring a “small” speaker, choose the setting that has the frequency closest to that of the lowest fre- quency the speakers in question are capable of han- dling. If one of the six available crossover points does not match, select the one that is above, but closest to, the speaker’s
SYSTEM CONFIGURATION 29