G. Install Metal Roof Flashing

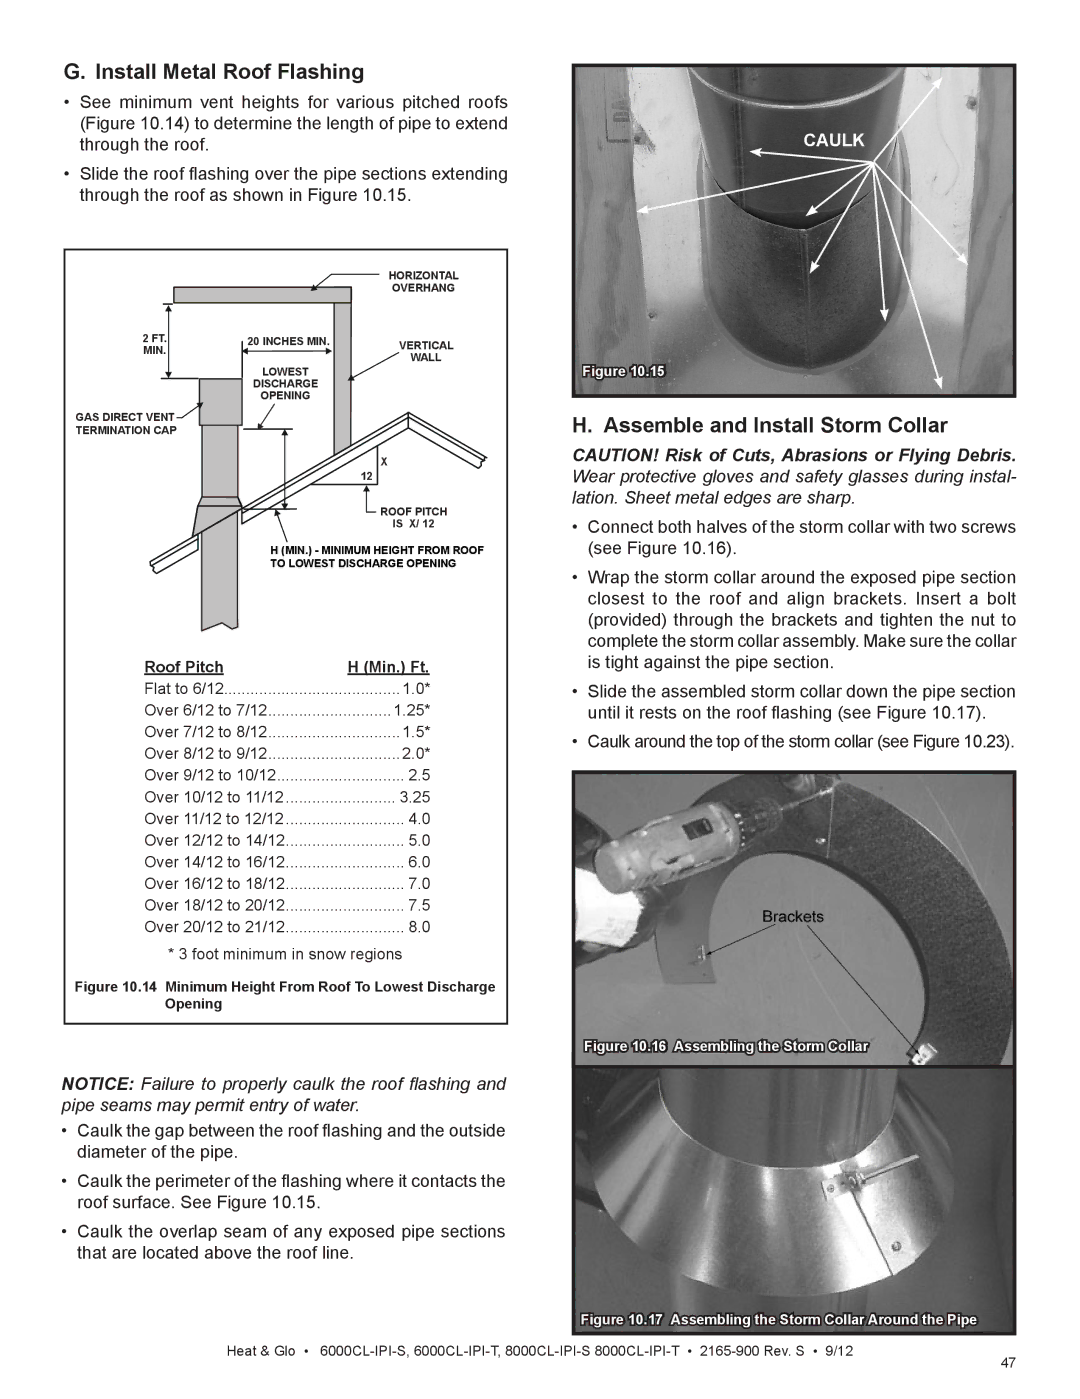
See minimum vent heights for various pitched roofs (Figure 10.14) to determine the length of pipe to extend through the roof.

Slide the roof flashing over the pipe sections extending through the roof as shown in Figure 10.15.


HORIZONTAL


OVERHANG

2 FT.

20 INCHES MIN.

VERTICAL

MIN.


WALL


LOWEST


DISCHARGE


OPENING


GAS DIRECT VENT


TERMINATION CAP


X


12


ROOF PITCH


IS X/ 12


H (MIN.) - MINIMUM HEIGHT FROM ROOF


TO LOWEST DISCHARGE OPENING

Roof Pitch


H (Min.) Ft.

Flat to 6/12........................................1.0*

Over 6/12 to 7/12............................1.25*

Over 7/12 to 8/12..............................1.5*

Over 8/12 to 9/12..............................2.0*

Over 9/12 to 10/12............................. 2.5

Over 10/12 to 11/12.......................... 3.25

Over 11/12 to 12/12............................ 4.0

Over 12/12 to 14/12........................... 5.0

Over 14/12 to 16/12........................... 6.0

Over 16/12 to 18/12........................... 7.0

Over 18/12 to 20/12........................... 7.5

Over 20/12 to 21/12........................... 8.0

* 3 foot minimum in snow regions

Figure 10.14 Minimum Height From Roof To Lowest Discharge

Opening


NOTICE: Failure to properly caulk the roof flashing and pipe seams may permit entry of water.

Caulk the gap between the roof flashing and the outside diameter of the pipe.

Caulk the perimeter of the flashing where it contacts the roof surface. See Figure 10.15.

Caulk the overlap seam of any exposed pipe sections that are located above the roof line.

CAULK

Figure 10.15

H. Assemble and Install Storm Collar

CAUTION! Risk of Cuts, Abrasions or Flying Debris. Wear protective gloves and safety glasses during instal- lation. Sheet metal edges are sharp.

Connect both halves of the storm collar with two screws (see Figure 10.16).

Wrap the storm collar around the exposed pipe section closest to the roof and align brackets. Insert a bolt (provided) through the brackets and tighten the nut to complete the storm collar assembly. Make sure the collar is tight against the pipe section.

Slide the assembled storm collar down the pipe section until it rests on the roof flashing (see Figure 10.17).

Caulk around the top of the storm collar (see Figure 10.23).

Figure 10.16 Assembling the Storm Collar

Figure 10.17 Assembling the Storm Collar Around the Pipe

Heat & Glo • 6000CL-IPI-S, 6000CL-IPI-T, 8000CL-IPI-S 8000CL-IPI-T2165-900 Rev. S • 9/12

47

Page 47
Image 47
Heat & Glo LifeStyle 6000CL-IPI-T manual Install Metal Roof Flashing, Assemble and Install Storm Collar, Roof Pitch Min. Ft

6000CL-IPI-T, 6000CL-IPI-S, 8000CL-IPI-S, 8000CL-IPI-T specifications

Heat & Glo has recognized the importance of creating both aesthetic and functional gas fireplaces that cater to the diverse needs of modern homeowners. Among their impressive lineup, the LifeStyle series stands out, particularly the models 6000CL-IPI-S, 6000CL-IPI-T, 8000CL-IPI-S, and 8000CL-IPI-T. Each of these units is designed to deliver exceptional performance, energy efficiency, and versatility.

The LifeStyle 6000CL-IPI-S and 6000CL-IPI-T models are distinguished by their contemporary linear design, offering a sleek aesthetic that perfectly complements modern interiors. Whether you choose the linear version with a sleek front or opt for one with traditional styling, both models provide flexibility in installation, making them suitable for various settings. The 8000CL-IPI series takes this further, offering larger fire viewing areas, which enhances the ambiance of any living space.

A notable feature across these models is the IntelliFire® automated ignition system, which provides reliable and efficient operation. This technology ensures that users can light their fireplaces with ease, eliminating the hassle of manual ignition. Additionally, the systems can be controlled via a remote, giving homeowners the convenience of adjusting flame height, heat output, and other features from a distance.

The fireplaces are designed with an emphasis on energy efficiency, making them an environmentally friendly choice. The advanced burner systems not only produce beautiful flames but also optimize fuel consumption. This means that homeowners can enjoy the warmth and beauty of a fire without the worry of excessive energy bills.

Another significant characteristic of the LifeStyle series is the array of finish options and media choices available. Whether you prefer traditional logs, contemporary glass media, or stone options, there is a choice to suit every style. The customizable nature of these fireplaces allows homeowners to create a focal point that reflects their personal taste.

Additionally, the easy maintenance of these models is a major selling point. With features like the clean-face design, users can spend more time enjoying their fireplaces rather than worrying about upkeep. The seamless cleanouts and accessibility ensure that servicing remains simple and straightforward.

Overall, the Heat & Glo LifeStyle 6000CL-IPI-S, 6000CL-IPI-T, 8000CL-IPI-S, and 8000CL-IPI-T gas fireplaces embody a perfect blend of innovation, efficiency, and style, making them a preferred choice for those looking to enhance their living spaces with the warmth of a fireplace.