B. Assemble Vent Sections (SLP Pipe Only)

To attach the first vent component to the starting collars of the appliance:

Attach a DVP-2SL or DVP-SLP24 adapter to the starting collar of the appliance.

Lock the vent components into place by sliding the pipe section onto the collar.

Align the seam of the pipe and seam of collar to allow engagement. Rotate the vent component to lock into place. Use this procedure for all vent components. See Figure 10.5.

Slide the gasket over the first vent section and place it flush to the appliance. This will prevent cold air infiltration. Caulk with a minimum of 300ºF continuous exposure rating may be used to hold the part in place.

Continue adding vent components, locking each succeeding component into place.

Ensure that each succeeding vent component is securely fitted and locked into the preceding component.

Commercial, Multi-family (Multi-level exceeding two sto- ries), or High-Rise Applications

For Installation into a commercial, multi-family (multi-level exceeding two stories) or high-rise applications: All outer pipe joints must be sealed with silicone with a minimum of 300ºF continuous exposure rating, including the slip section that connects directly to the horizontal termina- tion cap.

Apply a bead of silicone sealant inside the female outer pipe joint prior to joining sections. See Figure 10.1.

Only outer pipes need to be sealed. All unit collar, pipe, slip section, elbow and cap outer flues shall be sealed in this manner, unless otherwise stated.

WARNING! Risk of Fire or Explosion! DO NOT break silicone seals on slip sections. Use care when remov- ing termination cap from slip pipe. If slip section seals are broken during removal of the termination cap, vent may leak.

Note: Align seams to engage pipe, then rotate counterclockwise to lock

Figure 10.5 Adding Venting Components

C. Assemble Slip Sections

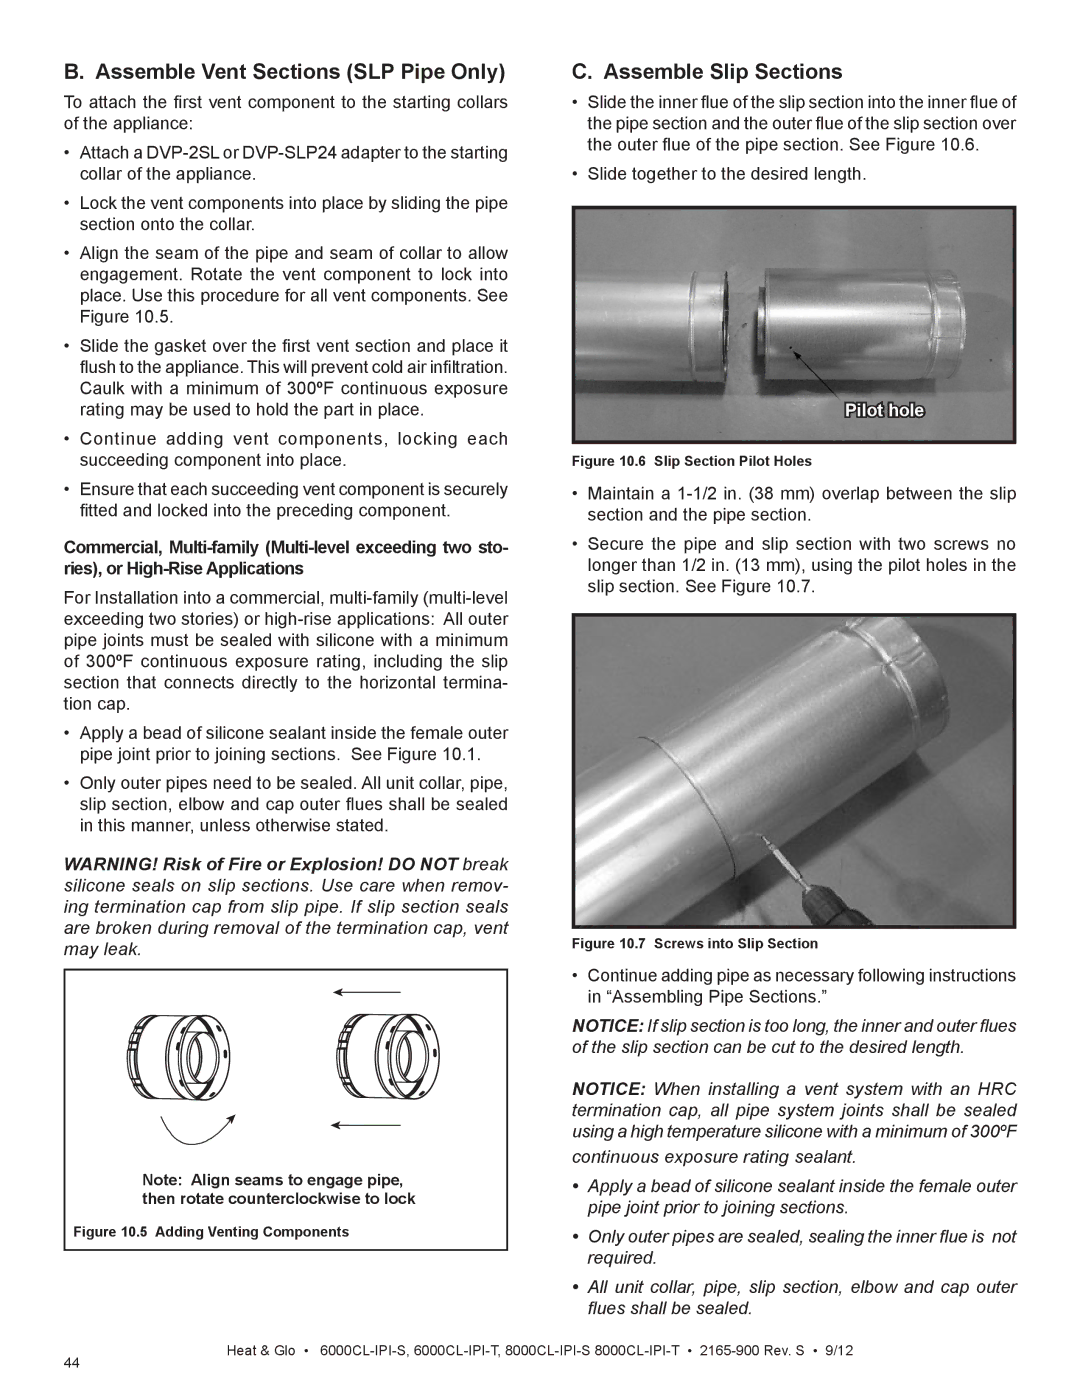
Slide the inner flue of the slip section into the inner flue of the pipe section and the outer flue of the slip section over the outer flue of the pipe section. See Figure 10.6.

Slide together to the desired length.

Pilot hole

Figure 10.6 Slip Section Pilot Holes

Maintain a 1-1/2 in. (38 mm) overlap between the slip section and the pipe section.

Secure the pipe and slip section with two screws no longer than 1/2 in. (13 mm), using the pilot holes in the slip section. See Figure 10.7.

Figure 10.7 Screws into Slip Section

Continue adding pipe as necessary following instructions in “Assembling Pipe Sections.”

NOTICE: If slip section is too long, the inner and outer flues of the slip section can be cut to the desired length.

NOTICE: When installing a vent system with an HRC termination cap, all pipe system joints shall be sealed using a high temperature silicone with a minimum of 300ºF

continuous exposure rating sealant.

Apply a bead of silicone sealant inside the female outer pipe joint prior to joining sections.

Only outer pipes are sealed, sealing the inner flue is not required.

All unit collar, pipe, slip section, elbow and cap outer flues shall be sealed.

44

Heat & Glo • 6000CL-IPI-S, 6000CL-IPI-T, 8000CL-IPI-S 8000CL-IPI-T2165-900 Rev. S • 9/12

Page 44
Image 44
Heat & Glo LifeStyle 8000CL-IPI-S, 8000CL-IPI-T, 6000CL-IPI-S Assemble Vent Sections SLP Pipe Only, Assemble Slip Sections

6000CL-IPI-T, 6000CL-IPI-S, 8000CL-IPI-S, 8000CL-IPI-T specifications

Heat & Glo has recognized the importance of creating both aesthetic and functional gas fireplaces that cater to the diverse needs of modern homeowners. Among their impressive lineup, the LifeStyle series stands out, particularly the models 6000CL-IPI-S, 6000CL-IPI-T, 8000CL-IPI-S, and 8000CL-IPI-T. Each of these units is designed to deliver exceptional performance, energy efficiency, and versatility.

The LifeStyle 6000CL-IPI-S and 6000CL-IPI-T models are distinguished by their contemporary linear design, offering a sleek aesthetic that perfectly complements modern interiors. Whether you choose the linear version with a sleek front or opt for one with traditional styling, both models provide flexibility in installation, making them suitable for various settings. The 8000CL-IPI series takes this further, offering larger fire viewing areas, which enhances the ambiance of any living space.

A notable feature across these models is the IntelliFire® automated ignition system, which provides reliable and efficient operation. This technology ensures that users can light their fireplaces with ease, eliminating the hassle of manual ignition. Additionally, the systems can be controlled via a remote, giving homeowners the convenience of adjusting flame height, heat output, and other features from a distance.

The fireplaces are designed with an emphasis on energy efficiency, making them an environmentally friendly choice. The advanced burner systems not only produce beautiful flames but also optimize fuel consumption. This means that homeowners can enjoy the warmth and beauty of a fire without the worry of excessive energy bills.

Another significant characteristic of the LifeStyle series is the array of finish options and media choices available. Whether you prefer traditional logs, contemporary glass media, or stone options, there is a choice to suit every style. The customizable nature of these fireplaces allows homeowners to create a focal point that reflects their personal taste.

Additionally, the easy maintenance of these models is a major selling point. With features like the clean-face design, users can spend more time enjoying their fireplaces rather than worrying about upkeep. The seamless cleanouts and accessibility ensure that servicing remains simple and straightforward.

Overall, the Heat & Glo LifeStyle 6000CL-IPI-S, 6000CL-IPI-T, 8000CL-IPI-S, and 8000CL-IPI-T gas fireplaces embody a perfect blend of innovation, efficiency, and style, making them a preferred choice for those looking to enhance their living spaces with the warmth of a fireplace.