Hard disk
Hitachi
For Your Safety
Precautions
Identifications of caution marks
Page
Important Safety Instructions
Handle the liquid crystal display LCD with care
Save the data recorded on HDD
Liquid crystal display LCD and viewfinder
Be careful of ambient temperature
Hold the DVD video camera/recorder correctly
Do not subject the DVD video camera/recorder to impact
Do not use a generally available 8 cm CD lens cleaner
Do not use the DVD video camera/recorder near corrosive gas
Do not expose the DVD video camera/recorder to insecticide
Indicator Is lit or
ACCESS/PC Or Card
Indicator Is lit or blinking
Card Access indicator
This could cause malfunctions
Suggestions and Restrictions
Make a trial recording
Copyright
Lens, remove it using a cotton swab, etc
OCleaning LCD screen and camera lens
Cleaning DVD Video Camera/ Recorder Case
Using discs
Disc Cleaning
Read This First
Quick Index
About This Manual
Notation of cancel button
Displays in this manual
Marks beside headings
EYou can immediately play back desired recorded scenes p
Introduction
EUse Disc Navigation to create your original movie p
ECreate original DVDs on PC p
Table of Contents
Disc Navigation
Subsidiary
To PC
Information
Camera/recorder
DZ-BPO7PW
Checking Provided Accessories
Names of Parts
ACCESS/PC indicator p
Viewfinderp Battery Eject button p
Lock switch p
Power switch p
Card Access indicator p Quick Menu button p
Speaker p Reset button p
Focus button p
Menu button p , 51,86
Display
Demonstration Function
Setting Up the DVD Video Camera/Recorder
Holding DVD Video CAMERA/RECORDER
Attaching Shoulder Strap
Attaching Lens CAP
Inserting Battery Into Remote Control
Using remote Control
Removing Battery from Remote Control
DVD
HDD/DVD/Cards
Information on DVD-R
HDD, Discs
DVD-RW
DVD-R
Available Cards
OHandling card
Metal.Terminal
Using DVD Video CAMERA/RECORDER with AC ADAPTER/CHARGER
Preparations for Power Supply
Charging Battery
Setting Up the Battery
Battery charged status
Attaching Battery to DVD Video CAMERA/RECORDER
Removing Battery
Continuously be used with a fully charged battery
With DZ-BP14Sprovided with DZ-HS303A/DZ-B P14SW optional
With DZ-BP07PW* provided with DZ-HS3OOA/DZ-BP7SW* optional
Efficient USE of Battery
Battery Remaining Level Indicator
Battery life
Power save and discharge of battery
Set to SD
Set to OFF
Set to HDD
Set to DVD
Viewing Images
Range where the LCD monitor can be moved
Viewing Image on LCD Monitor
Screen
Changing Display Format of Date and Time
Setting Date and Time
Initial Settings
Switching Operating Sound on or OFF Beep
Changing Display Language Language
Resetting Menu Settings to Defaults Reset
Changing Setting of Demonstration
Turning Record LED on or OFF Record LED
Adjustment bar
LCD/EVF Setup
Brightness
Screen Becomes
Always Displaying Image in Viewfinder
Adjusting Color Density Color Level
Ll/ ,41/ III/ I1/II
Press
Disc
Inserting and Removing
OWhen using brand-new DVD-RW/+RW
When recording on this DVD video camera/recorder
When recording data from PC
Inserting and Removing Card
Recording Movie
PHOTO/SELECT
Recording Stills
Swift Restart of Recording SLEEP/RESTART button
Setting to the sleep/restart standby status
Information Display During Recording
On.Screen Information
See the next page for details
Full Auto
Program AE only in movie recording mode p O
+RW
Volume p
OSwitching the information display mode
ODisplay when recording an image of yourself
Operating status/warning message Battery remaining level,w
Page
Operating Menu
Checking Flow of Menu
OFIow of Full Menu
Macro Recording
Zooming
Lens hood Conversion lens
Focusing During Recording
Manually Focusing Subject
Focusing range
Manual Focus icon
Eva Ia,ion,are ar
Compensating for Backlight
Adjusting Brightness of Image to be recorded Exposure
Using Full Auto Function
EOptional Video Flash for DZ- HS303A only
Built.in Video Flash for DZ.HS303A Only
Setting Up Camera Functions
Adjusting Color White Balance
Recording Dark Subjects Using LCD Monitor Light
Press the button to end the setting
OSetting white balance manually
Recording Subject Using Large Magnification Digital Zoom
Using the Electronic Image Stabilizer EIS
Reducing Wind Noise During Recording MIC.FILTER
Ii button
Setting Up Record Functions
Switching Movie Quality Video Mode
LI/lill/ll/ll buttons
When using DZ-HS3OOA
Setting to Wide TV Screen Mode 169 Mode
Display on LCD monitor screen Display in viewfinder
To input S-VIDEO signal from another device
Switching Quality of Still Image Quality
Receiving Image from Another Device Input Source
Usually select this option No display
SELF-TIMER
Switching External Input Recording Method Photo Input
Fora
Ee dis
Drop Detection HDD Protection
Setting ON-SCREEN Display Output on or OFF OSD Output
CXjacko a
Using External Microphone
Starting or Terminating Disc Navigation
Using Disc Navigation
Before You Begin
Turn the DVD video camera/recorder on p
#DI
Playing Back from Disc Navigation Screen
Adjusting Volume During Playback
OWhen
Playback
Deleting Last Recorded Scene
Playing Back Latest Recorded Scene
Capturing Photo
Search Playback of Movie
Frame ADVANCE/FRAME BACK/SLOW Playback of Movie
Skip Playback of Movie
When using DVD-RAM
Playing Back Stills
Portion being played back Press
OSpecifying the point to view
Jumping to Specified Point GO to
Choose Specify in above, and then Press the 1/ button
Press To select End
Recording mode Repeat play.4 Operation.5
When using HDD/DVD
When using card
Information Display During Playback
Selecting Consecutive Scenes Together
Selecting Multiple Scenes
Repeat Steps 2 and 3 to randomly select
Multiple Scenes
Title
Functions Available with Disc Navigation
Understanding Flow of Disc Navigation Menu
@When using HDD/DVD-RAM/DVD-RW VR-mode
Play list
Top End
OWhen Using card
OWhen using DVD-RW VF-mode/DVD-R/+RW
Select DVD Setting Play
Program
Dubbing on DVD
Dubbing ALL Scenes Recorded on HDD Dubbing ALL
You can dub the images recorded on the HDD to a DVD
Dub only those scenes on discs
Scene
OList of dubbing possible/impossible
Deleting Scenes Edit Delete
Editing using submenu
Dividing Movies EDIT- Divide
Place Cursor Scene To be Divided
Arranging Order of Scenes Edit Move
Combining Multiple Scenes Edit Combine
Directing Scenes Effectively Effect Fade
Fade Out
Effect Outkeffect tPLAY
Releasing Skip
Playing Back by Skipping Scenes Effect Skip
Changing Images for Thumbnails Effect Thumbnail
Copying Stills on DVD-RAM to Card Copy
Set the power switch to DVD Press the Disc Navigation button
OTo unlock the scene
Locking Scenes on Card Lock
Selecting Scenes Using Menu Screen Select
Deselecting selected scenes
Deselecting scenes one by one
Button Recording mode, recording date/time
Displaying Information Using Menu Screen Detail
Switching to Thumbnail Display of Specific Date Select
What is PROGRAM?
Program
Use the I/HH/I/I/I/II
Playing Back Program Play
Changing Title of Program Title
Use Il/IN/ql Title input bar
OCharacters available for entering title
What is Play LIST?
Play List
Creating NEW Play List Create
Switching to Display of Each Play List Select
On play List
Playing Back a Play List Play
Adding Scenes to Play List Editing Play List
100
Eiqinsertion position
Press the Disc Navigation button Press the Menu button
101
Adding Scenes Using Submenu for Editing Editing Play List
Deleting Scenes from Play List Editing Play List
Jsa Insertion position
Selecting Scenes Using Submenu for Editing Editing Play
Deleting Scenes Using Submenu for Editing Editing Play List
102
Then Press Menu button
Arranging Order of Scenes Move
103
Changing Title of Play List Title
104
Deleting Play List Delete
See Changing
105
HDD/DVD/Card Management
Moving to Beginning END of HDD/DVD/CARD
Initializing HDD/DVD/CARD
106
When using HDD When using card
Protection
Verifying Remaining Free Space on Disc or Card Capacity
Deleting Data on HDD Full Format
107
Finalizing DVD-RW/DVD-R/+RW Finalize DVD
OUsing Finalize button to finalize a disc
That the disc is being Finalized Will Appear
Disc will then be Finalized
109
Others
When Repeat Play is set
Displaying Movies or Stills Independently Category
Playing Back Scenes Repeatedly Repeat Play
Playing Back WIDE-MODE Images on 43 Display TV TV Type
111
Slide Show Continuous Playback of Stills
Navigation button Choose Then press the I/11 button Press
Connecting to a TV
Viewing on TV Screen
112
Viewing on TV Screen
113
114
Playback on DVD Recorder/Player
Playing Back DVD-RAM/DVD-RW VR-MODE
Playing Back DVD-RW VF-MODE/DVD-R/+RW
Recording Dubbing Images
Signal flow
115
To S-VIDEO ., Tovideo/audio VCR, etc
116
Recording Dubbing Images on Other Video Devices
117
118
Software Provided
Windows
Macintosh
Using
When using Windows
Requirements of available PC
119
120
Installing Software
Click
121
When using Macintosh
Installation
122
123
Connecting to PC via PC Connection Cable
Handling photos
124
EWhen removing SD memory card
When removing disc
Using Disc in DVD Drive Built Into PC
125
126
When using Windows
Using Imagemixer
Using Software
Viewing Images Recorded on HDD/DISC Using PC
See page 32 when using Macintosh
128
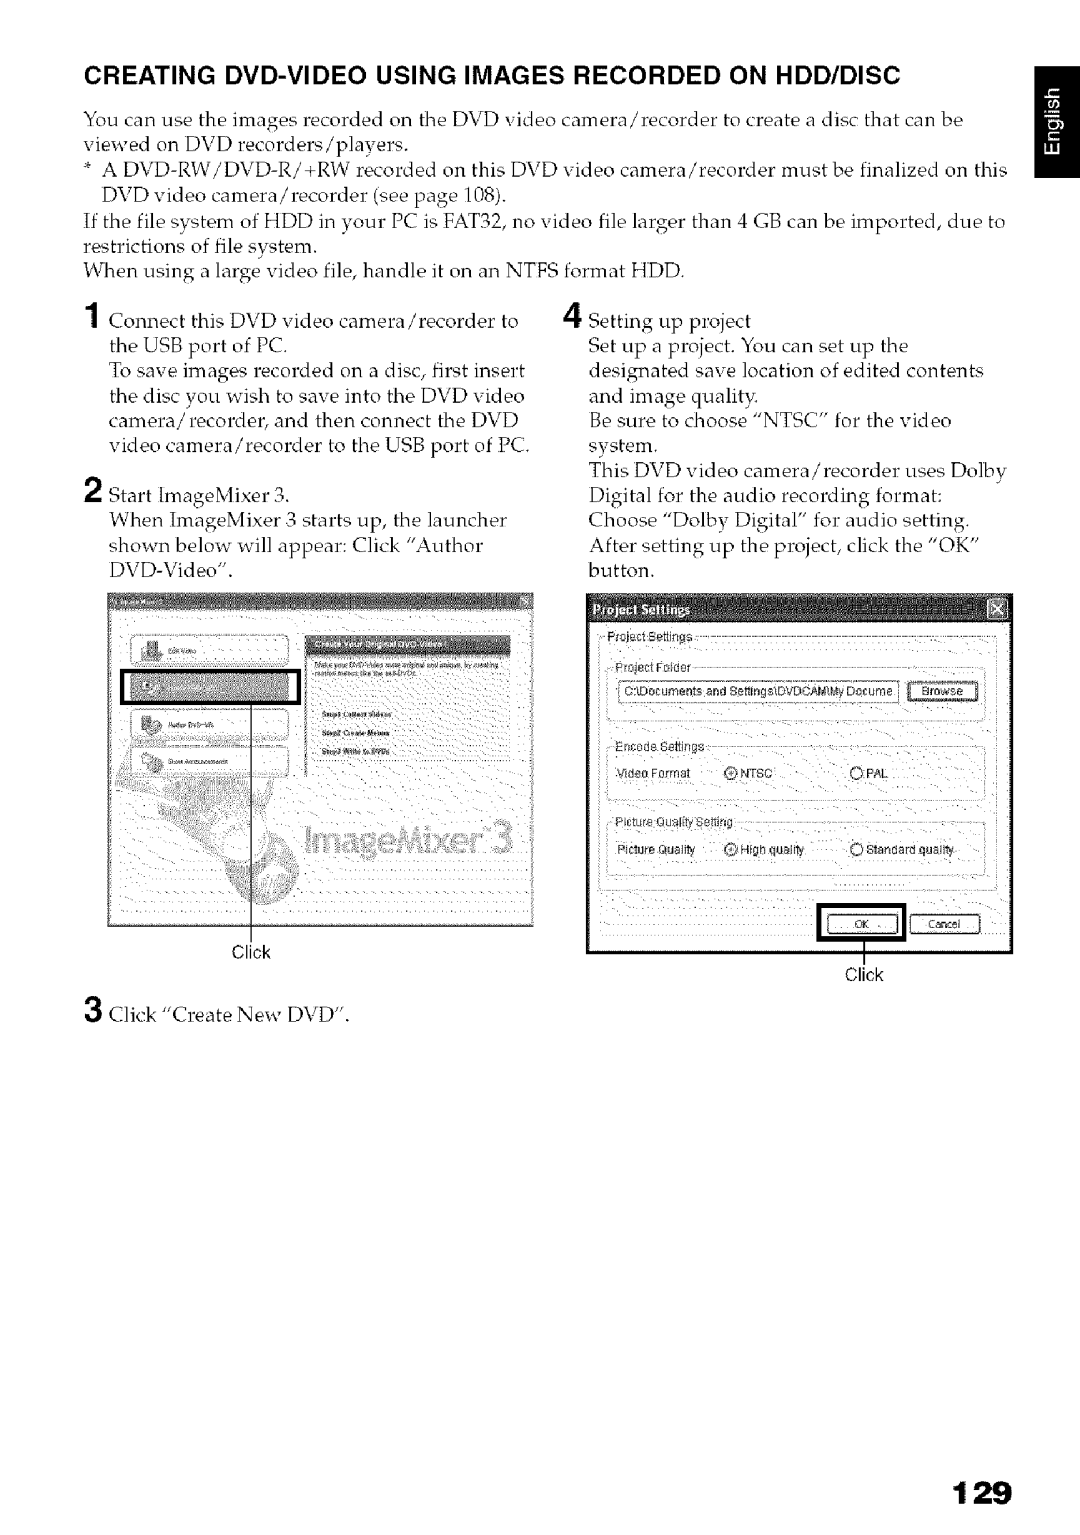
Creating DVD-VIDEO Using Images Recorded on HDD/DISC
129
Click Create New DVD
EditE ViewO! ToolsTHelpH
130
131
132
Using Pixe VRF Browser EX and Imagemixer VCD/DVD2
Browser EX
For Dvdcam Icon ImageMixerVCD/DVD2
133
134
135
Viewing Images recorded on Disc using PC
Playing back DVD-RWVF-mode/DVD-R/+RW
Playing back DVD-RAM/DVD-RW VR-mode
136
Uninstalling Software
PC Software Support Center number
User/Library/Preferences/ImageMixerVCDDVD2.plist
Recorder to PC
137
From PC
Camera Accessories
Introduction to Optional Accessories
Power Supply
Battery DZ-BP7SW Battery DZ-BP14SW
Trouble Messages
139
+RW
140
ThecardterminalsmaybedirtyWipeoffdirt,andtrythecard
141
WasthecardformattedonPC?Wasformattinginterrupted
TheinsertedcardcannotbeusedinthisDVDvideocamera
142
143
END of Card
HDD/DVD Almost Full
No DVD
144
Ntsc
145
PAL
Unformat DVD Unformat HDD
Troubleshooting
146
Charge
147
148
149
When the DVD video camera/recorder is connected to PC
150
Miscellaneous
151
152
Indicator on this DVD
Video camera
Recorder remains lit or
List of setting items
System Reset
All settings will be reset
153
154
Major Specifications
DVD-RAM/DVD-RW DVD-R/+RW
Stills
Xtra
DZ-HS300A
156
Storage Capacity of HDD/DVD/CARD
Recordable Time On Disc
Recordable Stills Photos on Card
157
Norm
ECO
To Order in the Canada
To Order in the United States
158
By Phone
159
Index
160
License Agreement
161
TAG
Conditions Hitachi Limited
Warranty
HITACHI.COMrTV Or MAiL iN to Address on this Card
Hitachi
CA Q
Hitachi Warranty Policy
Itac H
Hitachi
Mp N
Service Direct 1-800-HITACHI
Service Hotline 1-800-HITACHI
Hitachi Home Electronics Division Digital Media Division
Hitachi Way Meadowpine Blvd Chula Vista Mississauga Ontario