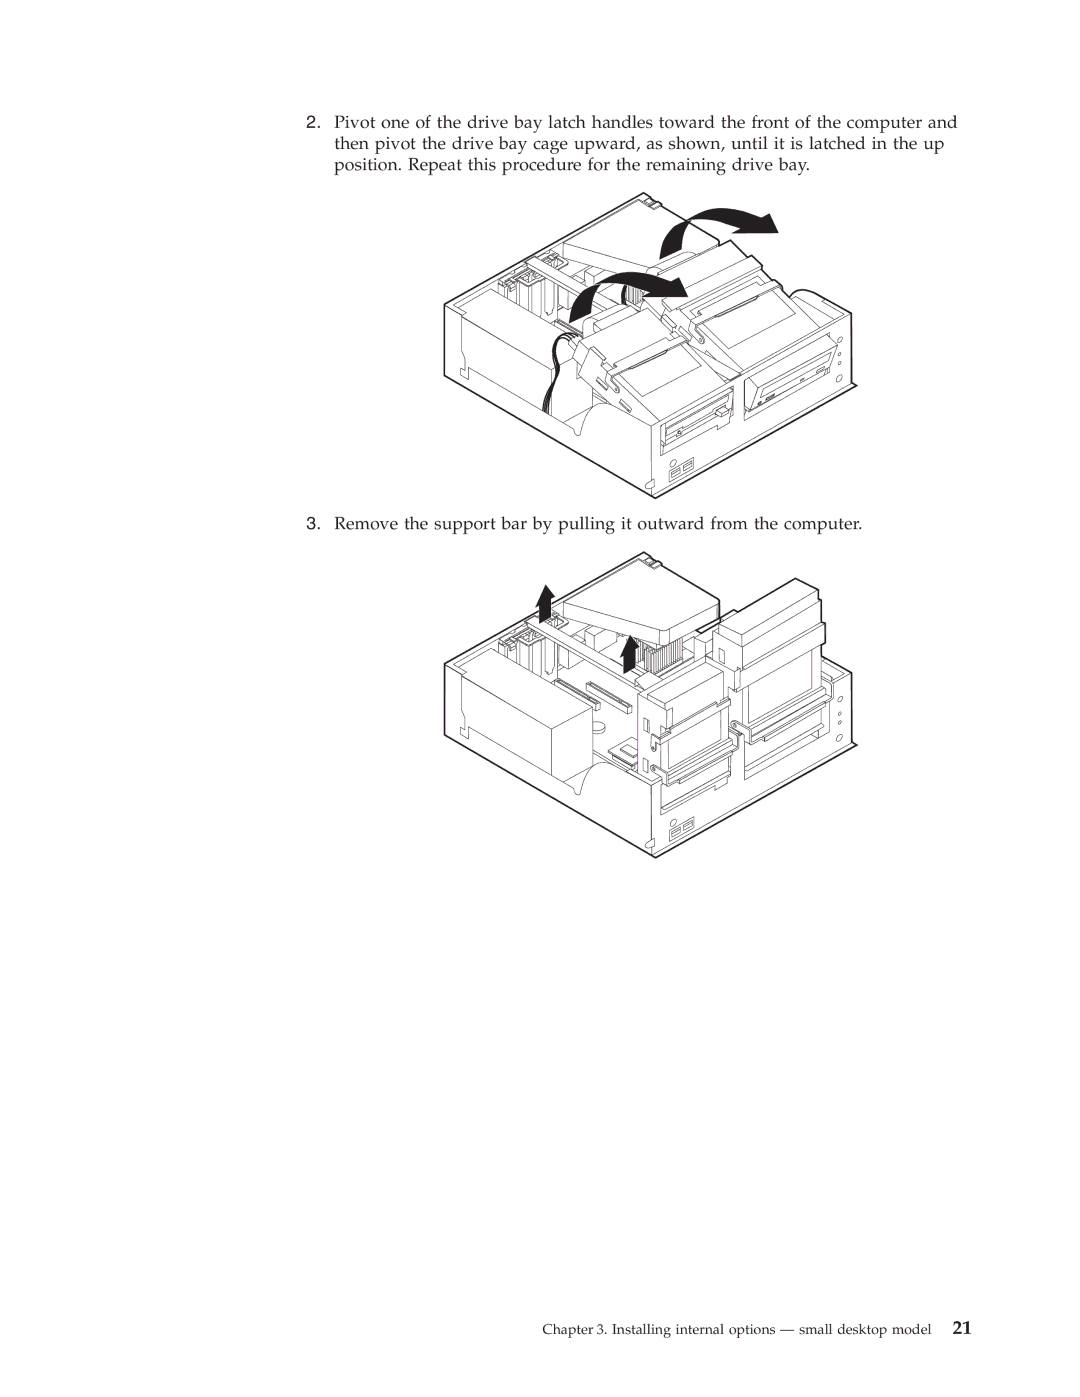
Type
User Guide Type 2292, 6343, 6349 Type 6790, 6791, 6792, 6793, 6794
Page
Type 6823
User Guide Type 2292, 6343, 6349 Type 6790, 6791, 6792, 6793, 6794
First Edition August
Contents
Trademarks
Index
DANGER
Safety Information
To avoid a shock hazard
DANGER
Modem safety information
Lithium battery notice
Danger of explosion if battery is incorrectly replaced
Dispose of the battery as required by local ordinances or regulations
Consignes de sécurité relatives au modem
Laser compliance statement
L’ouverture de l’unité de CD-ROM/DVD-ROM peut entraîner un risque
DANGER
How this book is organized
About this book
x User Guide
Information resources
Identifying your computer
Chapter 1. Overview
Small desktop model computer Desktop model computer
Microtower model computer
2 User Guide
System management features varies by model type
Features
Input/output features
Microprocessor
IBM preinstalled software
Power
Expansion
Operating systems supported
Physical specifications - small desktop model
Specifications
Dimensions
Weight
Dimensions
Physical specifications - desktop model
Weight
Environment
Dimensions
Physical specifications - microtower model
Weight
Environment
Available options
Tools required
Handling static-sensitive devices
v Prevent others from touching components
10 User Guide
Locating the connectors on the front of your computer
Chapter 2. Installing external options
Note Not all computer models will have the following connectors
Chapter 2. Installing external options
Locating the connectors on the rear of your computer
14 User Guide
Mouse connector
Obtaining device drivers
Connector
Description
Removing the cover
Chapter 3. Installing internal options - small desktop model
Locating components
Identifying parts on the system board
18 User Guide
Installing DIMMs
Installing memory
What to do next
Installing adapters
3. Remove the support bar by pulling it outward from the computer
Chapter 3. Installing internal options - small desktop model
22 User Guide
What to do next
Drive specifications
Installing internal drives
Installing a drive
What to do next
Installing a Rope Clip
What to do next
Replacing the cover and connecting the cables
3. Position the cover over the chassis and pivot it down over the computer until it snaps into place
28 User Guide
Removing the cover
Chapter 4. Installing internal options - desktop model
Locating components
Identifying parts on the system board
30 User Guide
Installing memory
Installing DIMMs
Chapter 4. Installing internal options - desktop model
Installing adapters
What to do next
32 User Guide
What to do next
Installing internal drives
34 User Guide
Drive specifications
Installing a drive
36 User Guide
To connect the first IDE CD drive or DVD drive
To connect an additional IDE hard disk drive
To connect an additional IDE CD drive or DVD drive
Installing a Rope Clip
What to do next
Replacing the cover and connecting the cables
What to do next
38 User Guide
Chapter 4. Installing internal options - desktop model
40 User Guide
Removing the cover
Chapter 5. Installing internal options - microtower model
Moving the power supply
Locating components
42 User Guide
Identifying parts on the system board
Chapter 5. Installing internal options - microtower model
Installing memory
Installing DIMMs
44 User Guide
What to do next
Installing adapters
5. Install the adapter slot cover latch
4. Install the adapter into the appropriate slot on the system board
3. Remove the adapter from its static-protective package
46 User Guide
Installing internal drives
Drive specifications
What to do next
48 User Guide
Installing a drive
v If it is the first CD drive or DVD drive, set as a master device
50 User Guide
To connect the first IDE CD drive or DVD drive
To connect an additional IDE CD drive or DVD drive
Installing a Rope Clip
To connect an additional IDE hard disk drive
What to do next
Replacing the cover and connecting the cables
What to do next
52 User Guide
Chapter 5. Installing internal options - microtower model
54 User Guide
Starting the IBM Setup Utility program
Chapter 6. Using the IBM Setup Utility program
Viewing and changing settings
Exiting from the IBM Setup Utility program
Administrator password
Setting, changing, and deleting a password
Erasing a lost or forgotten password clearing CMOS
Other settings in the IBM Setup Utility program
Using Security Profile by Device
The startup sequence
Changing the startup sequence
58 User Guide
Appendix A. Changing the battery
9. Turn on the computer and all attached devices
Recovering from a POST/BIOS update failure
Appendix B. Updating System Programs
System programs
10. Unplug the power cords from electrical outlets
Appendix C. System address maps
System memory map
I/O address map
Address range hex
Table 2. I/O address map continued
Size bytes
Description
Table 2. I/O address map continued
DMA I/O address map
Address range hex
Size bytes
Address hex
Table 3. DMA I/O address map continued
Description
Bits
System resource
Table 4. IRQ channel assignments
Table 5. DMA channel assignments
DMA channel
68 User Guide
Television output notice
Appendix E. Notices and trademarks
IBM Director of Licensing IBM Corporation North Castle Drive
Armonk, NY U.S.A
Trademarks
13, 14, 15
Index A
8, 34
23, 34
Page
Page
1P P/N 25P4024
Part Number 25P4024