DEALER This manual MUST be given to the user of the wheelchair
Owner’s Operator and Maintenance Manual
Xtra
Xtra
TABLE OF CONTENTS
TABLE OF CONTENTS
SECTION 2-SAFETY/HANDLING OF WHEELCHAIRS
SECTION 3-SAFETY INSPECTION/TROUBLESHOOTING
TABLE OF CONTENTS
TABLE OF CONTENTS
Installing/Removing/Adjusting the Footrests
Adjusting 70 MFX and 90 Footrests
TABLE OF CONTENTS
TABLE OF CONTENTS
SECTION 7-ARMS
SECTION 8-WHEELS
TABLE OF CONTENTS
REGISTER YOUR PRODUCT
LIMITED WARRANTY
Installing Amputee Attachments
Cut Along Line
PRODUCT REGISTRATION FORM
Fold
here
Please Seal with Tape Before Mailing
Fold here Cut Along Line Fold here
Invacare Product Registration Form
SPECIAL NOTES
Manual Title
LABEL LOCATIONS
LABEL LOCATIONS
XTRA
TYPICAL PRODUCT PARAMETERS
Stability
SECTION 1-GENERAL GUIDELINES
NOTE When changes to the left
the chart and refer to the
Operating Information
Repair and Service Information
ALWAYS keep hands and fingers clear of moving parts to avoid injury
Tire Pressure
Weight Training
Weight Limitation
Stability and Balance
SECTION 2-SAFETY/HANDLING OF WHEELCHAIRS
A Note to Wheelchair Assistants
Coping with Everyday Obstacles
NOTE For this procedure, refer to FIGURE
Tipping
NOTE For this procedure, refer to FIGURE
Tipping - Curbs
Stairways
NOTE For this procedure, refer to FIGURE
Transferring To and From Other Seats
Adjusting the Wheelbase for Stability
Percentage of Weight Distribution
NOTE For this procedure, refer to FIGURE
Reaching, Bending - Backward
Reaching, Leaning and Bending - Forward
NOTE For this procedure, refer to FIGURE
Safety Inspection Checklists
SECTION 3-SAFETY INSPECTION/ TROUBLESHOOTING
Inspect/Adjust Weekly
Inspect/Adjust Periodically
SECTION 3-SAFETY INSPECTION/TROUBLESHOOTING
Inspect/Adjust Monthly
Maintenance
Troubleshooting
CHAIR VEERS LEFT/RIGHT
SLUGGISH TURN/PERFORMANCE
Suggested Maintenance Procedures
SECTION 4-FRONT RIGGINGS
Installing/Removing/Adjusting the Footrests
NOTE For this procedure, refer to FIGURE
NOTE Make sure to note the position of the washers before disassembly
NOTE For this procedure, refer to FIGURE
Adjusting 70 MFX and 90 Footrests
Raising/Lowering Elevating Legrests
Installing Elevating Legrests
NOTE For this procedure, refer to FIGURE
Installing Adjustable Angle Flip-Up Footplate Hinge
Adjusting Calfpads
NOTE For this procedure, refer to FIGURE
Depth Adjustment
Adjusting Adjustable Angle Flip-Up Footplates
Angle Adjustment
NOTE For this procedure, refer to FIGURE
Installing Impact Guards/Calf Strap
Heel Loop Replacement
NOTE For this procedure, refer to FIGURE
SECTION 5-BACK
Adjusting the Back Height
NOTE For this procedure, refer to FIGURE
NOTE Both back canes should be adjusted to the same adjustment hole
NOTE For this procedure, refer to FIGURE
Adjusting the Back Angle
NOTE This procedure applies to adjustable angle backs only
Detail A - back
NOTE For this procedure, refer to FIGURE
Installing/Removing the Chest Positioning Strap
Installing and Removing a Seating System
Installing the Stroller Handles
NOTE For this procedure, refer to FIGURE
NOTE This procedure applies to ALL stroller handles
NOTE For this procedure, refer to FIGURE
SECTION 6-SEAT
Folding/Unfolding the Wheelchair
Replacing Seat Upholstery
Installing/Removing Seat Positioning Strap
NOTE For this procedure, refer to FIGURE
Installing Fabric Clothing Guards
NOTE For this procedure, refer to FIGURE
Installing Clothing Guards
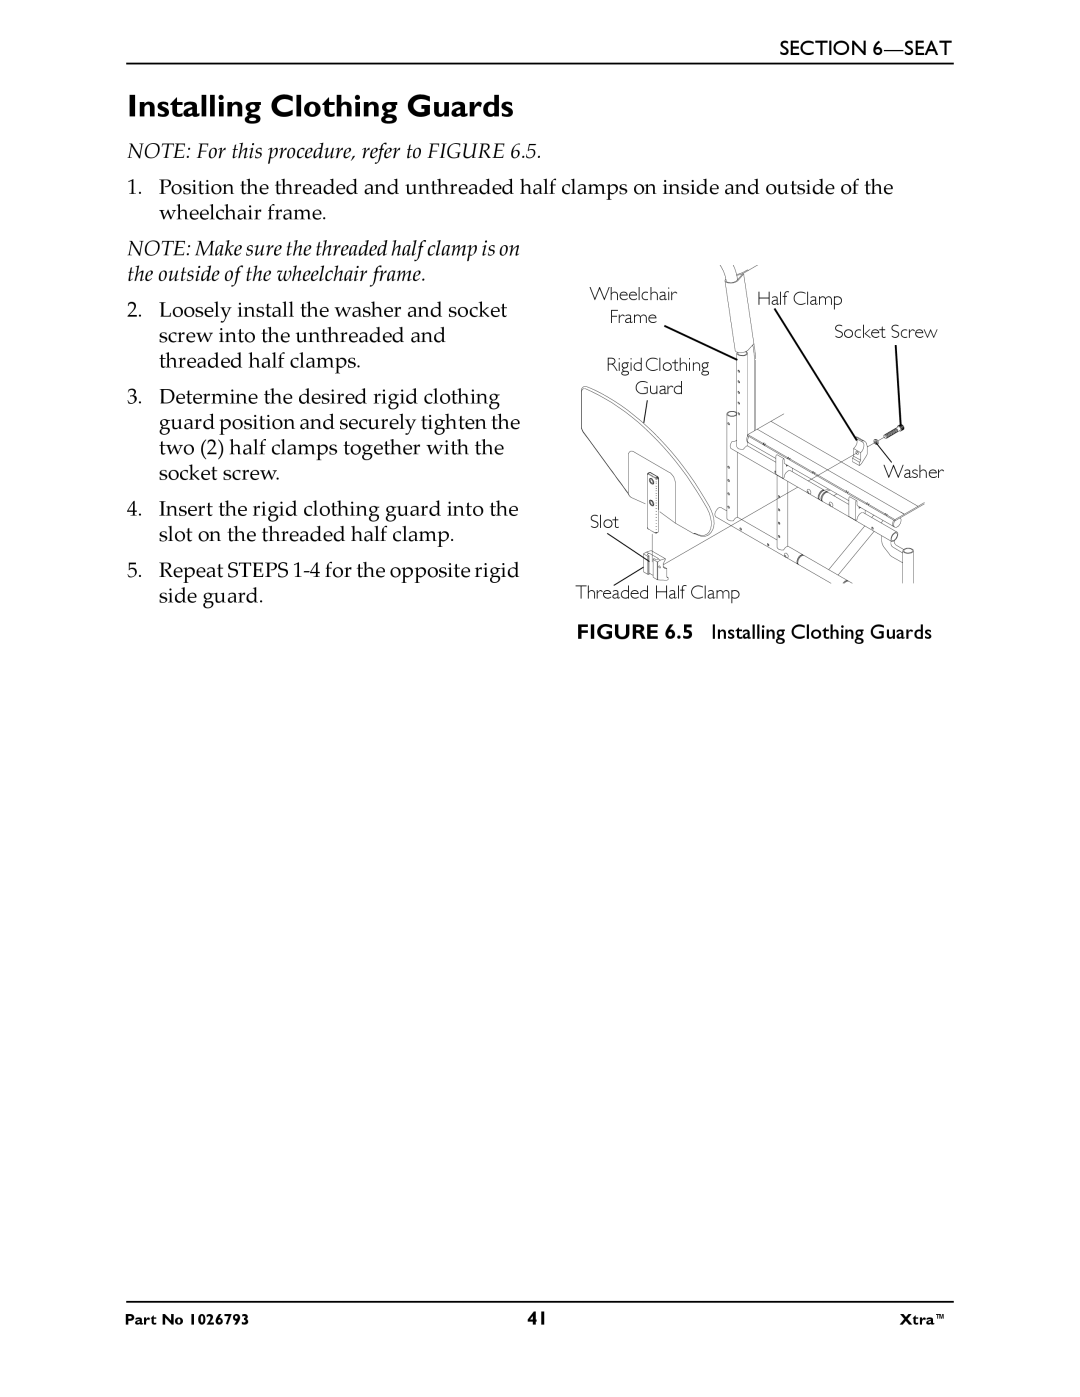
NOTE For this procedure, refer to FIGURE
Installing the Half Arm
SECTION 7-ARMS
NOTE For this procedure, refer to FIGURE
Adjusting Half Arm Height
Adjusting Armrest Height
Using/Adjusting Dual Point Arms
NOTE For this procedure, refer to FIGURE
Removing Armrests
Replacing Dual Point Arm Pad/Clothing Guards
Installing/Removing T-Arms
NOTE For this procedure, refer to FIGURE
NOTE This procedure is for fixed height dual point arms ONLY
Adjusting T-Arm Height
Adjusting the T-Arms
NOTE For this procedure, refer to FIGURE
Removing T-Arms
NOTE For this procedure, refer to FIGURE
Adjusting T-Arm Width
NOTE For this procedure, refer to FIGURE
Adjusting T-Arm Depth
NOTE Additional positions are obtainable by turning the arm tube
NOTE Desk length arm
NOTE For this procedure, refer to FIGURE
Adjusting T-Arm Sockets
T-Arm T-Arm Clamp Hex Screws and Washer
Slot
NOTE For this procedure, refer to FIGURE
Adjusting T-Arm Transfer Assists and/or Side Guards
Removing/Installing Rear Wheels
Repairing/Replacing Pneumatic Tire/Tube
SECTION 8-WHEELS
NOTE For this procedure, refer to FIGURE
Permanent Axles
NOTE For this procedure, refer to FIGURE
Adjusting Quick-Release Axles
Locking Pins
Axle Mounting Plate
NOTE For this procedure, refer to FIGURE
Installing Quad-Release Axles
NOTE For this procedure, refer to FIGURE
Adjusting Quad-Release Handles
NOTE For this procedure, refer to FIGURE
In and/or Out
NOTE For this procedure, refer to FIGURE
Adjusting Forks
NOTE For this procedure, refer to FIGURE
Replacing/Adjusting the Wheel Locks
SECTION 9-WHEEL LOCKS/ANTI- TIPPERS
Installing Anti-Tippers
Installing/Adjusting the Anti-Tippers
Adjusting Anti-Tippers
NOTE For this procedure, refer to FIGURE
NOTE This will maintain the current rear seat to floor height
Installing Amputee Attachments
NOTE For this procedure, refer to FIGURE
Canada
LIMITED WARRANTY