Copying
Click
.
Memo :
0The following types of discs can be used on the provided software Everio MediaBrowser 4.
DVD-R DVD-R DL DVD-RW DVD+R
DVD+R DL DVD+RW
0The following formats are supported by the provided software Everio MediaBrowser 4.
AVCHD
http://www.pixela.co.jp/oem/jvc/mediabrowser/e/
0To view the help file of Everio MediaBrowser 4, select “Help” from the Everio MediaBrowser 4’s menu bar or press F1 on the keyboard.
0If you encounter any problems with the provided software Everio MediaBrowser 4, please consult the “Pixela User Support Center”.
Telephone | USA and Canada (English): |
| Europe (UK, Germany, France, and Spain) |
| (English/German/French/Spanish): |
| free) |
| Other Countries in Europe |
| (English/German/French/Spanish): |
| Asia (Philippines) (English): |
| China (Chinese): |
Homepage | http://www.pixela.co.jp/oem/jvc/mediabrowser/e/ |
|
|
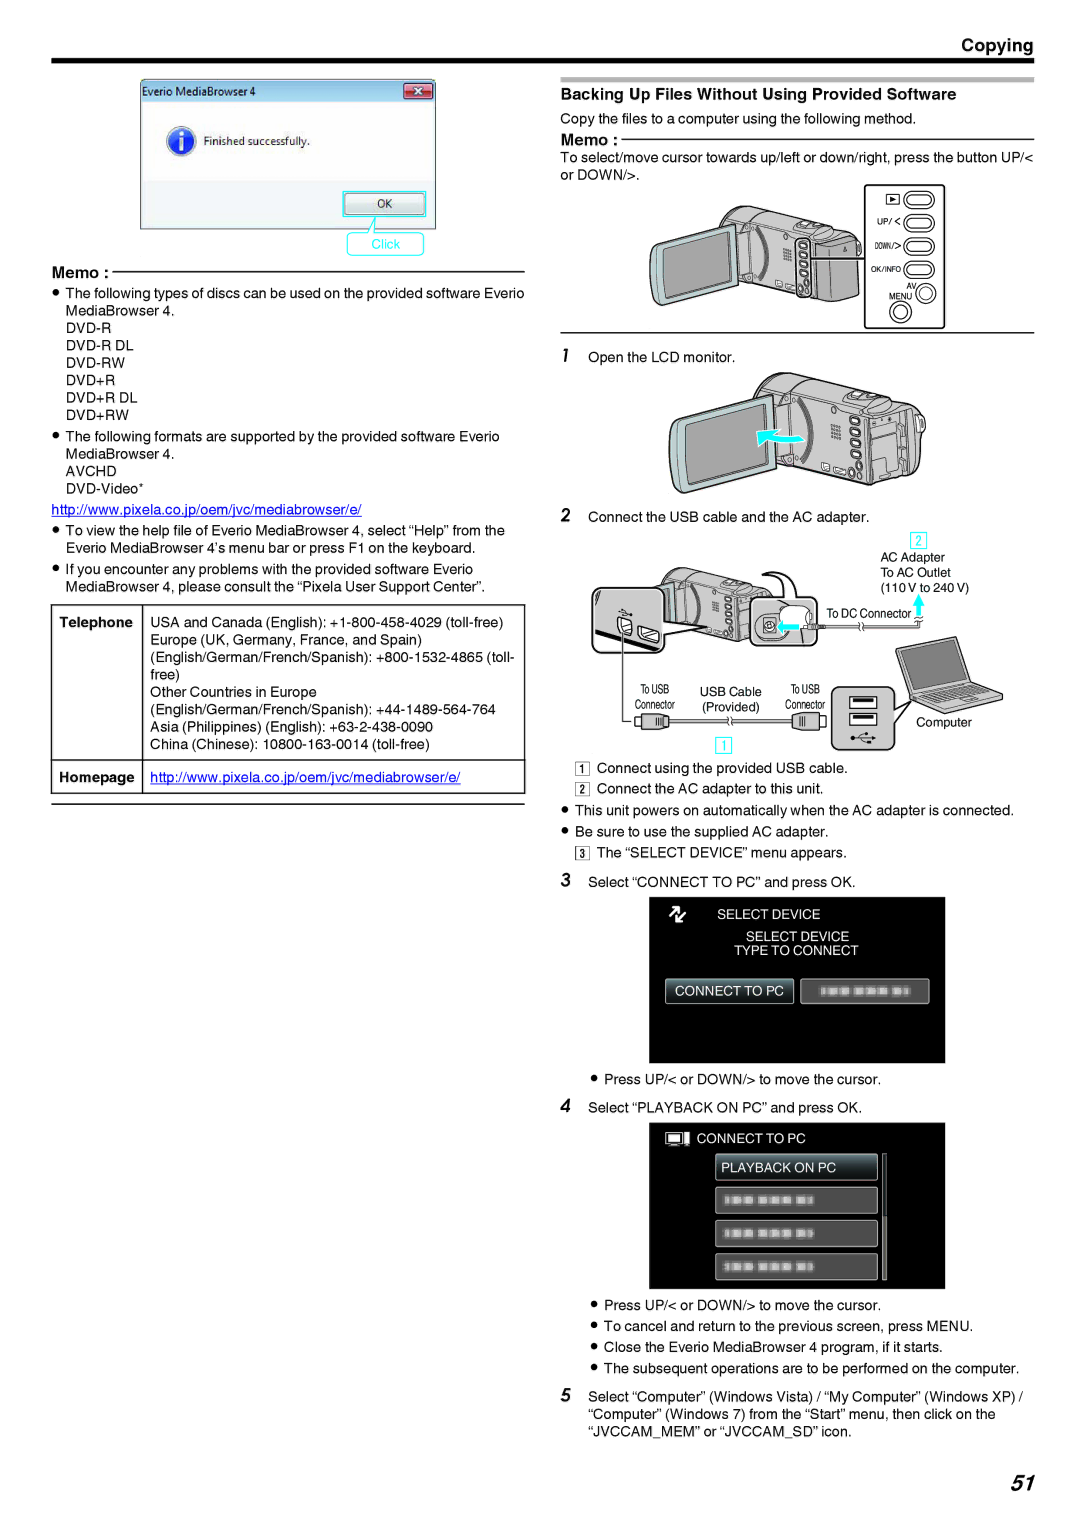
Backing Up Files Without Using Provided Software
Copy the files to a computer using the following method.
Memo :
To select/move cursor towards up/left or down/right, press the button UP/< or DOWN/>.
.
1Open the LCD monitor.
.
2Connect the USB cable and the AC adapter.
AC Adapter
To AC Outlet (110 V to 240 V)
To DC Connector![]()
To USB | USB Cable | To USB |
Connector | (Provided) | Connector |
Computer
.
AConnect using the provided USB cable. B Connect the AC adapter to this unit.
0This unit powers on automatically when the AC adapter is connected.
0Be sure to use the supplied AC adapter. C The “SELECT DEVICE” menu appears.
3Select “CONNECT TO PC” and press OK.
SELECT DEVICE
SELECT DEVICE
TYPE TO CONNECT
CONNECT TO PC
.
0Press UP/< or DOWN/> to move the cursor. 4 Select “PLAYBACK ON PC” and press OK.
![]() CONNECT TO PC
CONNECT TO PC
PLAYBACK ON PC
.
0Press UP/< or DOWN/> to move the cursor.
0To cancel and return to the previous screen, press MENU.
0Close the Everio MediaBrowser 4 program, if it starts.
0The subsequent operations are to be performed on the computer.
5Select “Computer” (Windows Vista) / “My Computer” (Windows XP) / “Computer” (Windows 7) from the “Start” menu, then click on the “JVCCAM_MEM” or “JVCCAM_SD” icon.
51
