70NEEXTRAINSTELLINGEN(vervolg)


1


2


1

2

3

NUMBER

4

5

6


7

8

9


0


1

3


2


3

4

4

MENU

OK


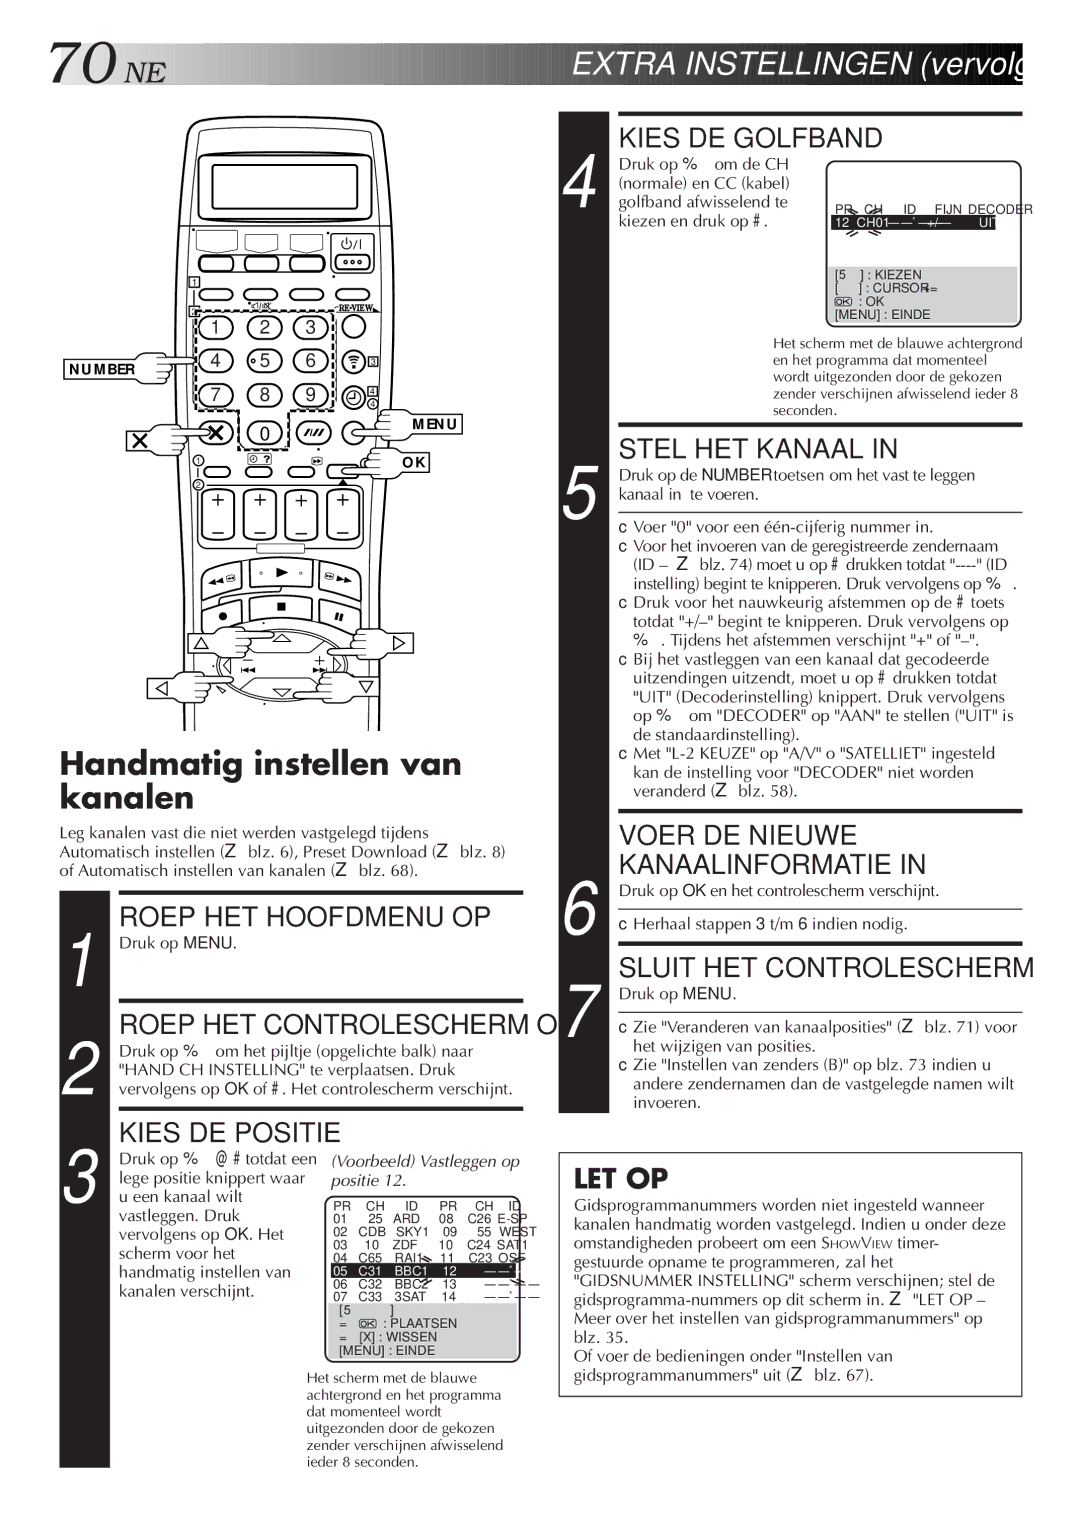
KIES DE GOLFBAND


Druk op om de CH


(normale) en CC (kabel)


4 golfband afwisselend te

PR

CH ID FIJN DECODER


kiezen en druk op #.

12

CH01 – –Ê – – +/– UIT


[] : KIEZEN


[°°] : CURSOR +=


: OK


[MENU] : EINDE


Het scherm met de blauwe achtergrond


en het programma dat momenteel


wordt uitgezonden door de gekozen


zender verschijnen afwisselend ieder 8


seconden.


5

STEL HET KANAAL IN

Druk op de NUMBER toetsen om het vast te leggen

kanaal in te voeren.


Handmatig instellen van kanalen

Leg kanalen vast die niet werden vastgelegd tijdens Automatisch instellen (blz. 6), Preset Download (blz. 8) of Automatisch instellen van kanalen (blz. 68).

1


ROEP HET HOOFDMENU OP


Druk op MENU.


2


ROEP HET CONTROLESCHERM OP


Druk op om het pijltje (opgelichte balk) naar


"HAND CH INSTELLING" te verplaatsen. Druk


vervolgens op OK of #. Het controlescherm verschijnt.

3


KIES DE POSITIE


Druk op @ #totdat een

(Voorbeeld) Vastleggen op


lege positie knippert waar

positie 12.


u een kanaal wilt

PR

CH

ID

PR

CH ID


vastleggen. Druk

01

25

ARD

08

C26 E-SP


vervolgens op OK. Het

02

CDB

SKY1

09

55 WEST


scherm voor het

03

10

ZDF

10

C24 SAT1


04

C65

RAI1

11

C23 OSF


handmatig instellen van

05

C31

BBC1

12

–Ê – –


kanalen verschijnt.

06

C32

BBC2

13

–Ê – –


07

C33

3SAT

14

–Ê – –


[5°°°]


=


: PLAATSEN


= [X] : WISSEN


[MENU] : EINDE


Het scherm met de blauwe


achtergrond en het programma


dat momenteel wordt


uitgezonden door de gekozen


zender verschijnen afwisselend


ieder 8 seconden.


Voer "0" voor een één-cijferig nummer in.

Voor het invoeren van de geregistreerde zendernaam (ID – blz. 74) moet u op #drukken totdat "----" (ID instelling) begint te knipperen. Druk vervolgens op .

Druk voor het nauwkeurig afstemmen op de #toets totdat "+/–" begint te knipperen. Druk vervolgens op . Tijdens het afstemmen verschijnt "+" of "–".

Bij het vastleggen van een kanaal dat gecodeerde uitzendingen uitzendt, moet u op #drukken totdat "UIT" (Decoderinstelling) knippert. Druk vervolgens op om "DECODER" op "AAN" te stellen ("UIT" is de standaardinstelling).

Met "L-2 KEUZE" op "A/V" o "SATELLIET" ingesteld kan de instelling voor "DECODER" niet worden veranderd (blz. 58).


VOER DE NIEUWE

6

KANAALINFORMATIE IN

Druk op OK en het controlescherm verschijnt.


Herhaal stappen 3 t/m 6 indien nodig.

7

SLUIT HET CONTROLESCHERM

Druk op MENU.


Zie "Veranderen van kanaalposities" (blz. 71) voor

het wijzigen van posities.


Zie "Instellen van zenders (B)" op blz. 73 indien u


andere zendernamen dan de vastgelegde namen wilt


invoeren.

LET OP

Gidsprogrammanummers worden niet ingesteld wanneer kanalen handmatig worden vastgelegd. Indien u onder deze omstandigheden probeert om een SHOWVIEW timer- gestuurde opname te programmeren, zal het "GIDSNUMMER INSTELLING" scherm verschijnen; stel de gidsprogramma-nummers op dit scherm in. "LET OP – Meer over het instellen van gidsprogrammanummers" op blz. 35.

Of voer de bedieningen onder "Instellen van gidsprogrammanummers" uit (blz. 67).

Page 70
Image 70
JVC HR-DVS2EU manual NE Extra Instellingen vervolg, Handmatig instellen van kanalen, Roep HET Hoofdmenu OP

HR-DVS2EU specifications

The JVC HR-DVS2EU is a versatile dual-format video cassette recorder designed for both VHS and S-VHS formats, making it a valuable tool for both amateur and professional videographers. This device stands out due to its integration of advanced technologies that enhance video quality and playback performance.

One of the primary features of the HR-DVS2EU is its ability to play back both VHS and S-VHS tapes. This compatibility means users can enjoy a wide range of media without needing multiple machines. The VCR incorporates JVC’s Super VHS technology, which delivers superior resolution compared to standard VHS, providing sharper images and improved color reproduction.

The machine is equipped with a digital video head, which allows for more precise tracking and reduces the occurrence of dropout and distortion in playback. This is particularly beneficial for archival footage from less than perfect tapes. Its Dynamic Drum System further optimizes performance by allowing for smoother tape transport and enhanced image stability.

Moreover, the HR-DVS2EU features a built-in digital video processor that aids in elevating the overall quality of the video output. This processor assists in minimizing noise and enhancing the clarity of images, making this VCR ideal for professional use where image quality is paramount.

Another notable characteristic is the easy-to-use interface, which includes straightforward controls for recording, pausing, and rewinding. The unit also supports a range of connectivity options, including AV inputs and outputs, enabling users to connect it effortlessly with other devices such as camcorders, televisions, and external storage solutions.

The HR-DVS2EU also includes advanced features such as timer recording and a variety of playback options including slow motion and frame-by-frame viewing. This would be particularly useful in editing or reviewing footage in detail.

Durability is a crucial aspect of the JVC HR-DVS2EU, making it a reliable choice for both home users and professionals. With its combination of dual-format capability, advanced imaging technologies, and user-friendly controls, the JVC HR-DVS2EU is an excellent choice for anyone looking to preserve and enjoy their video collections effectively.