30

 EN
EN


 TIMER
TIMER
 RECORDING(cont.)


| If you don’t know the SHOWVIEW number for the programme | |
Regular Timer | ||
you wish to record, use the following procedure to set your | ||
button to press next by lighting it up. To use the | ||
| recorder to | |
Programming | ||
FF light up at this time.) | ||
| feature, with the TV/SAT/VCR switch set to "VCR", press | |
| ILLUMI GUIDE before performing step 1. (PROG, REW, PLAY, | |
| If you aren't going to use the | |
| step 1. | |
|
Remember, the clock must be set before you can |
|
|
|
|
| |||
programme the timer (☞ pg. 55). |
|
| ACCESS TIMER |
|
|
| ||
|
|
|
|
|
|
|
| |
Before performing the following steps: | 1 | PROGRAMMING SCREEN |
| |||||
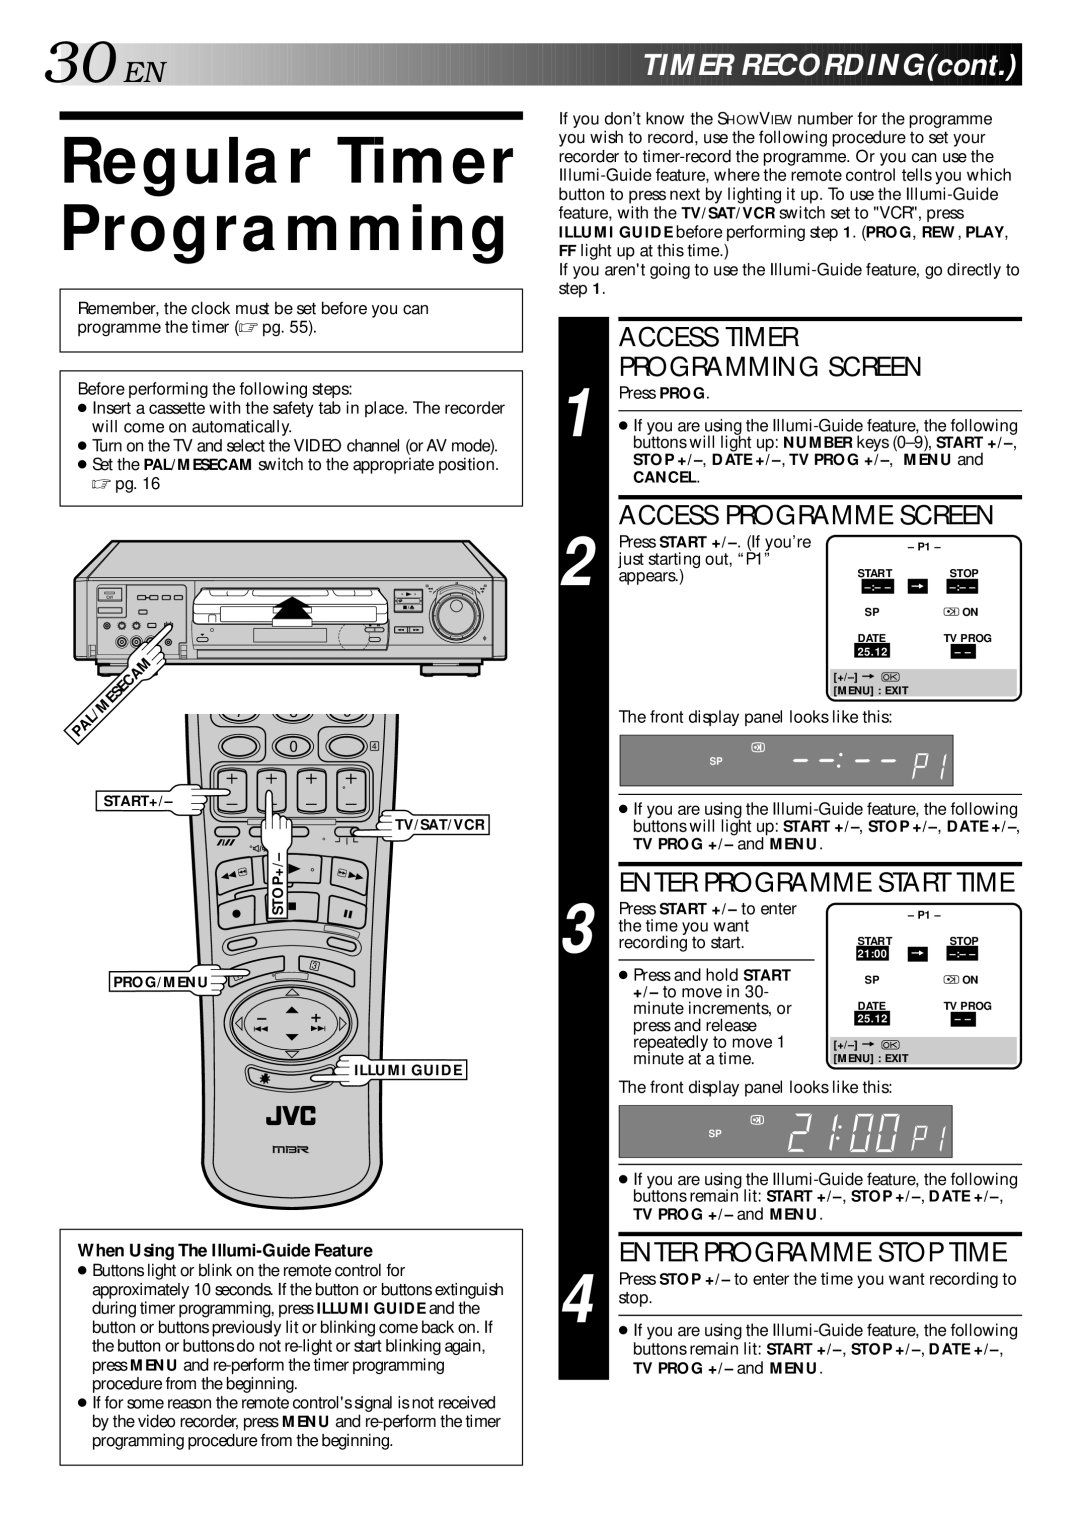
Press PROG. |
|
|
| |||||
● Insert a cassette with the safety tab in place. The recorder | ● If you are using the | |||||||
will come on automatically. |
| |||||||
● Turn on the TV and select the VIDEO channel (or AV mode). | buttons will light up: NUMBER keys | |||||||
● Set the PAL/MESECAM switch to the appropriate position. |
| STOP | MENU and | |||||
| CANCEL. |
|
|
| ||||
☞ pg. 16 |
|
|
|
|
|
|
| |
|
|
|
|
|
|
|
| |
|
|
|
| 2 | ACCESS PROGRAMME SCREEN | |||
|
|
|
| Press START |
| – P1 – |
| |
|
|
|
| just starting out, “P1” | START |
| STOP | |
|
|
| 8 | appears.) | = | |||
|
|
|
|
| ||||
|
|
|
|
|
| SP |
| ON |
•• • • • •• •• • • • •• |
|
|
|
|
|
|
|
|
• • • • • • • • |
|
|
|
|
| DATE |
| TV PROG |
|
|
|
|
|
|
| ||
PAL/MESECAM |
|
|
|
|
| 25.12 |
| – – |
|
|
|
|
|
|
| ||
|
|
|
|
|
| [MENU] : EXIT |
| |
| 7 | 8 | 9 |
| The front display panel looks like this: |
|
| |
|
|
|
|
|
| |||
|
| 0 | 4 |
| SP |
|
|
|
|
|
|
|
|
|
|
| |
START+/– |
|
|
|
| ● If you are using the | |||
|
|
| TV/SAT/VCR |
| ||||
|
|
|
| buttons will light up: START | ||||
|
| STOP+/– |
|
| TV PROG +/– and MENU. |
|
|
|
|
|
|
| Press START +/– to enter |
| – P1 – |
| |
|
|
|
| 3 | ENTER PROGRAMME START TIME | |||
|
|
|
| the time you want | START |
| STOP | |
|
|
|
| recording to start. | = | |||
PROG/MENU |
| 3 |
| ● Press and hold START | 21:00 | |||
1 |
|
|
| SP |
| ON | ||
|
|
|
|
| +/– to move in 30- | DATE |
| TV PROG |
|
|
|
|
| minute increments, or |
| ||
|
|
|
|
| press and release | 25.12 |
| – – |
|
|
|
|
|
|
|
| |
|
|
|
|
| repeatedly to move 1 |
|
| |
|
|
| ILLUMI GUIDE |
| minute at a time. | [MENU] : EXIT |
| |
|
|
|
| The front display panel looks like this: |
|
| ||
|
|
|
|
|
|
| ||
SP
|
|
|
| ● If you are using the | |
|
|
|
| buttons remain lit: START | |
|
|
|
| TV PROG +/– and MENU. | |
|
|
|
|
| |
|
|
|
|
| |
When Using The | 4 | ENTER PROGRAMME STOP TIME | |||
● Buttons light or blink on the remote control for | Press STOP +/– to enter the time you want recording to | ||||
approximately 10 seconds. If the button or buttons extinguish | |||||
stop. | |||||
during timer programming, press ILLUMI GUIDE and the | |||||
| |||||
button or buttons previously lit or blinking come back on. If | ● If you are using the | ||||
the button or buttons do not |
|
| buttons remain lit: START | ||
press MENU and |
|
| TV PROG +/– and MENU. | ||
procedure from the beginning. |
|
|
| ||
●If for some reason the remote control's signal is not received by the video recorder, press MENU and
