For canceling the display demonstration, see
Model No Serial No
Only for KW-AVX830/KW-ADV793 Sólo para KW-AVX830/KW-ADV793
Information For U.S.A
To prevent accidents and damage
How to reset your unit
Contents
Adjust the hour 1, then the minute
Display Setup screen
Finish the procedure
Select Off
Attaching
Basic operations
Detaching ~ While the unit is turned on
Attaching plate
Basic operations on the monitor panel
Open/Tilt screen
Sound
AV Menu
Equalizer
Mode
Prox
Touch
Off
Playback control on the touch panel
When the source is Tuner
When the source is AV-INor EXT-IN
∞ / 4 / ¢
Disc
Selecting the playback source
KW-AVX838/KW-AVX830KW-ADV793/KW-AVX738
USB
Listening to the radio
Preset list operations
When an FM stereo broadcast is hard to Receive
Band
Auto
When the FM reception is interfered
Storing-station Sequential Memory for FM only
Wide
Prohibiting disc ejection
Disc/USB operations
Playing a disc
~To eject a disc Open the monitor panel
DVD
Playable disc type
Disc type Recording format, file type, etc
CD/VCD
Do not start the car engine if a USB device is connected
For more details about USB operations
USB cable from the rear of the unit
Disc/file playback operations
Menu
Operation buttons on the screen
Enter
Return
Select the playback mode
Setting for watching video
Connecting iPod/iPhone
Setting the iPod control mode
Listening to the iPod/iPhone device
Playback mode
Selects a track/video.*3
Track information bars
One
To select the playback mode
To cancel, select Off To select the speed of audio books
All
Check your Sirius ID
GCI Global Control Information update
For Sirius Radio For XM Radio
~ Select SAT as the source
Selects a preset channel Press
Tuning in to a channel you want
Preset number*1 Channel number Only for Sirius
Selecting a channel on the list
Search for a station-Auto Search
What is HD Radio Technology?
Searching for HD Radio stations only
Refer to page 11 for basic radio operations
Tuning to digital audio only
Changing HD Radio reception mode
Tuning to analog audio only
Audio automatically
Using other external components
Manual
Full regardless of the Aspect setting
Displaying navigation screen
To view the navigation screen
KW-AVX838 KW-AVX830
To change the aspect ratio To adjust the picture
To display the picture
You cannot select USB/iPod for the main source
Storing your own adjustments
Using a rear view camera
Select a sound mode
Sound equalization
AV Setup/Sound/Equalizer menu items
Menu item Selectable setting/item
Selectable setting/itemInitial Underlined
Menu item
Display
Hours, 24 Hours Off
Disc
Subtitle *4
Off, Auto
Ner
Beep Off
AV Input
External Input
Muting1
Low Pass Filter
Volume Adjust
Select when the subwoofer is connected
55Hz, 85Hz, 120Hz
Information for using Bluetooth devices
Bluetooth profile
Icons for phone types
Change the PIN code
Connecting Bluetooth devices
Close the monitor panel
PIN code initial
Make sure to disconnect the device when it is connected
To disconnect
Confirmation screen appears. Press Yes
Pauses
Using the Bluetooth audio player
Start playback
Selects the group.*5
When Auto Answer is activated
Receiving a call
Ending the call
Making a call
Display Dial Menu
Copying the phone book
Select a preset number
Display Settings
Operate the target mobile phone
Selecting which phone book/ call lists to use
To copy the phone book manually
Dial Menu *1
New Pairing
MIC Setting
Last
Bluetooth operations for KW-ADV793
Registration Pairing methods
KW-ADV793
You can enter any number you like 1-digit to 16-digit number
If you skip changing PIN code, press Enter
Use Open or Search to connect
Unit displays the list of the preset devices
Select a device you want to connect
To connect
Be registered
Except and VOL +
Displays Dial Menu screen
To read the message, press Yes
To read the message later, press No
To call a preset number
Select the phone number you want to
Select a telephone number to store
To connect a new device
~ Select BT Audio as the source Start playback
Can be registered
Tag data*1 *2 current track title/artist name/album title
Bluetooth device settings
Installing the batteries
Before using the remote controller
Source Operations
Button
@/# buttons
Using the number buttons
Disc
ENT enter button
WMA/WAV/VCD/CD
Using the disc menu
Searching for an item directly
VCD
Selecting a folder or track on the control screen
Using the on-screen bar
Using the list screen
Selecting playback modes
Maintenance
Recommended cleaning method
Do not use the following discs
Playing MPEG1/MPEG2 files
More about this unit
General
Playing Jpeg files
Satellite radio operations Only for
Upper and lower cases Numbers and symbols
Playing MP3/WMA/WAV files
HD Radio reception Only for KW- AVX830/KW-ADV793
Through the analog terminals Speaker out/REAR OUT/FRONT OUT
IPhone is a trademark of Apple Inc
Only for KW-AVX838/KW-AVX830/KW-ADV793
Only for KW-AVX830/KW-ADV793
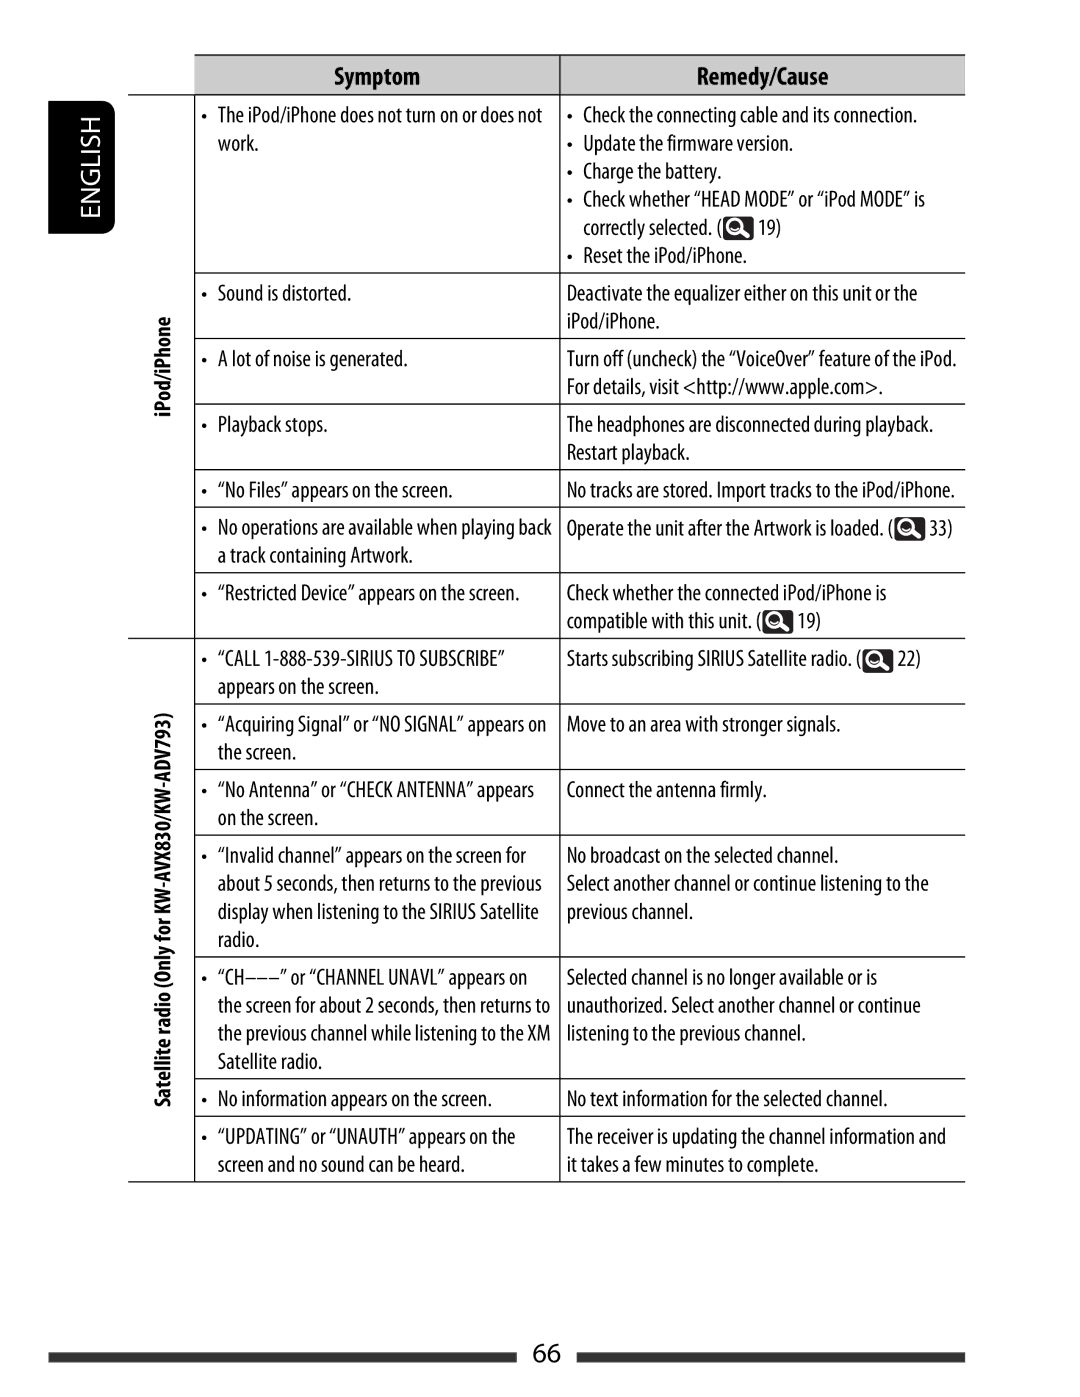
Troubleshooting
Symptom
Eral
General
Disc in general
MPEG1/MPEG2/MP3/WMA/WAV USB
Symptom Remedy/Cause
IPod/iPhone Satellite radio Only for KW-AVX830/KW-ADV793
AV-IN
KW-ADV793
Bluetooth for KW-AVX838/KW-AVX830 Bluetooth for KW-ADV793
Power Output
≤ 1% THD+N
DVD/CD
Sleeve
Required space for installation and the monitor ejection
Operating Voltage
Unit mm inch
Countries where you may use the Bluetooth function
Bluetooth 기능을 사용할 수 있는 국가
Hrvatska Magyarország Ireland Éire
Slovenija Slovensko
Iii
Country
Call
Installation IN-DASH Mounting
Advertencias
Electrical Connections Conexiones Electricas
Fije el panel del monitor
JVC
Troubleshooting
Localización DE Averias
Lye
E0984
Italiano
Upolorneni
Before installation, remove the screw
Control panel to the main unit
3el=
PO BOX BEDFORD, TX
Product Registration
Gaiantii
Pour tout produit utilise a des fins
To OUR Valued Customer
JVC