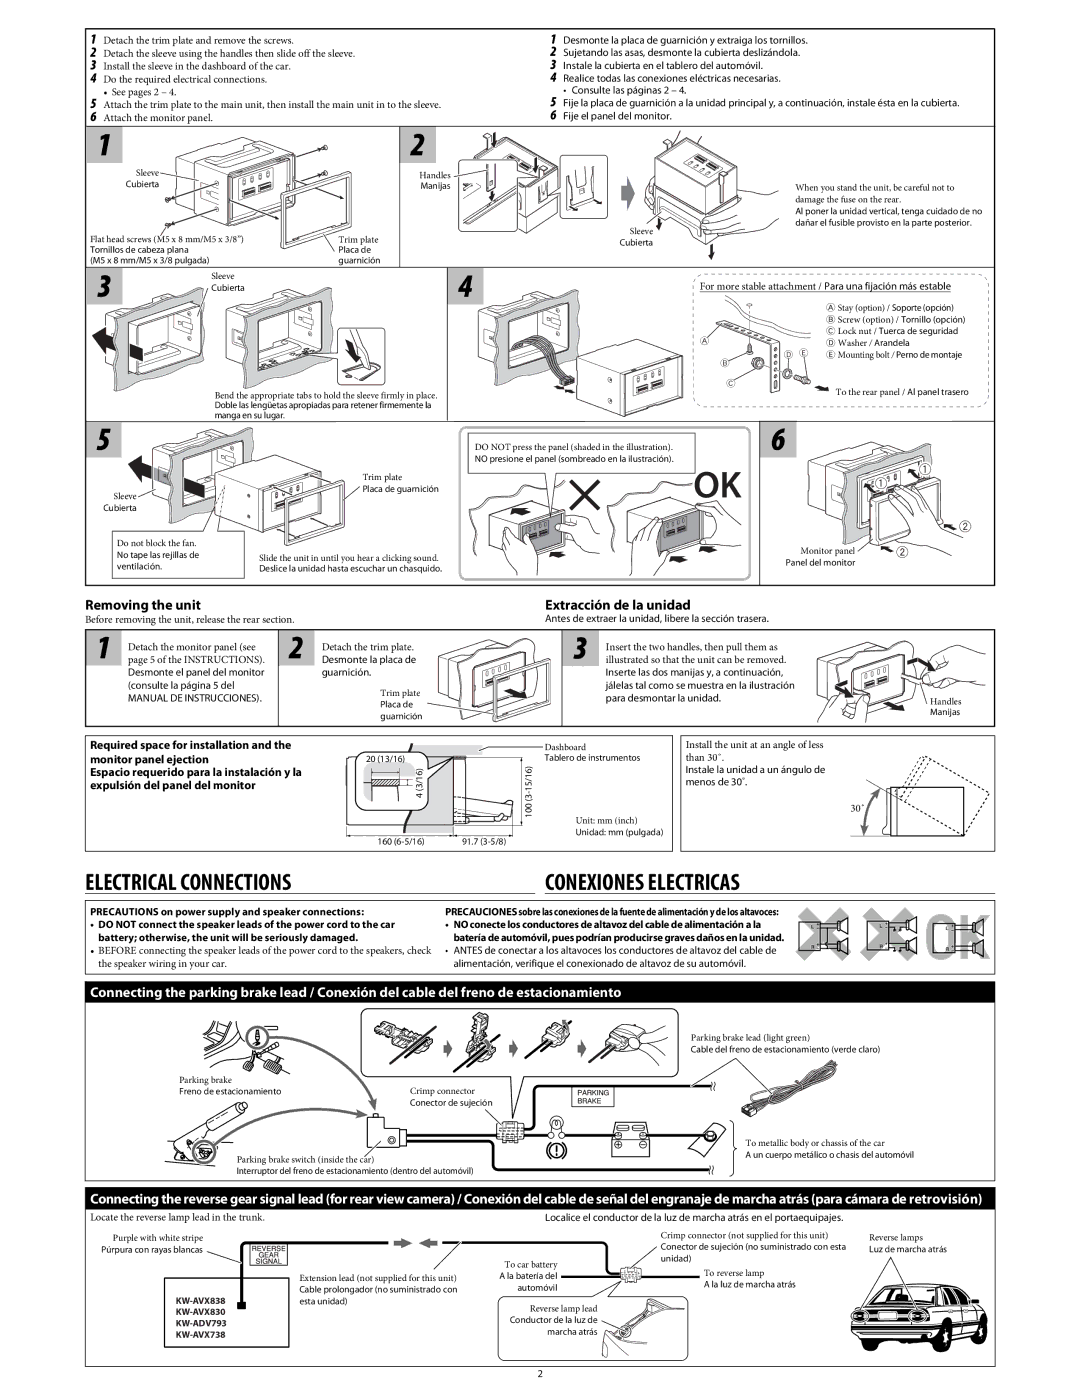
1 Detach the trim plate and remove the screws. |
| 1 Desmonte la placa de guarnición y extraiga los tornillos. |
| ||||
2 | Detach the sleeve using the handles then slide off the sleeve. | 2 | Sujetando las asas, desmonte la cubierta deslizándola. |
| |||
3 | Install the sleeve in the dashboard of the car. |
| 3 | Instale la cubierta en el tablero del automóvil. |
|
| |
4 | Do the required electrical connections. |
| 4 | Realice todas las conexiones eléctricas necesarias. |
| ||
5 | • See pages 2 – 4. |
|
| 5 | • Consulte las páginas 2 – 4. |
|
|
Attach the trim plate to the main unit, then install the main unit in to the sleeve. | Fije la placa de guarnición a la unidad principal y, a continuación, instale ésta en la cubierta. | ||||||
6 | Attach the monitor panel. |
| 6 | Fije el panel del monitor. |
|
| |
| 1 |
| 2 |
|
|
|
|
| Sleeve |
| Handles |
|
|
|
|
| Cubierta |
| Manijas |
|
| When you stand the unit, be careful not to | |
|
|
|
|
|
| damage the fuse on the rear. | |
|
|
|
|
|
| Al poner la unidad vertical, tenga cuidado de no | |
|
|
|
|
| Sleeve | dañar el fusible provisto en la parte posterior. | |
Flat head screws (M5 x 8 mm/M5 x 3/8”) | Trim plate |
|
|
| |||
| Cubierta |
|
| ||||
Tornillos de cabeza plana |
| Placa de |
|
|
|
| |
(M5 x 8 mm/M5 x 3/8 pulgada) |
| guarnición | 4 |
|
|
| |
| 3 | Sleeve |
| For more stable attachment / Para una fijación más estable | |||
| Cubierta |
| |||||
|
|
|
|
| A Stay (option) / Soporte (opción) | ||
|
|
|
|
|
|
| |
|
|
|
|
|
|
| B Screw (option) / Tornillo (opción) |
|
|
|
|
| A |
| C Lock nut / Tuerca de seguridad |
|
|
|
|
|
| D Washer / Arandela | |
|
|
|
|
| B | D E | E Mounting bolt / Perno de montaje |
|
|
|
|
| C |
| To the rear panel / Al panel trasero |
|
| Bend the appropriate tabs to hold the sleeve firmly in place. |
|
|
| ||
|
| Doble las lengüetas apropiadas para retener firmemente la |
|
|
|
| |
5 | manga en su lugar. |
|
|
| 6 |
| |
|
| DO NOT press the panel (shaded in the illustration). |
| ||||
|
|
|
| NO presione el panel (sombreado en la ilustración). |
|
| |
|
|
| Trim plate |
| OK |
|
|
| Sleeve |
| Placa de guarnición |
|
|
| |
|
|
|
|
|
| ||
| Cubierta |
|
|
|
|
|
|
| Do not block the fan. |
|
|
|
| Monitor panel | |
| No tape las rejillas de | Slide the unit in until you hear a clicking sound. |
|
| |||
|
|
| Panel del monitor | ||||
| ventilación. | Deslice la unidad hasta escuchar un chasquido. |
|
| |||
|
|
|
|
| |||
Removing the unit
Before removing the unit, release the rear section.
Extracción de la unidad
Antes de extraer la unidad, libere la sección trasera.
1Detach the monitor panel (see page 5 of the INSTRUCTIONS).
Desmonte el panel del monitor (consulte la página 5 del
MANUAL DE INSTRUCCIONES).
2Detach the trim plate.
Desmonte la placa de guarnición.
Trim plate
Placa de guarnición
3Insert the two handles, then pull them as illustrated so that the unit can be removed.
Inserte las dos manijas y, a continuación, jálelas tal como se muestra en la ilustración para desmontar la unidad.
![]() Handles
Handles
Manijas
Required space for installation and the monitor panel ejection
Espacio requerido para la instalación y la expulsión del panel del monitor
|
| Dashboard |
20 (13/16) | Tablero de instrumentos | |
4 (3/16) |
| |
| 100 | Unit: mm (inch) |
|
| |
160 | 91.7 | Unidad: mm (pulgada) |
|
Install the unit at an angle of less than 30˚.
Instale la unidad a un ángulo de menos de 30˚.
30˚
ELECTRICAL CONNECTIONS |
| CONEXIONES ELECTRICAS |
PRECAUTIONS on power supply and speaker connections:
•DO NOT connect the speaker leads of the power cord to the car battery; otherwise, the unit will be seriously damaged.
•BEFORE connecting the speaker leads of the power cord to the speakers, check the speaker wiring in your car.
PRECAUCIONES sobre las conexiones de la fuente de alimentación y de los altavoces:
•NO conecte los conductores de altavoz del cable de alimentación a la batería de automóvil, pues podrían producirse graves daños en la unidad.
•ANTES de conectar a los altavoces los conductores de altavoz del cable de alimentación, verifique el conexionado de altavoz de su automóvil.
Connecting the parking brake lead / Conexión del cable del freno de estacionamiento
| Parking brake lead (light green) |
| Cable del freno de estacionamiento (verde claro) |
Parking brake | Crimp connector |
Freno de estacionamiento | |
| Conector de sujeción |
| To metallic body or chassis of the car |
Parking brake switch (inside the car) | A un cuerpo metálico o chasis del automóvil |
|
Interruptor del freno de estacionamiento (dentro del automóvil)
Connecting the reverse gear signal lead (for rear view camera) / Conexión del cable de señal del engranaje de marcha atrás (para cámara de retrovisión)
Locate the reverse lamp lead in the trunk.
Localice el conductor de la luz de marcha atrás en el portaequipajes.
Purple with white stripe
Púrpura con rayas blancas
To car battery
Crimp connector (not supplied for this unit)
Conector de sujeción (no suministrado con esta unidad)
Reverse lamps
Luz de marcha atrás
KW-AVX838 KW-AVX830 KW-ADV793 KW-AVX738
Extension lead (not supplied for this unit)
Cable prolongador (no suministrado con esta unidad)
A la batería del ![]()
![]()
![]() To reverse lamp
To reverse lamp
automóvil | A la luz de marcha atrás |
Reverse lamp lead
Conductor de la luz de marcha atrás
2