ENGLISH
ESPAÑOL
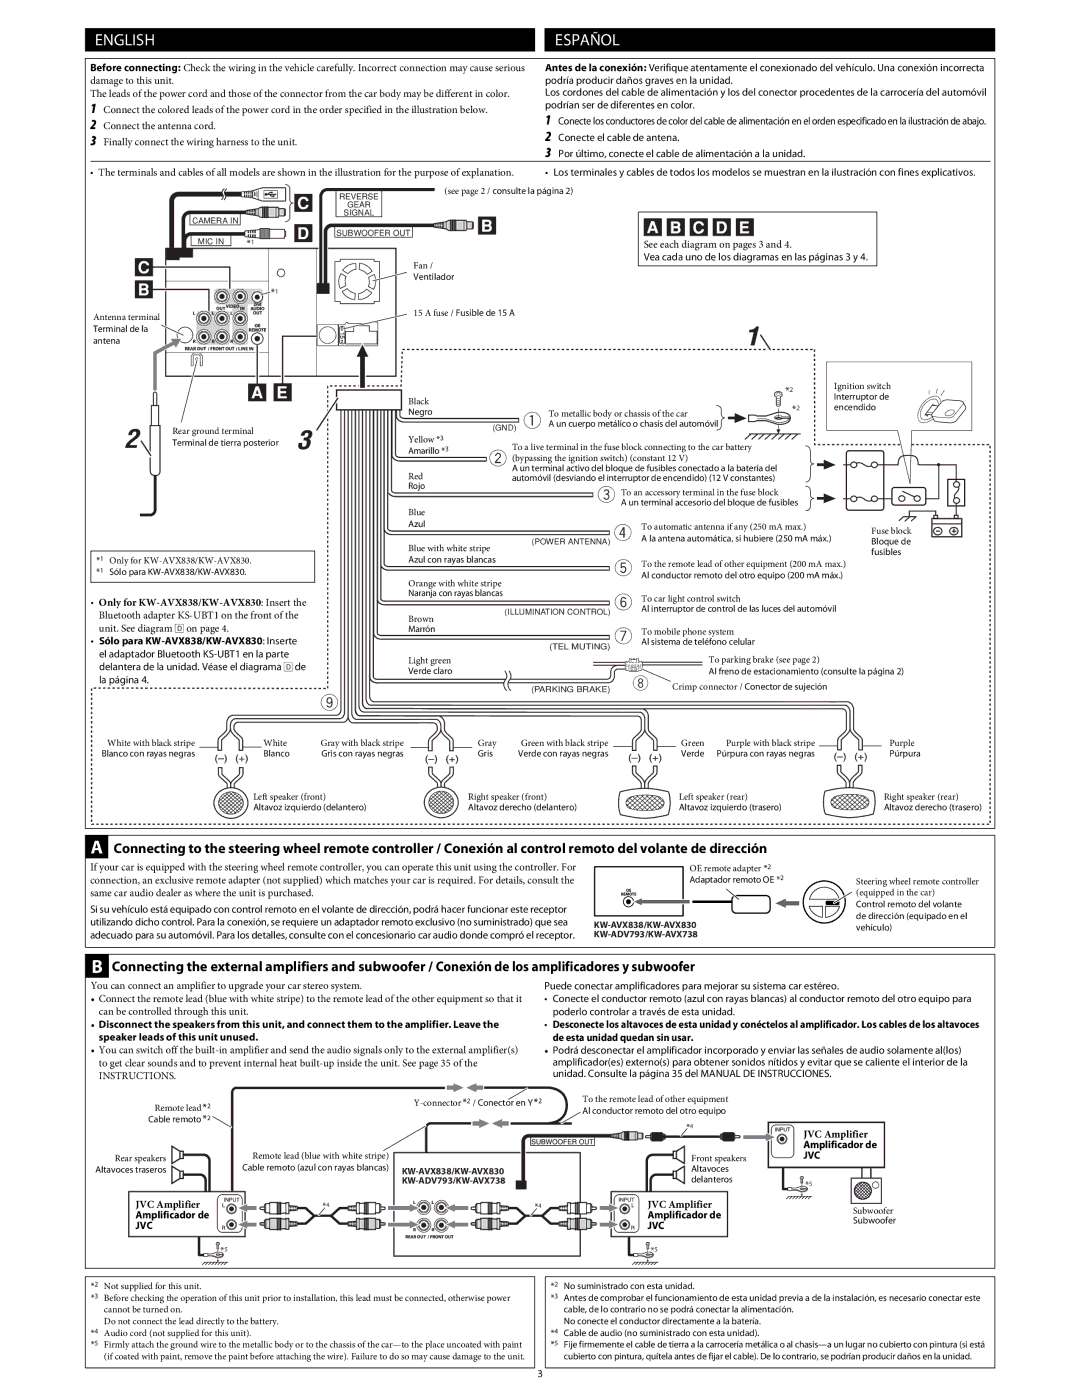
Before connecting: Check the wiring in the vehicle carefully. Incorrect connection may cause serious damage to this unit.
The leads of the power cord and those of the connector from the car body may be different in color.
1Connect the colored leads of the power cord in the order specified in the illustration below.
2Connect the antenna cord.
3Finally connect the wiring harness to the unit.
Antes de la conexión: Verifique atentamente el conexionado del vehículo. Una conexión incorrecta podría producir daños graves en la unidad.
Los cordones del cable de alimentación y los del conector procedentes de la carrocería del automóvil podrían ser de diferentes en color.
1Conecte los conductores de color del cable de alimentación en el orden especificado en la ilustración de abajo.
2Conecte el cable de antena.
3Por último, conecte el cable de alimentación a la unidad.
• The terminals and cables of all models are shown in the illustration for the purpose of explanation. | • Los terminales y cables de todos los modelos se muestran en la ilustración con fines explicativos. |
|
|
|
| (see page 2 / consulte la página 2) |
|
| |
|
|
|
| REVERSE |
|
|
|
|
|
|
| GEAR |
|
|
|
| CAMERA IN |
|
| SIGNAL |
|
|
|
|
|
|
|
|
|
| |
| MIC IN | *1 |
| SUBWOOFER OUT | See each diagram on pages 3 and 4. |
| |
|
|
|
| ||||
|
|
|
| Fan / | Vea cada uno de los diagramas en las páginas 3 y 4. | ||
|
|
|
|
|
|
| |
|
|
|
| Ventilador |
|
|
|
|
| *1 |
|
|
|
|
|
Antenna terminal |
|
|
| 15 A fuse / Fusible de 15 A |
|
| |
|
|
|
| 1 |
|
| |
Terminal de la |
|
|
|
|
|
| |
antena |
|
|
|
|
|
| |
|
|
|
|
|
| *2 | Ignition switch |
|
|
|
| Black |
|
| Interruptor de |
|
|
|
|
| *2 | encendido | |
|
|
|
| Negro | To metallic body or chassis of the car | ||
2 | Rear ground terminal | 3 |
| (GND) 1 A un cuerpo metálico o chasis del automóvil |
|
| |
Yellow *3 |
|
|
| ||||
Terminal de tierra posterior | To a live terminal in the fuse block connecting to the car battery |
|
| ||||
Amarillo *3 |
|
| |||||
|
|
|
|
| 2 (bypassing the ignition switch) (constant 12 V) |
|
|
|
|
|
| Red | A un terminal activo del bloque de fusibles conectado a la batería del |
|
|
|
|
|
| automóvil (desviando el interruptor de encendido) (12 V constantes) |
|
| |
|
|
|
| Rojo | 3 To an accessory terminal in the fuse block |
|
|
|
|
|
|
|
|
| |
|
|
|
| Blue | A un terminal accesorio del bloque de fusibles |
| |
|
|
|
|
|
|
| |
|
|
|
|
| Azul | 4 | To automatic antenna if any (250 mA max.) | Fuse block | ||
|
|
|
|
|
| A la antena automática, si hubiere (250 mA máx.) | ||||
|
|
|
|
|
| Bloque de | ||||
|
|
|
|
| Blue with white stripe | (POWER ANTENNA) |
|
|
| |
|
|
|
|
|
|
|
|
| fusibles | |
| *1 | Only for |
|
| Azul con rayas blancas |
|
|
|
| |
|
|
| 5 | To the remote lead of other equipment (200 mA max.) |
| |||||
| *1 | Sólo para |
|
|
|
| ||||
|
|
|
|
| Orange with white stripe |
| Al conductor remoto del otro equipo (200 mA máx.) |
| ||
|
|
|
|
|
|
|
|
|
| |
• | Only for |
| Naranja con rayas blancas | 6 | To car light control switch |
| ||||
|
|
| ||||||||
| Bluetooth adapter |
| Brown | (ILLUMINATION CONTROL) | Al interruptor de control de las luces del automóvil |
| ||||
|
|
|
|
|
|
| ||||
| unit. See diagram Î on page 4. |
|
| Marrón | 7 | To mobile phone system |
| |||
• | Sólo para |
|
| Al sistema de teléfono celular |
| |||||
| el adaptador Bluetooth |
|
| (TEL MUTING) |
|
|
|
| ||
|
| Light green |
|
|
| To parking brake (see page 2) |
| |||
| delantera de la unidad. Véase el diagrama Î de |
|
|
|
|
| ||||
|
| Verde claro |
|
|
| Al freno de estacionamiento (consulte la página 2) | ||||
| la página 4. |
|
|
| 8 |
| ||||
|
|
|
| (PARKING BRAKE) | Crimp connector / Conector de sujeción |
| ||||
|
|
|
|
|
|
|
| |||
|
|
|
| 9 |
|
|
|
|
|
|
|
| White with black stripe | White | Gray with black stripe | Gray | Green with black stripe |
| Green | Purple with black stripe | Purple |
| Blanco con rayas negras | Blanco | Gris con rayas negras | Gris | Verde con rayas negras |
| Verde | Púrpura con rayas negras | Púrpura | |
|
|
| Left speaker (front) | Right speaker (front) |
| Left speaker (rear) | Right speaker (rear) | |||
|
|
| Altavoz izquierdo (delantero) | Altavoz derecho (delantero) |
| Altavoz izquierdo (trasero) | Altavoz derecho (trasero) | |||
AConnecting to the steering wheel remote controller / Conexión al control remoto del volante de dirección
If your car is equipped with the steering wheel remote controller, you can operate this unit using the controller. For |
| OE remote adapter *2 | ||
connection, an exclusive remote adapter (not supplied) which matches your car is required. For details, consult the |
| Adaptador remoto OE *2 | ||
same car audio dealer as where the unit is purchased. |
|
|
|
|
Si su vehículo está equipado con control remoto en el volante de dirección, podrá hacer funcionar este receptor |
|
|
|
|
utilizando dicho control. Para la conexión, se requiere un adaptador remoto exclusivo (no suministrado) que sea | ||||
adecuado para su automóvil. Para los detalles, consulte con el concesionario car audio donde compró el receptor. |
| |||
Steering wheel remote controller (equipped in the car)
Control remoto del volante de dirección (equipado en el vehículo)
BConnecting the external amplifiers and subwoofer / Conexión de los amplificadores y subwoofer
You can connect an amplifier to upgrade your car stereo system.
•Connect the remote lead (blue with white stripe) to the remote lead of the other equipment so that it can be controlled through this unit.
Puede conectar amplificadores para mejorar su sistema car estéreo.
•Conecte el conductor remoto (azul con rayas blancas) al conductor remoto del otro equipo para poderlo controlar a través de esta unidad.
•Disconnect the speakers from this unit, and connect them to the amplifier. Leave the speaker leads of this unit unused.
•You can switch off the
INSTRUCTIONS.
•Desconecte los altavoces de esta unidad y conéctelos al amplificador. Los cables de los altavoces de esta unidad quedan sin usar.
•Podrá desconectar el amplificador incorporado y enviar las señales de audio solamente al(los) amplificador(es) externo(s) para obtener sonidos nítidos y evitar que se caliente el interior de la unidad. Consulte la página 35 del MANUAL DE INSTRUCCIONES.
Remote lead *2 |
|
Cable remoto *2 |
|
Rear speakers | Remote lead (blue with white stripe) |
Altavoces traseros | Cable remoto (azul con rayas blancas) |
JVC Amplifier | *4 |
Amplificador de
JVC
![]() *5
*5
KW-AVX838/KW-AVX830
KW-ADV793/KW-AVX738
*4
To the remote lead of other equipment
Al conductor remoto del otro equipo
*4
Front speakers
Altavoces delanteros
JVC Amplifier
Amplificador de
JVC
![]() *5
*5
JVC Amplifier Amplificador de
JVC
![]() *5
*5
Subwoofer
Subwoofer
*2 Not supplied for this unit.
*3 Before checking the operation of this unit prior to installation, this lead must be connected, otherwise power cannot be turned on.
Do not connect the lead directly to the battery. *4 Audio cord (not supplied for this unit).
*5 Firmly attach the ground wire to the metallic body or to the chassis of the
*2 | No suministrado con esta unidad. |
*3 | Antes de comprobar el funcionamiento de esta unidad previa a de la instalación, es necesario conectar este |
| cable, de lo contrario no se podrá conectar la alimentación. |
| No conecte el conductor directamente a la batería. |
*4 | Cable de audio (no suministrado con esta unidad). |
*5 | Fije firmemente el cable de tierra a la carrocería metálica o al |
| cubierto con pintura, quítela antes de fijar el cable). De lo contrario, se podrían producir daños en la unidad. |
3