50![]()
![]()
![]() EN
EN![]()
![]()
![]()
![]()
![]()
![]()
![]()
![]()
![]()
![]()
![]()
![]()
![]()
![]()
![]()
![]()
![]()
![]()
![]()
![]()
![]()
![]()
![]()
![]()
![]()
![]()
![]()
![]()
![]()
![]()
![]()
![]()
![]()
![]()
![]()
![]()
![]()
![]()
![]()
![]()
![]()
![]()
![]()
![]()
![]()
![]()
![]()
![]()
![]()
![]()
![]()
![]()
![]()
![]()
![]()
TIMER RECORDING
 (cont.)


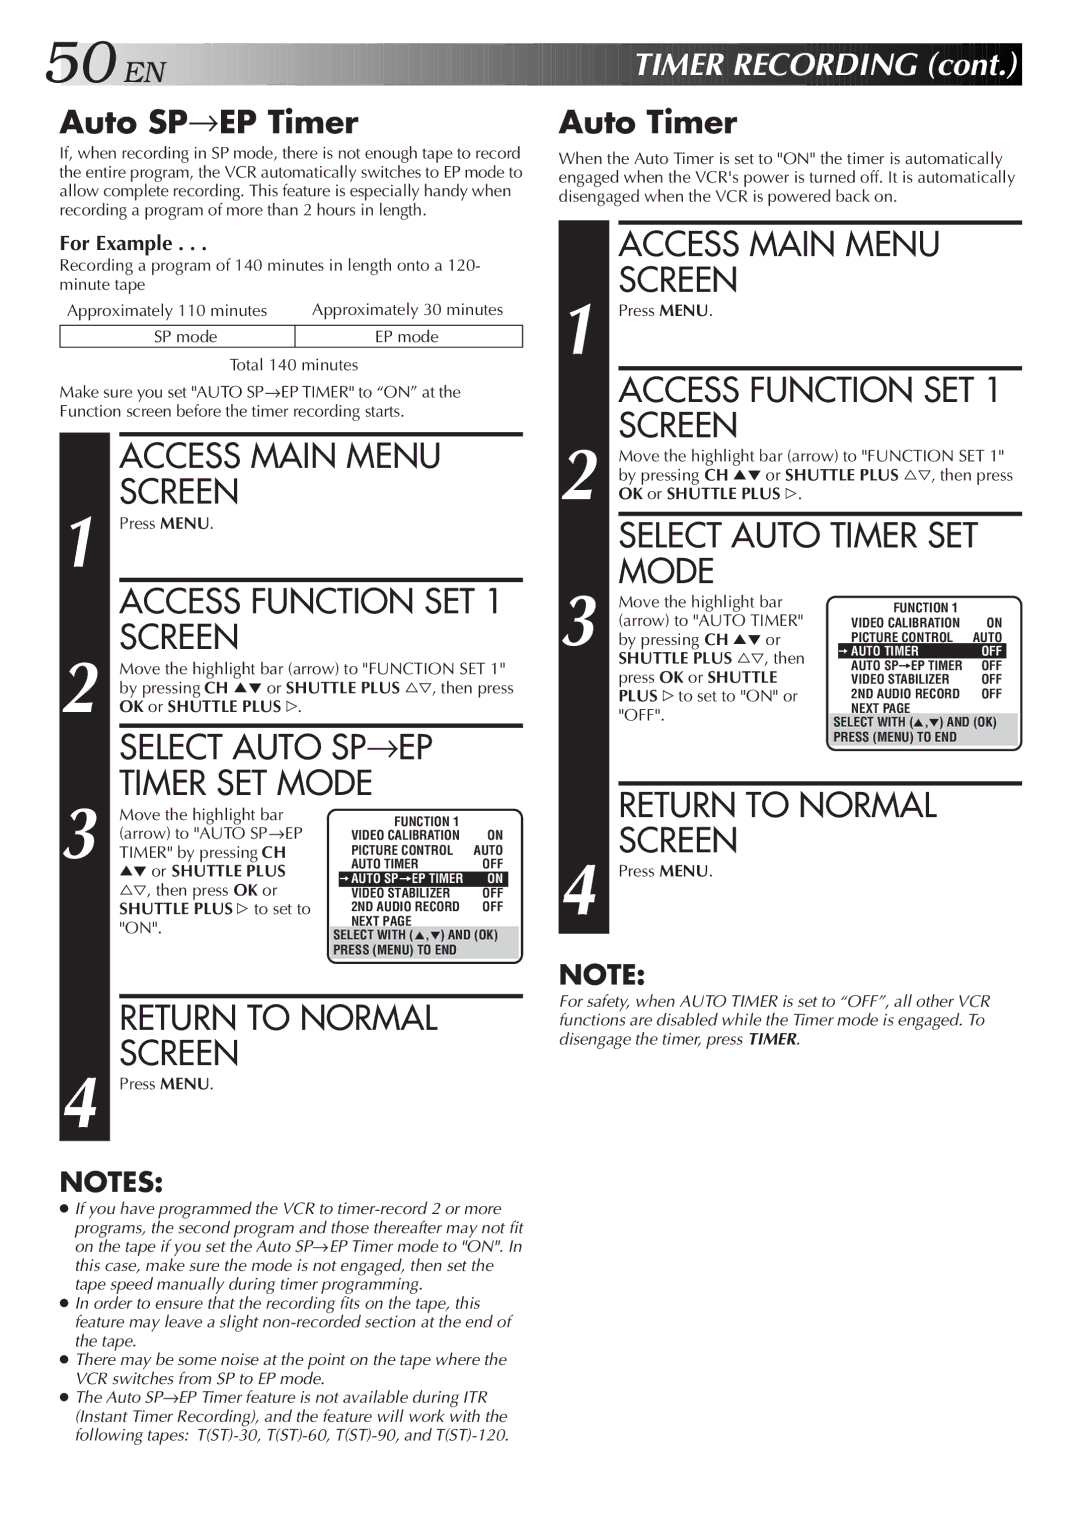
Auto SP→EP Timer
If, when recording in SP mode, there is not enough tape to record the entire program, the VCR automatically switches to EP mode to allow complete recording. This feature is especially handy when recording a program of more than 2 hours in length.
Auto Timer
When the Auto Timer is set to "ON" the timer is automatically engaged when the VCR's power is turned off. It is automatically disengaged when the VCR is powered back on.
For Example . . .
Recording a program of 140 minutes in length onto a 120- minute tape
Approximately 110 minutes | Approximately 30 minutes |
|
|
SP mode | EP mode |
Total 140 minutes
Make sure you set "AUTO SP→EP TIMER" to “ON” at the Function screen before the timer recording starts.
|
| ACCESS MAIN MENU |
|
|
| ||
1 |
| SCREEN |
|
|
|
|
|
| Press MENU. |
|
|
|
|
| |
|
| ACCESS FUNCTION SET 1 | |||||
2 |
| SCREEN |
|
|
|
|
|
| Move the highlight bar (arrow) to "FUNCTION SET 1" | ||||||
| by pressing CH 5° or SHUTTLE PLUS %Þ, then press | ||||||
| OK or SHUTTLE PLUS #. |
|
|
|
|
| |
|
|
|
| → |
|
|
|
|
| SELECT AUTO SP EP |
|
|
| ||
3 |
| TIMER SET MODE |
|
|
| ||
| Move the highlight bar |
| FUNCTION 1 |
|
|
| |
| (arrow) to "AUTO SP→EP |
|
|
|
| ||
|
| VIDEO CALIBRATION | ON | ||||
| TIMER" by pressing CH |
| PICTURE CONTROL | AUTO | |||
|
| AUTO TIMER | OFF | ||||
|
| 5° or SHUTTLE PLUS |
|
|
|
| |
|
|
| =AUTO SP=EP TIMER | ON | |||
|
| %Þ, then press OK or |
| VIDEO STABILIZER | OFF |
| |
|
| SHUTTLE PLUS # to set to |
| 2ND AUDIO RECORD | OFF | ||
|
| "ON". |
| NEXT PAGE |
|
|
|
|
| SELECT WITH (5,°) AND (OK) |
| ||||
|
|
|
| ||||
|
|
| PRESS (MENU) TO END |
|
|
| |
|
|
|
|
|
|
|
|
|
| RETURN TO NORMAL |
|
|
| ||
4 |
| SCREEN |
|
|
|
|
|
| Press MENU. |
|
|
|
|
| |
NOTES:
If you have programmed the VCR to
In order to ensure that the recording fits on the tape, this feature may leave a slight
There may be some noise at the point on the tape where the VCR switches from SP to EP mode.
The Auto SP→EP Timer feature is not available during ITR (Instant Timer Recording), and the feature will work with the following tapes:
|
|
| ACCESS MAIN MENU |
|
|
| ||
| 1 |
| SCREEN |
|
|
|
|
|
|
| Press MENU. |
|
|
|
|
| |
|
|
| ACCESS FUNCTION SET 1 | |||||
| 2 |
| SCREEN |
|
|
|
|
|
|
| Move the highlight bar (arrow) to "FUNCTION SET 1" | ||||||
|
| by pressing CH 5° or SHUTTLE PLUS %Þ, then press | ||||||
|
| OK or SHUTTLE PLUS #. |
|
|
|
|
| |
|
|
| SELECT AUTO TIMER SET | |||||
| 3 |
| MODE |
|
|
|
|
|
|
| Move the highlight bar |
| FUNCTION 1 |
|
|
| |
|
| (arrow) to "AUTO TIMER" |
| VIDEO CALIBRATION | ON | |||
|
| by pressing CH 5° or |
| PICTURE CONTROL | AUTO | |||
|
|
| =AUTO TIMER | OFF |
| |||
|
|
| SHUTTLE PLUS %Þ, then |
| AUTO SP=EP TIMER | OFF |
| |
|
|
| press OK or SHUTTLE |
| VIDEO STABILIZER | OFF | ||
|
|
| PLUS #to set to "ON" or |
| 2ND AUDIO RECORD | OFF | ||
|
|
| "OFF". |
| NEXT PAGE |
|
|
|
|
|
| SELECT WITH (5,°) AND (OK) |
| ||||
|
|
|
|
| ||||
|
|
|
| PRESS (MENU) TO END |
|
|
| |
|
|
|
|
|
|
|
|
|
|
|
| RETURN TO NORMAL |
|
|
| ||
| 4 |
| SCREEN |
|
|
|
|
|
|
| Press MENU. |
|
|
|
|
| |
NOTE:
For safety, when AUTO TIMER is set to “OFF”, all other VCR functions are disabled while the Timer mode is engaged. To disengage the timer, press TIMER.