5 SETTING OF THE FUNCTION MENU SWITCHES
You can customize the VCR's functions to suit the requirements of your application using
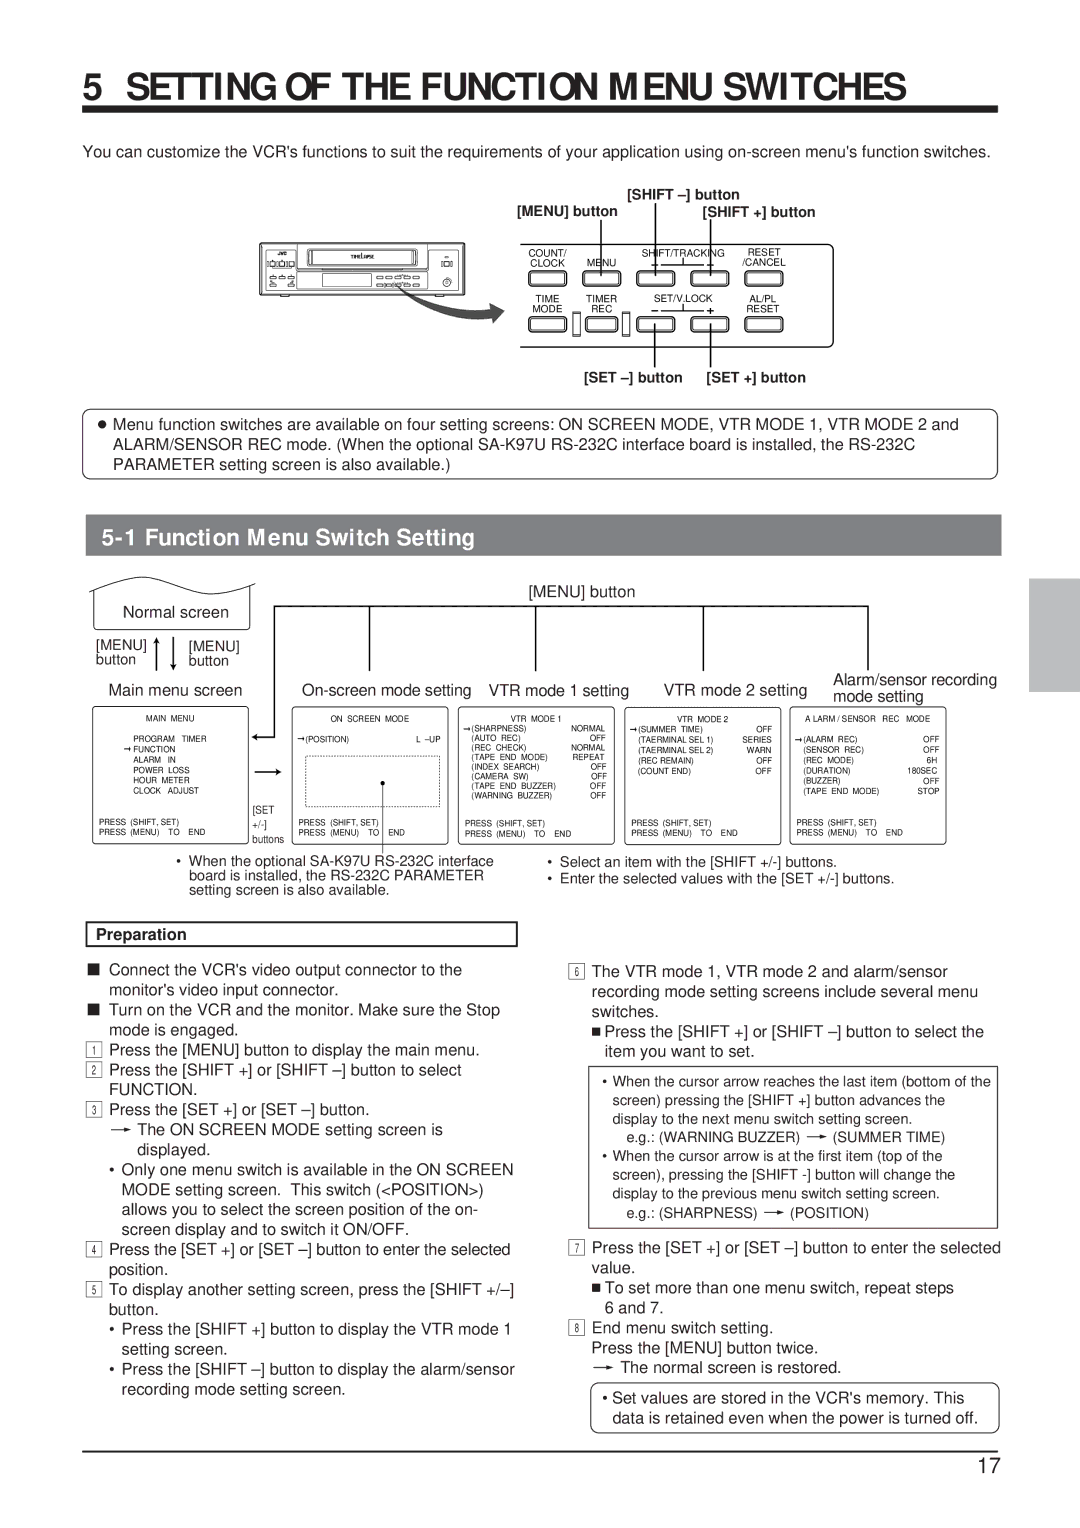
[MENU] button | [SHIFT | ||
[SHIFT +] button | |||
COUNT/ |
| SHIFT/TRACKING | RESET |
CLOCK | MENU |
| /CANCEL |
TIME | TIMER | SET/V.LOCK | AL/PL |
MODE | REC |
| RESET |
[SET
●Menu function switches are available on four setting screens: ON SCREEN MODE, VTR MODE 1, VTR MODE 2 and ALARM/SENSOR REC mode. (When the optional
5-1 Function Menu Switch Setting
[MENU] button
Normal screen |
|
|
|
|
|
|
|
|
|
|
|
|
|
|
|
|
| ||||
[MENU] |
|
|
| [MENU] |
|
|
|
|
|
|
|
|
|
|
|
|
|
|
|
|
|
|
|
|
|
|
|
|
|
|
|
|
|
|
|
|
|
|
|
| |||
button |
|
|
| button |
|
|
|
|
|
|
|
|
|
|
|
|
|
|
|
|
|
Main menu screen |
|
|
|
| VTR mode 2 setting | Alarm/sensor recording | |||||||||||||||
|
|
|
| mode setting | |||||||||||||||||
|
|
|
|
|
|
|
|
|
|
|
|
|
|
|
|
|
|
| |||
MAIN MENU |
|
|
|
| ON SCREEN MODE | VTR MODE 1 |
| VTR MODE 2 |
| A LARM / SENSOR | REC MODE | ||||||||||
|
|
|
|
|
|
|
|
|
|
|
| (SHARPNESS) | NORMAL | (SUMMER TIME) | OFF |
|
|
|
| ||
PROGRAM TIMER |
|
|
|
| (POSITION) | L | (AUTO REC) | OFF | (TAERMINAL SEL 1) | SERIES | (ALARM REC) | OFF | |||||||||
|
|
|
| ||||||||||||||||||
FUNCTION |
|
|
|
|
|
|
| (REC CHECK) | NORMAL | (TAERMINAL SEL 2) | WARN | (SENSOR REC) | OFF | ||||||||
ALARM | IN |
|
|
|
|
|
|
| (TAPE END MODE) | REPEAT | (REC REMAIN) | OFF | (REC MODE) | 6H | |||||||
|
|
|
|
|
|
| (INDEX SEARCH) | OFF | |||||||||||||
POWER LOSS |
|
|
|
|
|
|
| (COUNT END) | OFF | (DURATION) | 180SEC | ||||||||||
|
|
|
|
|
|
| (CAMERA SW) | OFF | |||||||||||||
HOUR METER |
|
|
|
|
|
| ● |
|
|
| (BUZZER) | OFF | |||||||||
|
|
|
|
|
| (TAPE END BUZZER) | OFF |
|
|
| |||||||||||
CLOCK | ADJUST |
|
|
|
|
|
|
|
|
| (TAPE END MODE) | STOP | |||||||||
|
|
|
|
|
|
| (WARNING BUZZER) | OFF |
|
|
| ||||||||||
|
|
|
|
|
|
|
|
|
|
|
|
|
|
|
|
|
|
| |||
|
|
|
|
| [SET |
|
|
|
|
|
|
|
|
|
|
|
|
| |||
PRESS (SHIFT, SET) |
|
| PRESS (SHIFT, SET) |
| PRESS (SHIFT, SET) |
| PRESS (SHIFT, SET) |
| PRESS (SHIFT, SET) |
| |||||||||||
PRESS (MENU) | TO END | buttons | PRESS (MENU) TO | END | PRESS (MENU) TO END | PRESS (MENU) TO END |
| PRESS (MENU) TO | END | ||||||||||||
|
|
|
|
|
|
|
|
|
|
|
|
|
|
|
|
|
| ||||
•When the optional
•Select an item with the [SHIFT
•Enter the selected values with the [SET
Preparation
5Connect the VCR's video output connector to the monitor's video input connector.
5Turn on the VCR and the monitor. Make sure the Stop mode is engaged.
1Press the [MENU] button to display the main menu.
2 Press the [SHIFT +] or [SHIFT
FUNCTION.
3 Press the [SET +] or [SET
[The ON SCREEN MODE setting screen is displayed.
•Only one menu switch is available in the ON SCREEN MODE setting screen. This switch (<POSITION>) allows you to select the screen position of the on-
screen display and to switch it ON/OFF.
4Press the [SET +] or [SET
position.
5To display another setting screen, press the [SHIFT
•Press the [SHIFT +] button to display the VTR mode 1 setting screen.
•Press the [SHIFT
6The VTR mode 1, VTR mode 2 and alarm/sensor recording mode setting screens include several menu switches.
■Press the [SHIFT +] or [SHIFT
•When the cursor arrow reaches the last item (bottom of the screen) pressing the [SHIFT +] button advances the display to the next menu switch setting screen.
e.g.: (WARNING BUZZER) [(SUMMER TIME)
•When the cursor arrow is at the first item (top of the screen), pressing the [SHIFT
e.g.: (SHARPNESS) [(POSITION)
7Press the [SET +] or [SET
■ To set more than one menu switch, repeat steps
6 and 7.
8End menu switch setting. Press the [MENU] button twice. [ The normal screen is restored.
•Set values are stored in the VCR's memory. This data is retained even when the power is turned off.
17