5 SETTING OF THE FUNCTION MENU SWITCHES
5-2 Contents of the Function Menu Switches
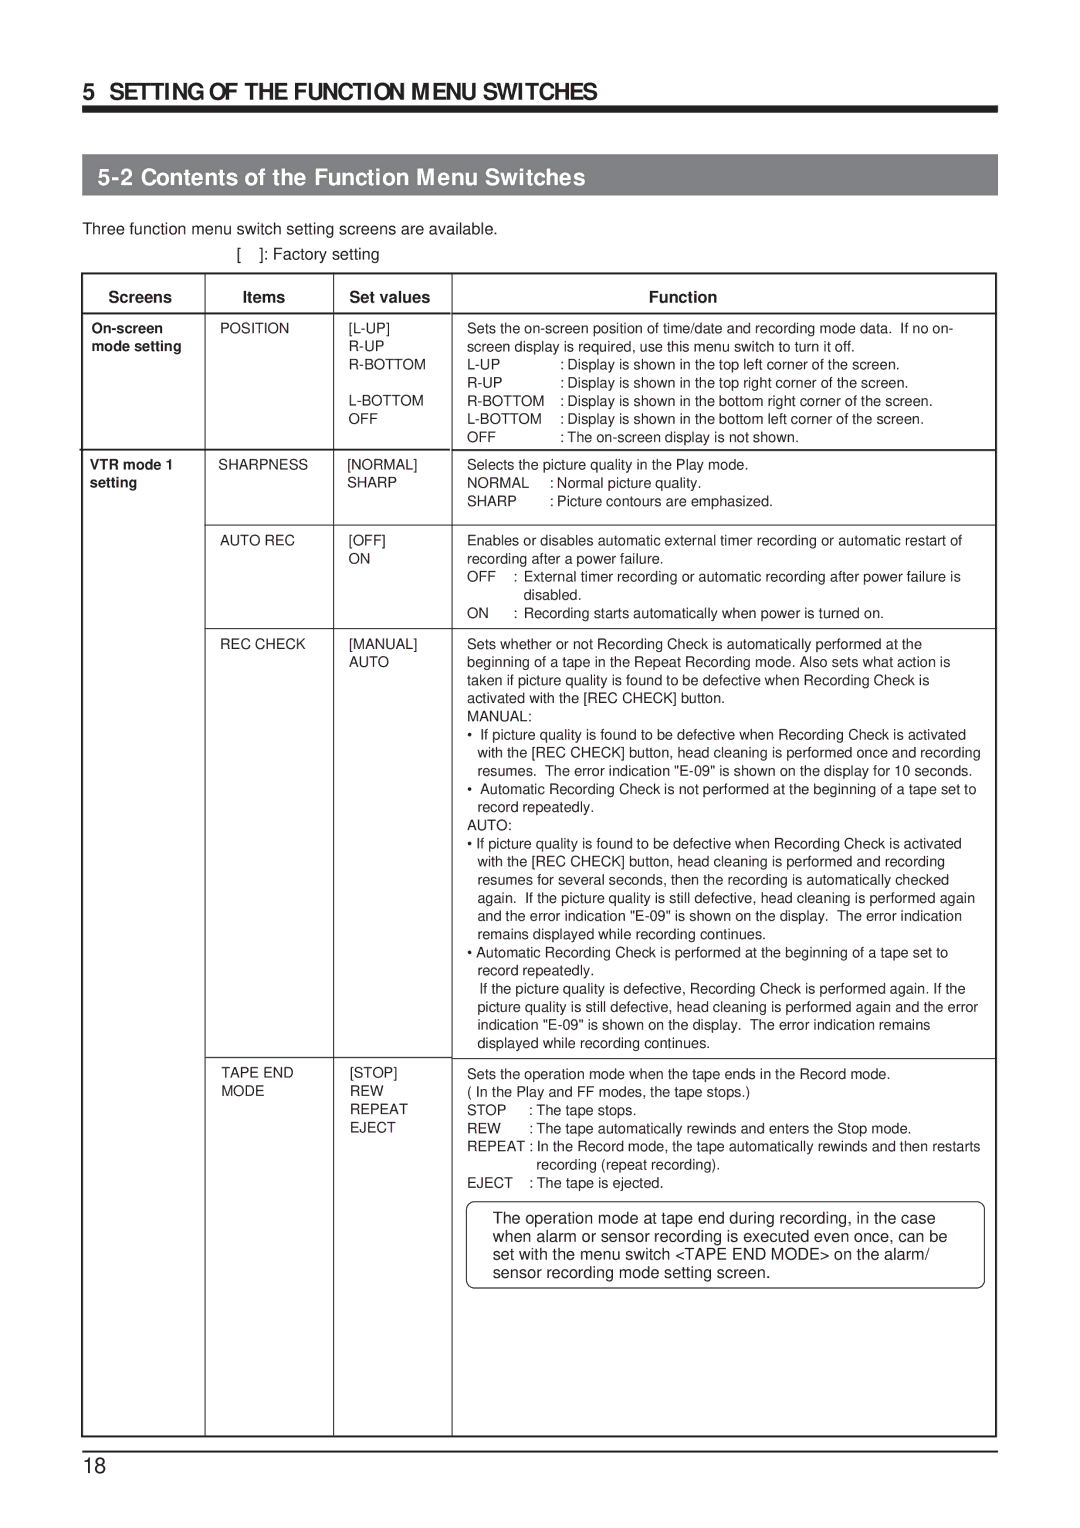
Three function menu switch setting screens are available.
[ ]: Factory setting
| Screens | Items | Set values |
|
|
| Function |
|
|
|
|
| |||
| POSITION | Sets the | |||||
| mode setting |
| screen display is required, use this menu switch to turn it off. | ||||
|
|
|
| : Display is shown in the top left corner of the screen. | |||
|
|
|
|
| : Display is shown in the top right corner of the screen. | ||
|
|
| : Display is shown in the bottom right corner of the screen. | ||||
|
|
| OFF | : Display is shown in the bottom left corner of the screen. | |||
|
|
|
| OFF |
| : The | |
|
|
|
|
| |||
| VTR mode 1 | SHARPNESS | [NORMAL] | Selects the picture quality in the Play mode. | |||
| setting |
| SHARP | NORMAL | : Normal picture quality. | ||
|
|
|
| SHARP | : Picture contours are emphasized. | ||
|
|
|
|
| |||
|
| AUTO REC | [OFF] | Enables or disables automatic external timer recording or automatic restart of | |||
|
|
| ON | recording after a power failure. | |||
|
|
|
| OFF | : External timer recording or automatic recording after power failure is | ||
|
|
|
|
|
| disabled. | |
|
|
|
| ON | : Recording starts automatically when power is turned on. | ||
|
|
|
|
| |||
|
| REC CHECK | [MANUAL] | Sets whether or not Recording Check is automatically performed at the | |||
|
|
| AUTO | beginning of a tape in the Repeat Recording mode. Also sets what action is | |||
|
|
|
| taken if picture quality is found to be defective when Recording Check is | |||
|
|
|
| activated with the [REC CHECK] button. | |||
|
|
|
| MANUAL: |
| ||
|
|
|
| • | If picture quality is found to be defective when Recording Check is activated | ||
|
|
|
|
| with the [REC CHECK] button, head cleaning is performed once and recording | ||
|
|
|
|
| resumes. The error indication | ||
|
|
|
| • | Automatic Recording Check is not performed at the beginning of a tape set to | ||
|
|
|
|
| record repeatedly. | ||
|
|
|
| AUTO: |
|
| |
|
|
|
| • If picture quality is found to be defective when Recording Check is activated | |||
|
|
|
|
| with the [REC CHECK] button, head cleaning is performed and recording | ||
|
|
|
|
| resumes for several seconds, then the recording is automatically checked | ||
|
|
|
|
| again. If the picture quality is still defective, head cleaning is performed again | ||
|
|
|
|
| and the error indication | ||
|
|
|
|
| remains displayed while recording continues. | ||
|
|
|
| • Automatic Recording Check is performed at the beginning of a tape set to | |||
|
|
|
|
| record repeatedly. | ||
|
|
|
|
| If the picture quality is defective, Recording Check is performed again. If the | ||
|
|
|
|
| picture quality is still defective, head cleaning is performed again and the error | ||
|
|
|
|
| indication | ||
|
|
|
|
| displayed while recording continues. | ||
|
|
|
|
| |||
|
| TAPE END | [STOP] | Sets the operation mode when the tape ends in the Record mode. | |||
|
| MODE | REW | ( In the Play and FF modes, the tape stops.) | |||
|
|
| REPEAT | STOP | : The tape stops. | ||
|
|
| EJECT | REW | : The tape automatically rewinds and enters the Stop mode. | ||
|
|
|
| REPEAT : In the Record mode, the tape automatically rewinds and then restarts | |||
|
|
|
|
|
| recording (repeat recording). | |
|
|
|
| EJECT | : The tape is ejected. | ||
|
|
|
|
| The operation mode at tape end during recording, in the case | ||
|
|
|
|
| when alarm or sensor recording is executed even once, can be | ||
|
|
|
|
| set with the menu switch <TAPE END MODE> on the alarm/ | ||
|
|
|
|
| sensor recording mode setting screen. | ||
|
|
|
|
|
|
|
|
|
|
|
|
|
|
|
|
18