TH-A5
English
XV-THA5
Important for Laser Products
Table of Contents
Display
Center Unit
Front Panel
Display window
Remote Control
Remote Control
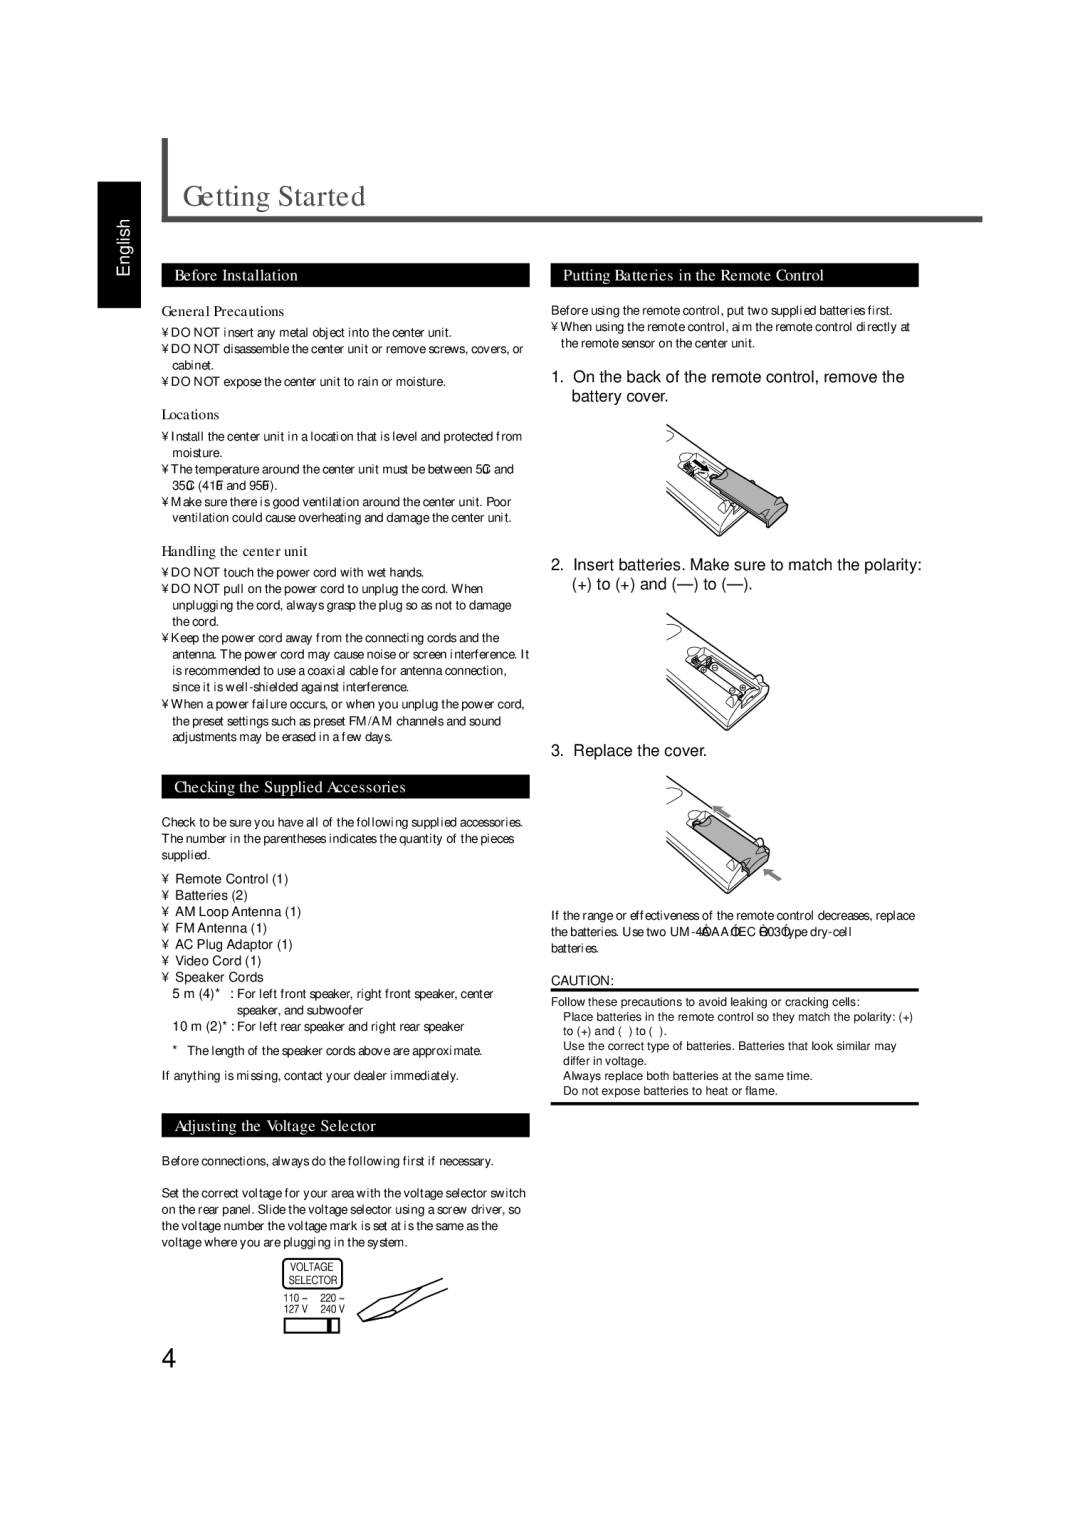
Inside of the Cover
Adjusting the Voltage Selector
Putting Batteries in the Remote Control
On the back of the remote control, remove the battery cover
Checking the Supplied Accessories
FM antenna connection
Connecting the FM and AM Antennas
AM antenna connection
Getting Started
Speaker Layout Diagram
Connecting speaker cords to the terminals
Connecting the Speakers
When setting the speakers
Turn the power off to all components before connections
Connecting Audio/Video Component
Audio component connection
Video cord supplied
TV connection
Start Playback
Turn On the Power
Basic DVD Operations
Load a DVD
Stop Playback
Load a VCD/CD
Basic VCD/CD Operations
You can enjoy DSP modes
Tune into a Station
Basic Tuner Operations
Select the Band
Other Basic Operations
Turning Off the Power with the Timer
Enjoying Sounds from the External Equipment
Before you start, remember
Speaker Settings
Setting the Speaker Information
Press Setting repeatedly until one
For Dolby Digital or DTS Digital Surround
Setting the Delay Time
Press 3 or 2 to adjust delay time
Repeat steps 2 and 3 to adjust the other delay time
Creating Realistic Sound Fields
Available surround according to the input signal format
DSP Digital Signal Processor Modes
Press 3 or 2 to adjust the output level
Press 3 or 2 to adjust the output balance
Adjusting Stereo Sound
To adjust the output level for the subwoofer
From the remote control only Press D.R.C
Adjusting Dolby Digital DTS Digital Surround
Activating Dynamic Range Compression
Adjusting Dolby Surround
Press Sound repeatedly to select the Sound CEN, REAR, or SW
Adjusting DSP Modes
Repeat 1 and 2 for setting the other speaker
Now, you are ready to start the adjustment
Adjusting DSP Sound Parameters
Disc Introduction-DVD/VCD/CD
If appears on the TV screen when pressing a button
Disc structure-DVD, Video CD VCD and Audio CD CD
To remove the disc
Basic Disc Operations
To go to another chapter or track except MP3
To stop during playback
Showing the On-Screen Bar
From the remote control only Press Display
DVD Playback
Changing the Color System
Selecting the Multi-Angle Views
Selecting the Audio Languages
Selecting the Subtitles
Moving to a Particular Portion Directly
Checking the Remaining Time
Disc Menu-Driven Playback
Repeating Playback
Searching for a Particular Point
Programming the Playing Order Chapters-Program Play
To exit from program play
To check the program contents
To erase the stored program
To modify the program
Picture frame by frame
DVD Special Effect Playback
Press Step once during playback
Press Step repeatedly to advance
Sound indication
VCD/CD Playback
Disc Menu-Driven Playback Only for VCD
End point
Press A-B Repeat again to select
To stop during play
Programming the Playing Order Tracks-Program Play
Repeat steps 3 and 4 to program other tracks you want
Press 3 or 2 to select a track number, then Enter
Selecting Playback Channel
Press AUDIO/FM Mode repeatedly
Press Zoom to zoom
VCD Special Effect Playback
Press 3/2/5/∞ to move Enlarged portion you want to Watch
Disc structure-How are MP3 files recorded and played back?
What is MP3?
MP3 Introduction
MP3 File Compatibility
To go off the on-screen bar
MP3 Playback
Starting Playback
Press 0 to load a disc Press 3
MP3 Playback
Operations Using the On-Screen Display
System starts playback from Selected track
Moving to a Particular Track Directly
Press the number buttons to Select a track number you Want
To repeat playback-Repeat Play
Tuning in Stations
Setting the AM Tuner Interval Spacing
Tuner Operations
Selecting the FM Reception Mode
Using Preset Tuning
For OSD Language
Setting up the DVD Preferences
Setting the Initial Languages
Languages you can select on this menu
Press ∞ or 5 to select highlight one of the language items
Press Setup
Basic language selecting procedure
To erase the Setup menu
Menu
Setting the TV screen size
Press Setup again
Setting the Parental Rating Level
Press the number buttons to enter the password 4 digits
To change the password
To operate a JVC’s TV
Operating JVC’s Components
Manufacturers’ codes for TV Codes
If there are more than one code listed for your brand of TV
Operating Other Manufacturers’ TV
Try to operate your TV by pressing TV
Handling Discs
Maintenance
Cleaning the unit
General Notes
VCR Control on button has been pressed
Troubleshooting
Press VCR Control OFF to operate the system. See
Tuner section
Specifications
Amplifier section
Video section
EN, CH 1101KSMMDWSAM
Système DVD Digital Cinema Sistema DE Cinema Digital DE DVD
Precaución
English Español Português
Produto Laser Classe
Adjust the Volume Tune in to a Station
Parts Identification
LOW Soundedit Angle
Getting Started
Component OUT
Getting Started
Connecting the Speakers
Connecting Audio/Video Component
R, P B jacks, connect them using an S-video cord not
Effect Clear
Stop Playback
Basic VCD/CD Operations
You can enjoy DSP modes
Tune in to a Station
Sound Setting
Speaker Settings
Setting the Delay Time
Creating Realistic Sound Fields
DSP Digital Signal Processor Modes
Creating Realistic Sound Fields
Adjusting Dolby Digital DTS Digital Surround
Adjusting Dolby Surround
Adjusting DSP Modes
Adjusting DSP Sound Parameters
Disc Introduction-DVD/VCD/CD
Basic Disc Operations
DVD Playback
DVD Playback
Checking the Remaining Time
To resume normal play
Repeat a appears on the display
To erase the stored program
DVD Special Effect Playback
VCD/CD Playback
To fast-forward the tracks-Variable Speed Forward Search
PBC operation concept
VCD/CD Playback
Increases the number Decreases the number
Selecting Playback Channel
Press Step once during playback
MP3 Introduction
MP3 Playback
SPRING1.MP3
Moving to a Particular Track Directly
Press 7 so that Manual appears on the display
Using Preset Tuning
Setting up the DVD Preferences
Introducing the DVD Preference System
Setting up the DVD Preferences
Digital Output
Operating JVC’s Components
Operating Other Manufacturers’ TV
Maintenance
Press Zoom to deactivate the zoom
Video-Y Vp-p/75 Ω Video-C Component-Y Component-PB/PR
Precaução para a ligação à tensão da rede CA
Precaución para la línea de la red CA
DVD Digital Theater System
XV-THA5
Important for Laser Products
Checking the Supplied Accessories
Speaker Settings
DVD Digital Theater System TH-A5
RM-STHA5J
Getting Started
Connecting the FM and AM Antennas
Getting Started
Connecting the Speakers
Connecting Audio/Video Component
You can select one of three connection types- a , B , and C
Angle
Stop Playback
Angle Zoom
You can enjoy DSP modes
Or AM appears on the display
From the remote control only Press Sleep
Slow Setup Test Angle Zoom DSP Mode
Setting the Delay Time
Creating Realistic Sound Fields
DSP Digital Signal Processor Modes
Creating Realistic Sound Fields
Adjusting Dolby Digital DTS Digital Surround
Adjusting Dolby Surround
Adjusting DSP Modes
Adjusting DSP Sound Parameters
Ntsc
REW VCR Channel Tuning Search Enter
DVD Playback
Setup Test Zoom DSP Mode
Checking the Remaining Time
Tuner Preset REW VCR Channel Tuning Search
Programming the Playing Order Chapters-Program Play
Select Enter Title
Slow
VCD/CD Playback
Play Normal play
FM Mode Display Return Step TV/VIDEO Tuner Preset
Programming the Playing Order Tracks-Program Play
Tuner Preset Down REW VCR Channel Tuning SEARCHF.SEARCH
Press Zoom again
Zoom
Press 0 to load a disc Press 3/8
SPRING2.MP3
Moving to a Particular Track Directly
Tuning
Using Preset Tuning
Setting up the DVD Preferences
Introducing the DVD Preference System
Setting up the DVD Preferences
Setting the Parental Rating Level
VCR
Setting PRO Logic Slow Setup Test Angle
Maintenance
Troubleshooting
Ntsc
1201KSMMDWSAM