Main
INSTRUCTIONS
XM-448BK
LVT0222-001A [J]
MINI DISC RECORDER
CAUTION
G-1
For U.S.A.
Warnings, Cautions and Others
Welcome !
Important cautions
For safe use, observe the following
Table of Contents
Parts Index
4
Remote control unit
1 2
3 4
5
Setting up the System
Supplied accessories
Remote control batteries
CAUTION: Handle batteries properly.
Operating the remote control unit
Connection
Example: CD player
Signal cable connections
Optical digital cable
7
Turning the Power On and Off
Power On
Power Off
Playback
Continuous playback
1 Load an MD.
2 Press 6 on the main unit or 3 on the remote control unit.
Shortcut:
9
To pause the MD:
To select a track
Main unit:
Remote control unit: Using 4 or :
Using the display mode
To switch the display information
When no track is selected (In Stop mode):
When a track has already been selected (During playback or in Stop mode):
To change the brightness of the display
Page
Random playback
Repeat playback
14
Recording
Things to know before recording
Recording operation
1 Load a recordable MD. 2 Press REC PAUSE on the main unit or on the remote control unit.
DIGITAL 1
3 Select the input by pressing INPUT SELECTOR on the main unit.
4 Play the source to be recorded.
5 Press 6 on the main unit or 3 on the remote control unit.
To stop recording:
To pause the MD:
16
To adjust the analog input level
To display the remaining recording time
Track marking
For analog input:
Editing Functions
MD editing functions
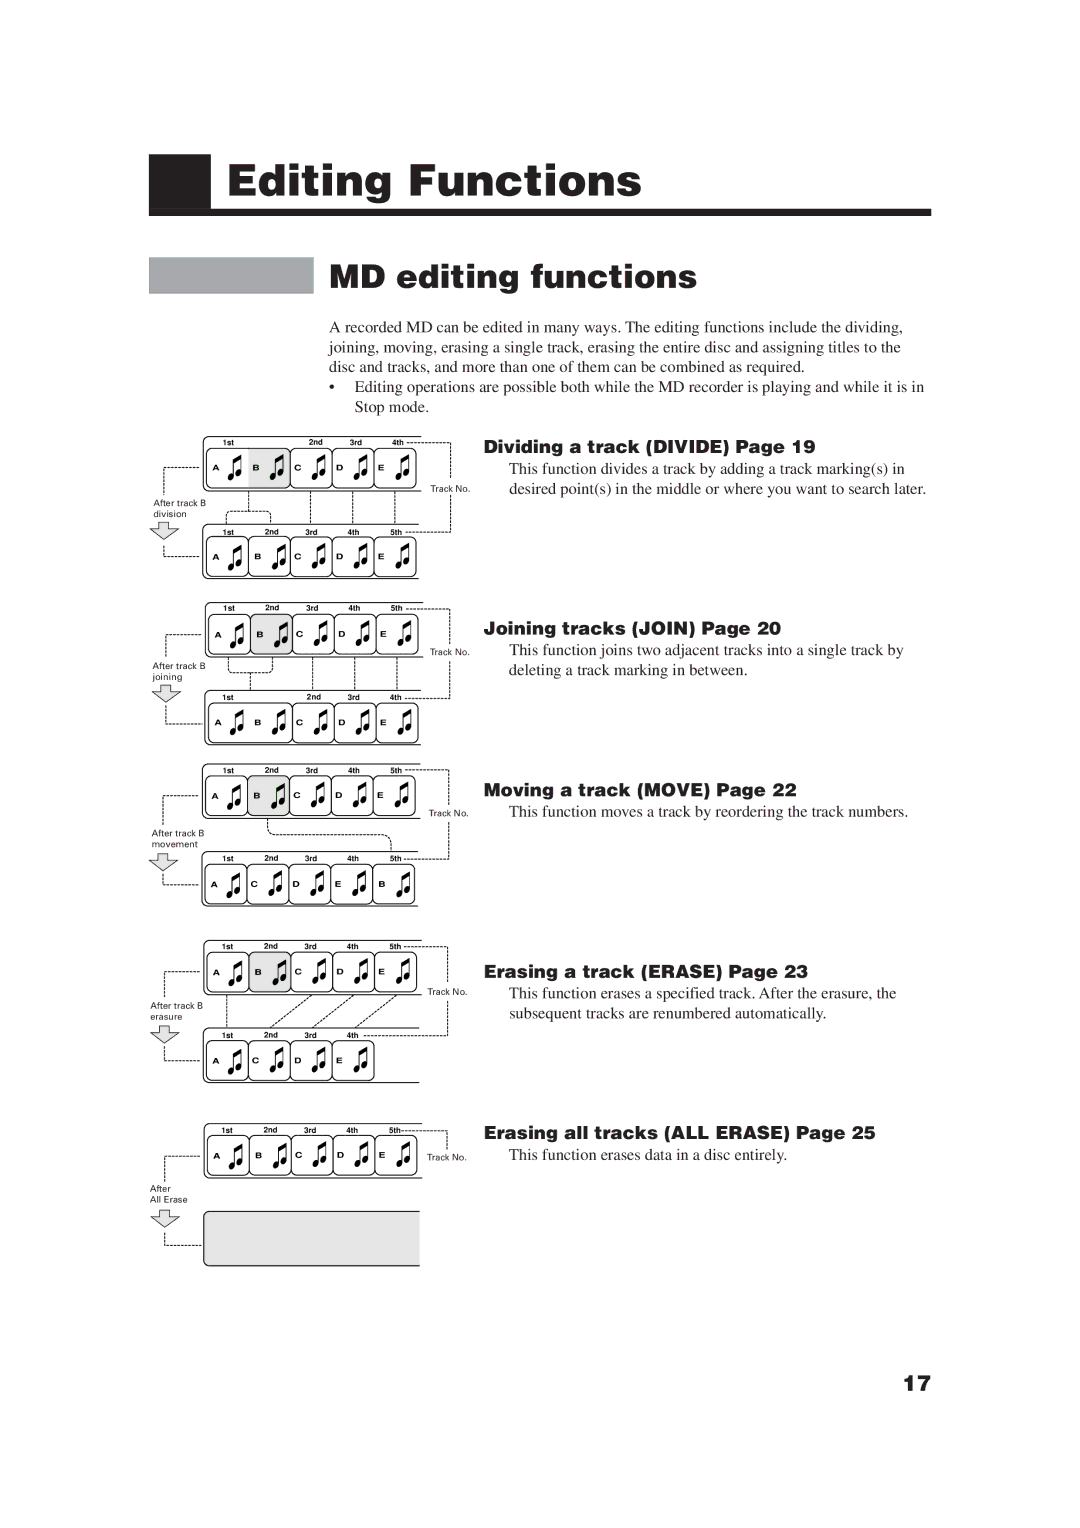
Dividing a track (DIVIDE) Page 19
Joining tracks (JOIN) Page 20
Moving a track (MOVE) Page 22
18
Combining editing functions
EN17-25.XM-448BK[J]/f 99.1.28, 3:23 PM18
a c
a c
Dividing a track (DIVIDE)
1 Press EDIT on the main unit or on the remote control unit to select DIVIDE.
2 Press SET on the main unit or on the remote control unit. 3 Play a track to be divided.
4 Press SET when a point where you want to divide the track comes.
Joining tracks (JOIN)
Page
Moving a track (MOVE)
1 Press EDIT on the main unit or on the remote control unit to select MOVE.
2 Press SET on the main unit or on the remote control unit.
3 Select a track number to be moved, then press SET.
4 Select the movement destination track number, then press SET.
Erasing a track (ERASE)
Page
Erasing all tracks in an MD (ALL ERASE)
26
Assigning the disc title and track titles
To assign a title using the buttons on the main unit
1 Load a recorded MD. 2 Press TITLE.
3 Press SET.
4 Enter a character
(Disc Title)
Available symbols
28
(Disc Title)
To assign a title using the buttons on the remote control unit
1 Load a recorded MD. 2 Press TITLE.
3 Press SET.
29
To assign a track title during playback or recording
COMPU LINK
Linked Operation of the Other Optional Components (Compu Link)
What is Compu Link
Compu Link connections
Compu Link-3 features
TEXT COMPU LINK
Connection with receiver (or amplifier)
32
Connection to CD player or CD changer
Rule on Digital Copying
SCMS (Serial Copy Management System)
About MD (Mini Disc)
Role of the cartridge
Two disc types
Playback-only MD
Recordable MD
ATRAC (Adaptive TRansform Acoustic Coding)
Sound skip guard memory
UTOC (User Table Of Contents)
36
Handling MDs
MD handling precautions
MD Messages
Treatment
Description
Messages
MD Restrictions
Cause
Symptom
Troubleshooting
Treatment
Cause
Symptom
QUALITY SERVICE
HOW TO LOCATE YOUR JVC SERVICE CENTER
JVC SERVICE & ENGINEERING COMPANY OF AMERICA DIVISION OF JVC AMERICAS CORP.
FACTORY SERVICE CENTER LOCATIONS
If you ship the product
CAUTION
LIMITED W ARRANTY
AUDIO-1
V
Specifications
Specifications and appearance subject to change for improvements without prior notice.