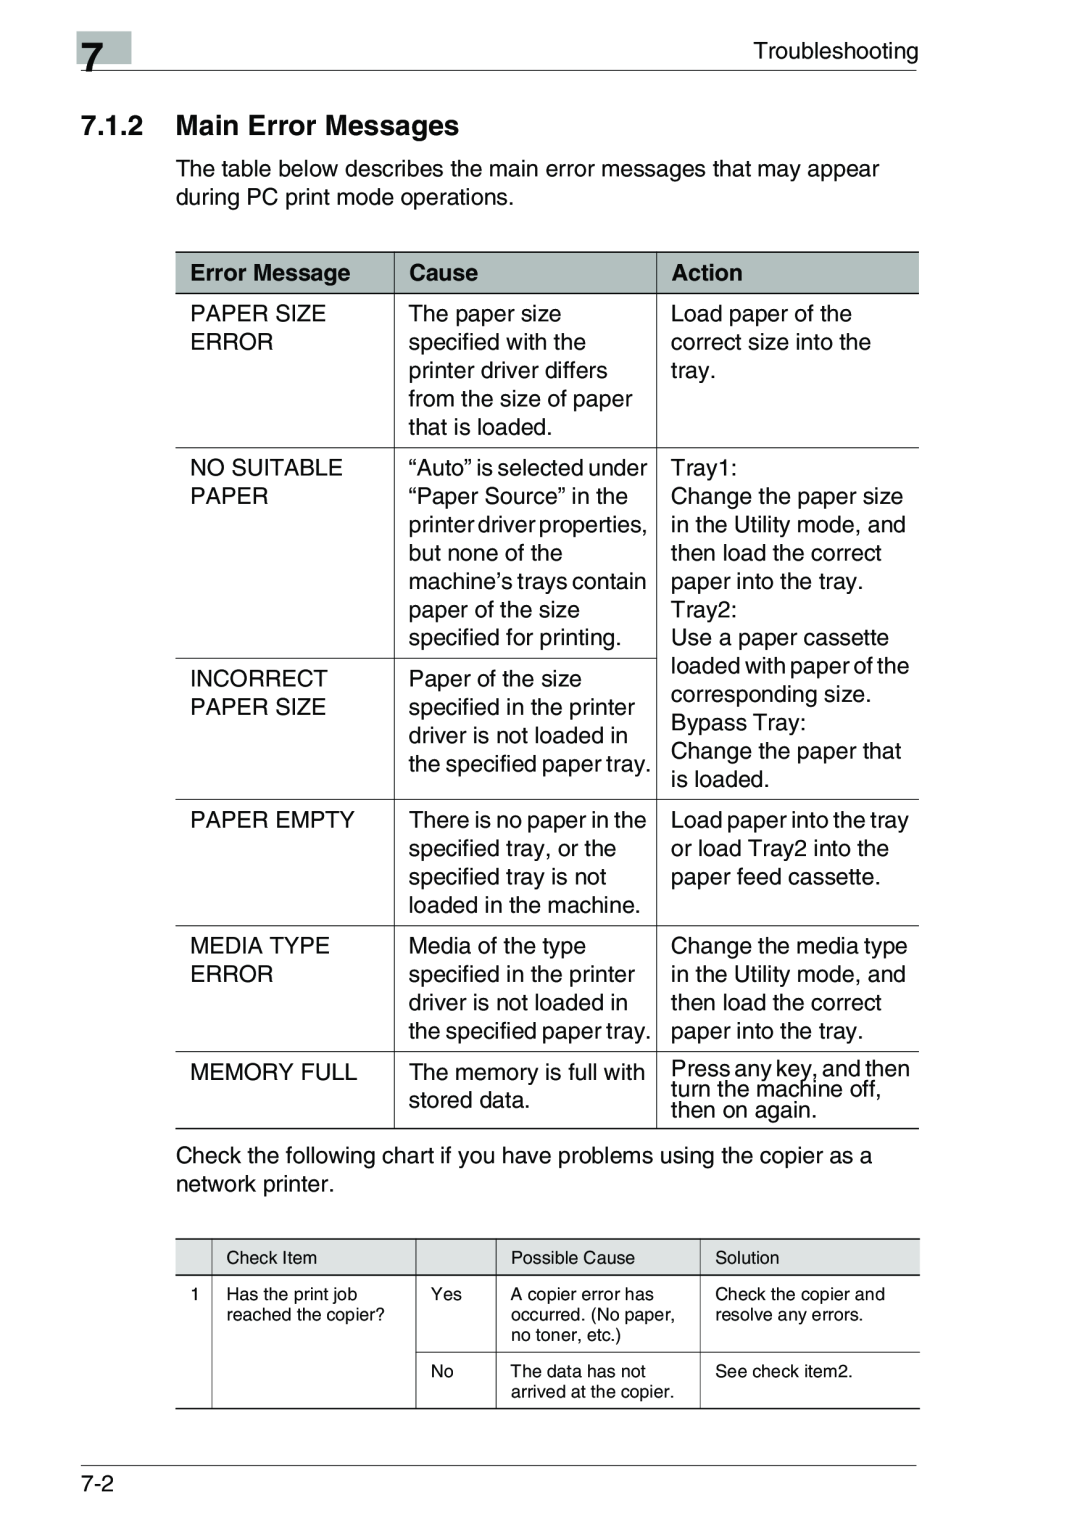
User’s Guide GDI Printer Controller
KONICA MINOLTA FAX2900/FAX3900
4 Configuring Printer Driver Settings
Contents
Connecting to a Computer
Installing the Printer Driver
Copy
Contents
Resolution
4.2.6
5 Control Panel Operations PC Print Mode
Troubleshooting
Contents
8 Specifications
1.1 END USER LICENSE AGREEMENT
1 Introduction
4. RESTRICTIONS
5. LIMITED WARRANTY
6. LIMITATION OF REMEDIES
8. GOVERNING LAW
7. TERMINATION
9. GOVERNMENT END USERS
System Requirements
1.2 Getting Ready
2.1 USB Port Connection
2 Connecting to a Computer
This connection is available only with FAX3900
2.2 Connecting the Network Cable
3.1 Installing the Printer Driver Using Plug and Play
3 Installing the Printer Driver
Page
Page
Page
7 Click the Have Disk button
Installing the Printer Driver 8 Click the Browse button
Note
This completes the installation of the printer driver
Installing the Printer Driver
13 Eject the CD-ROM from your computer’s CD-ROM drive
Page
3-10
Installing the Printer Driver complete the installation
This completes the installation of the printer driver
14 Eject the CD-ROM from your computer’s CD-ROM drive
Displaying Settings Under Windows XP
4 Configuring Printer Driver Settings
2 Select the “KONICA MINOLTA FAX2900/3900” icon
Configuring Printer Driver Settings
Displaying Settings Under Windows
The following printer setup dialog box appears
2 Select the “KONICA MINOLTA FAX2900/3900” icon
Configuring Printer Driver Settings
Displaying Settings Under Windows Me/98
The following printer setup dialog box appears
4.2.3 Paper Source
4.2 Common Operations
4.2.1 Common Button
4.2.2 Orientation
4.2.6 Copy
4.2.7 Resolution
4.2.4 Media Type
4.2.5 Paper Size
Configuring Printer Driver Settings
5.1 Printer Operations
5 Control Panel Operations PC Print Mode
General Guide
data indicated by the Printer indicator
See “Printer Indicator” on page
“Canceling a Print Job” on page
Description
Printer Indicator
Printer Indicator
machine is printing PC print data. The indicator
Control Panel Operations PC Print Mode
When there is print data in the
Pressing the Fax or Copy key exits the PC print mode
Yes No C
Canceling a Print Job
appears on the machine’s display, load paper onto the bypass tray
Using the Bypass Tray
5.2 Printing the Configuration Page
Control Panel Operations PC Print Mode
Environment Available only with FAX3900
6 Network Printing in a Windows
The Network Printing functions is available only with FAX3900
Entering the IP Address From the Control Panel
6.1 Assigning an IP Address
If “SPECIFY” is selected in this step, “AUTO” can also be selected. If “AUTO” is selected, the IP address, subnet mask, and default gateway setting are automatically assigned by the DHCP server on the network. This means that they do not have to be assigned manually, as is the case when “SPECIFY” is selected. However, please note the following points when using “AUTO” to assign the IP address
When “AUTO” is selected to assign the IP address, the IP address may sometimes be changed automatically. If the IP address and other settings are changed, you may not be able to print to a specified printer on the network due to a communication failure caused by a change in the address. When “AUTO” is selected, we recommend that you set the DHCP server to assign a fixed address to the copier
The subnet mask address shown in the illustration is only an example. Always check with your network administrator before entering a subnet mask address
For Windows 98/ Windows Me
6.2 Selecting the Network Print Method
For Windows
IPP PORT9100 TCP/IP protocol Windows XP
For Windows XP
TCP/IP protocol or
For NetWare NetWare Server/ Windows Client
Supported Environments
NetWare server
Peer-to-Peer Printing
6.3 Checking the Setup Procedures
LPR/PORT 9100 Printing
NetWare Server/Client except NDPS
IPP Printing
NetWare Server/Client NDPS
6.4.1 Peer-to-Peer Printing
6.4 Setting Up the Network Connections
Windows
6.4.2 LPR Printing
11 Click Finish
Network Printing in a Windows Environment Available only with FAX3900
6-14
Page
6.4.4
Setting Up the Windows Computer for the NetWare Client
6.4.5 Connecting a Copier to the NetWare Server
6-18
Network Printing in a Windows Environment Available only with FAX3900
7.1 Correcting Errors
7 Troubleshooting
7.1.1 Checking Error Messages
Action
7.1.2 Main Error Messages
Error Message
Cause
Troubleshooting
“MACHINE TROUBLE” Error
7.1.3 Errors and Print Data
Temporary Errors
FAX3900
Specifications
Specifications
FAX2900
Specifications
1392-7702-02
http//konicaminolta.com
Copyright