French Door Refrigerator
Table of Contents
Product Features
Filtered Water and ICE Dispenser
Important Safety Instructions
Read ALL Instructions Before Using the Appliance
Read ALL Instructions Before Using the Appliance
Save These Instuctions
Components
Refrigerator Exterior
Refrigerator Interior
Specifications
Installation
Installation Overview
Ambient Temperature
Unpacking Your Refrigerator
Choosing the Proper Location
Flooring
Removing/Assembling Refrigerator Door Handles
Removing the Handles
Assembling the Handles
Remove the mounting fasteners
Removing/Assembling the Doors and Drawers
Removing the Left Refrigerator Door
Removing the Right Refrigerator Door
Remove the top hinge cover screw . Lift the hook not
Lift the door from the middle hinge pin and remove
Visible, located at the bottom of the front side
Connect the wire harness
Removing the Right Refrigerator Door
Assembling the Right Refrigerator Door
Lift the door from the middle hinge pin and remove the door
Assembling the Left Refrigerator Door
Make sure that the door-switch located inside the cover
Removing the Freezer Drawers
Same way. In the following figures, the Pullout Drawer
Located above the freezer drawer is not shown for clarity
Assembling the Freezer Drawers
Remove the screws from the rails at both ends
Same way
With both hands, pull out each rail simultaneously until
Assembling the Freezer Drawers
Connecting the Water Line
Before You Begin
Water Pressure
What You Will Need
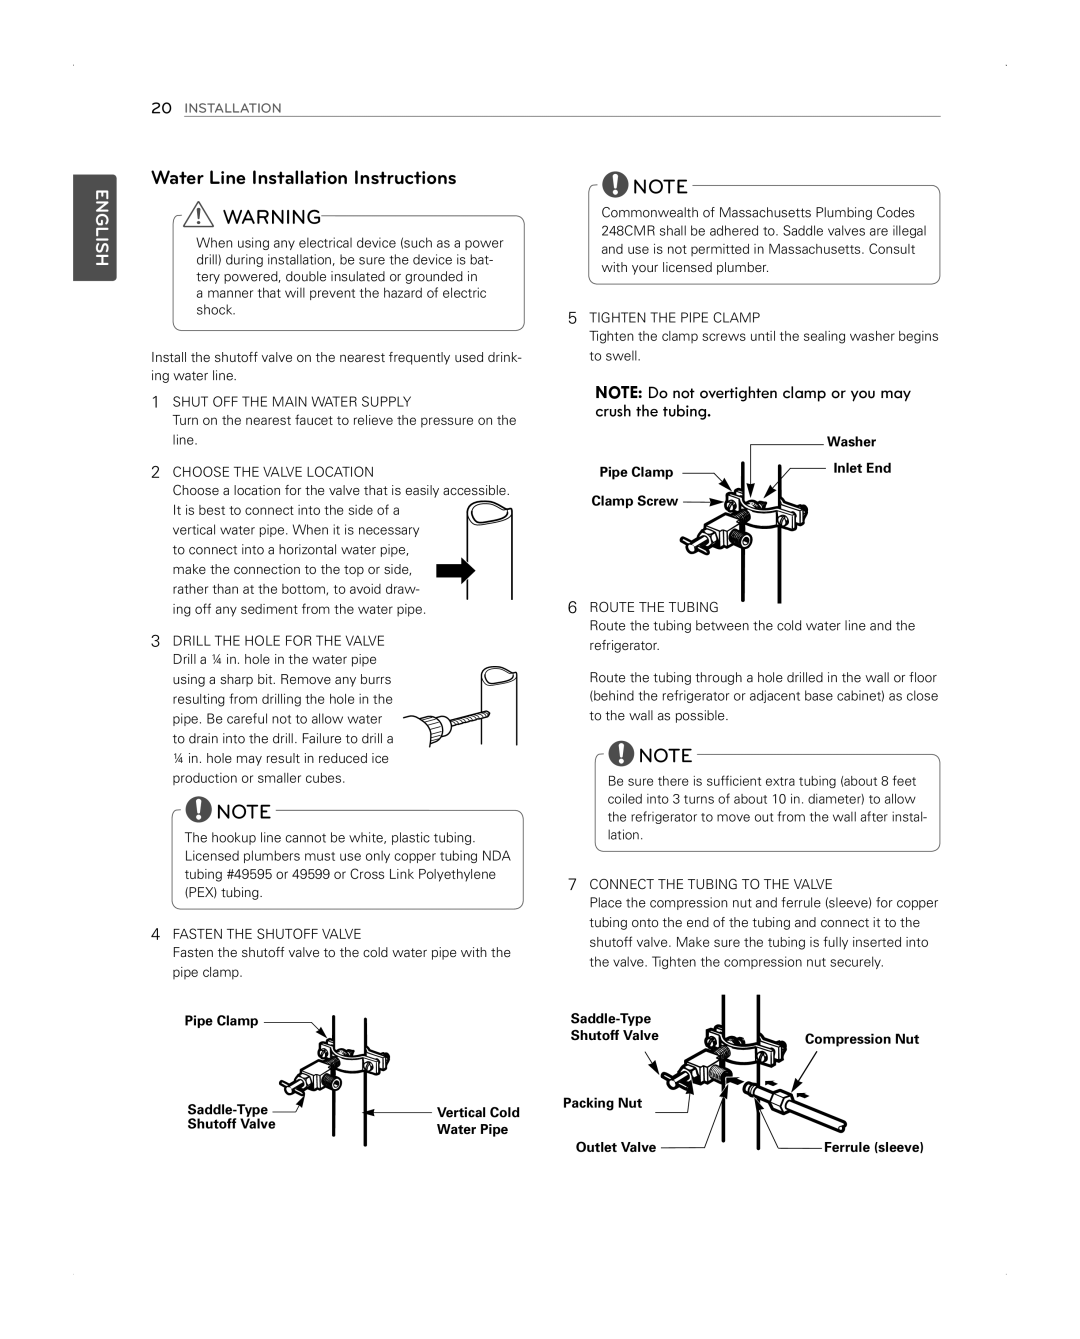
Water Line Installation Instructions
Washer Pipe Clamp Inlet End Clamp Screw
Turning On The Power
Flush OUT the Tubing Turn the Water on AT the Shutoff Valve
Door Alignment
Leveling and Door Alignment
Leveling
HOW to USE
Before use
Control Panel Features Ice Selection
Indicator Button Mode
Auto mode
Control Panel
Control Panel Features
Change Filter
In-Door Ice Bin
Assembling the In-Door Ice Bin
Detaching the In-Door Ice Bin
Gently pull the handle to open the ice compartment
Automatic Icemaker
Turning the Automatic Icekamer On or Off
Preparing For Vacation
When You Should Turn the Icemaker Off
Normal Sounds You May Hear
Using the Dispenser
Cleaning the Dispenser Stand
Ice and Water Dispenser
Dispenser
Storing Food
Food Preservation Location
Food How to
Food Storage Tips
Storing Frozen Food
Glide’N’Serve
Humidity Controlled Crisper and Glide’N’Serve
Humidity Controlled Crisper
Detaching and Assembling
Storage Bins
To Remove the Glass
Glide’N’Serve and Humidity Controlled Crisper
Adjusting the Refrigerator Shelves
Using the Folding Shelf
Detaching the Shelf
Assembling the Shelf
Hand wash, rinse and dry all surfaces thoroughly
Maintenance
Cleaning
Remove the Old Filter
Install a New Air Filter
Replacing the Fresh Air Filter
Replacing the Water Filter
Water Filter Bypass Plug
Performance Data Sheet
Based on the use of Cryptosporidium parvum oocysts
Unknown quality without adequate disinfection before or
English
Using Smart Diagnosis
Smart Diagnosis
Troubleshooting
Problem Possible Causes Solutions
Food in sealed packaging to prevent condensation
Frost
English
English
English
If the dispenser has not been used for several hours
Control on some models will also click when
Rearrange food containers to clear the door and door
Warranty USA
Warranty Period
Warranty Canada
Page
Réfrigérateur À PORTE-FENÊTRE
Mode D’UTILISATION
Table DES Matières
Caractéristiques DU Produit
EAU Filtrée ET Distributeur À Glaçons
Consignes Importantes DE Sécurité
Lire Toutes LES Instructions Avant D’UTILISER L’APPAREIL
Lire Toutes LES Instructions Avant D’UTILISER L’APPAREIL
Conservez CES Instructions
Composants
Extérieur du réfrigérateur
Intérieur du réfrigérateur
Vue d’ensemble de l’installation
Spécifications
Choisir le bon emplacement
Déballage de votre réfrigérateur
Mise au sol
Température ambiante
Enlèvement/Montage de la poignée du tiroir du congélateur
Enlèvement des poignées
Montage des poignées
Assemblage des poignées
Enlèvement/Montage des portes
Enlèvement de la porte gauche du réfri- gérateur
Enlèvement de la porte gauche du réfri- gérateur suite
Enlèvement de la porte droite du réfri- gérateur
Connecter les faisceaux de câbles
Enlèvement de la porte droite du réfri- gérateur suite
Montage de la porte droite du réfrigéra- teur
Montage de la porte gauche du réfrigéra- teur
Collet Tube Insert Line Clip
Teur
Couvercle soit bien connectée. Mettre le couvercle
Montage des tiroirs du congélateur
Montage des tiroirs du congélateur suite
Connexion de la canalisation d’eau
Avant de commencer
Pression de l’eau
Ce dont vous aurez besoin
Instructions d’installation de la ligne d’eau
’eau froide
Tube de ¼
Mise en marche
Enlever le capuchon flexible en plastique de la vanne
Alignement de la porte
Nivellement et alignement des portes
Nivellement
Mode D’EMPLOI
Avant l’utilisation
Panneau de commande
Caractéristiques du panneau de commande
Alarme de porte sera désactivée
Verrouillage des commandes
Le bouton de Verrouillage des commandes désactive tous les
Fonctions du panneau de com- mande suite
Détachement du bac à glaçons
Utilisation du bac à glaçons
Montage du bac à glaçons
Machine à glaçons automatique
Mise en marche et arrêt de la machine à glaçons automatique
Machine à glaçons automatique suite
Ne jamais stocker des cannettes de boissons ou
Distributeur de glace et d’eau
Structure du distributeur
Verrouillage du distributeur
Utilisation du distributeur
Stockage des aliments
Lieu de conservation des aliments
Aliment Comment stocker
Conseils pour le stockage des aliments
Stockage d’aliments congelés
Bac à fruits et légumes à humidité con- trôlée
Glide ‘N’ Serve
Détachement et montage des bacs de stockage
Glisser et Servir et bac à légumes avec contrôle d’humidité
Pour enlever le verre
Bacs de porte
Réglage des étagères du réfrigéra- teur
Détachement de l’étagère
Utilisation de l’étagère pliable
Montage de l’étagère
Entretien
Nettoyage
Doublures et joints de porte
Serpentins du condenseur
Enlever l’ancien filtre
Remplacement du filtre à air frais
Installer un nouveau filtre à air
Remplacement du filtre à eau
Filtre complètement vers le bas
Fiche technique des performances
Contaminants
Mise EN Garde
Français
Utiliser Smart Diagnosis
Dépannage
Guide de Stockage des Aliments
Ferment pas complètement ou s’ouvrent toutes seules de
La partie Dépannage des Pièces & Fonctions
Sa valeur correcte une fois le cycle de dégivrage
Complété
Les aliments congèlent Des aliments avec une teneur en eau
Dans le compartiment
Loin des bouches d’aération
Plus d’informations
De glace suite
Ce problème, tout comme la réduction du nombre
’ouvertures des portes
Fonctions pour plus d’informations
Pendant 60 secondes, par cycles
Dégagé
De distribution pendant 30 secondes puis relâchez-le
Que le bac est complètement sec avant de le réinstaller
Dégagé. Réinstallez le bac à glace et attendez 24h pour
La glace a un mauvais ’arrivée d’eau contient des minéraux
Jetez les premiers tas de glace afin d’éviter la glace
Le sol flanche ou est inégal, ou les pieds de nivellement
Un technicien qualifié. Veuillez vous reporter à la section
Remplacement d’une ampoule
Les portes ne se ferment
Garantie ÉTATS-UNIS
Période DE Garantie
Garantie Canada
Page
Refrigerador DE Puerta Frances
Índice
Nivelación y alineación de las puertas
Características DEL Producto
Agua Filtrada Y Dispensador DE Hielo
Instrucciones Importantes Sobre Seguridad
Advertencia
Español
Guarde Estas Instrucciones
Componentes
Exterior del refrigerador
Interior del refrigerador
Instalación
Instrucciones generales de instalación
Especificaciones
Abierta
Desembalaje del refrigerador
Cómo escoger la ubicación adecuada
Tipo de piso
Temperatura ambiente
Montaje de las manijas
Montaje y desmontaje de la manija del cajón del congelador
Desmontaje de las manijas
Montaje y desmontaje de las puertas
Desmontaje de la puerta izquierda del refrigerador
Desmontaje de la puerta derecha del re- frigerador
Montaje de la puerta derecha del refrig- erador
Instale primero la puerta del lado derecho
Bisagra
Conecte el mazo de cables
Montaje de la puerta izquierda del refrigerador
Cómo extraer los cajones del
Congelador
Cómo ensamblar los cajones del
Congelador continuación
Con el cajón completamente sacado, inserte la cesta
Inferior en la estructura de rieles
Las imágenes , en la siguiente figura pueden diferir
Conexión de las tuberías de agua
Antes de empezar
Presión del agua
Qué necesitará
Agua fría
Conectarla en el lateral de una tubería
Abrazadera Para tubos Válvula de corte
Encendido
Retire la tapa de plástico flexible de la válvula de agua
Ajuste las conexiones que goteen
Enchufe el refrigerador
Alineación de las puertas
Nivelación y alineación de las puertas
Nivelación
Instrucciones DE USO
Antes de usar
Indicador de Botón Control control
Panel de control
Funciones del panel de control
Tono
Funciones del panel de control continuación
Saving Mode, pulse los botones Freezer Tem
Desmontaje del depósito de hielo del interior de la puerta
Uso del depósito de hielo del inte- rior de la puerta
Montaje del depósito de hielo del interior de la puerta
Máquina de hielo automática
Encendido y apagado de la máquina de
Hielo automática
En posición on encendido
Preparándose para las vacaciones
Máquina de hielo automática continuación
Sonidos normales que se pueden escuchar
Dispensador de hielo y agua
Estructura del dispensador
Uso del dispensador
Bloqueo del dispensador
Almacenamiento DE Alimentos
Lugar de conservación de los alimentos
Comida Cómo
Almacenamiento de alimentos congelados
Sugerencias para el almacenamiento de alimentos
Glide‘N’Serve
Cajón para verduras con control de humedad y GlideNServe
Cajón para verduras con control de humedad
Montaje y desmontaje de las bande- jas de almacenamiento
GlideNServe y Cajón para verduras con control de humedad
Para retirar el vidrio
Bandejas de las puertas
Ajuste de los estantes del refrigerador
Desmontaje del estante
Uso del estante plegable
Montaje del estante
Mantenimiento
Limpieza
Instale el nuevo filtro de aire
Reemplazo del filtro de aire frío
Retire el filtro viejo
Reemplazo del filtro de agua
Hoja de datos de rendimiento
Basado en el uso de Cryptosporidium parvum oocysts
Guías de Uso/Parámetros de Suministro de Agua
Flujo de servicio L/m 0.5 g/m
Suministro de agua Agua potable
6C 38C 33F 100F
Español
Cómo usar la función de Smart Diagnosis
Condensador
Solución DE Problemas
Problema Causas posibles Soluciones
De problemas
Demasiado caliente
Bloqueados Para permitir que el aire fluya a través del
En la sección Uso del refrigerador
Guía de resolución de problemas
Alimentos con alto contenido de agua fueron
Incorrectamente ajustado
Para obtener mayor información
Hace suficiente hielo Períodos de tiempo
Temperatura del refrigerador, además de no abrir la
Puerta con tanta frecuencia
Cerradas De hielo se verá afectada. Para obtener mayor
En la posición on encendido
La fabricación de hielo. Asegúrese de que el
Área del sensor esté siempre limpia para que el
Funcionamiento sea el correcto
El suministro de agua contiene minerales
Olor/sabor en todos los suministros de agua
Un camino libre entre ambos sensores. Reinstale el
Depósito de hielo y espere 24 horas para confirmar
Las paredes internas debido a cambios en la
Proceso de instalación
Garantía EE.UU
Período DE Garantía
Garantía Canadá
LG Customer Information Center