PrintServer for USB with 4-Port Switch

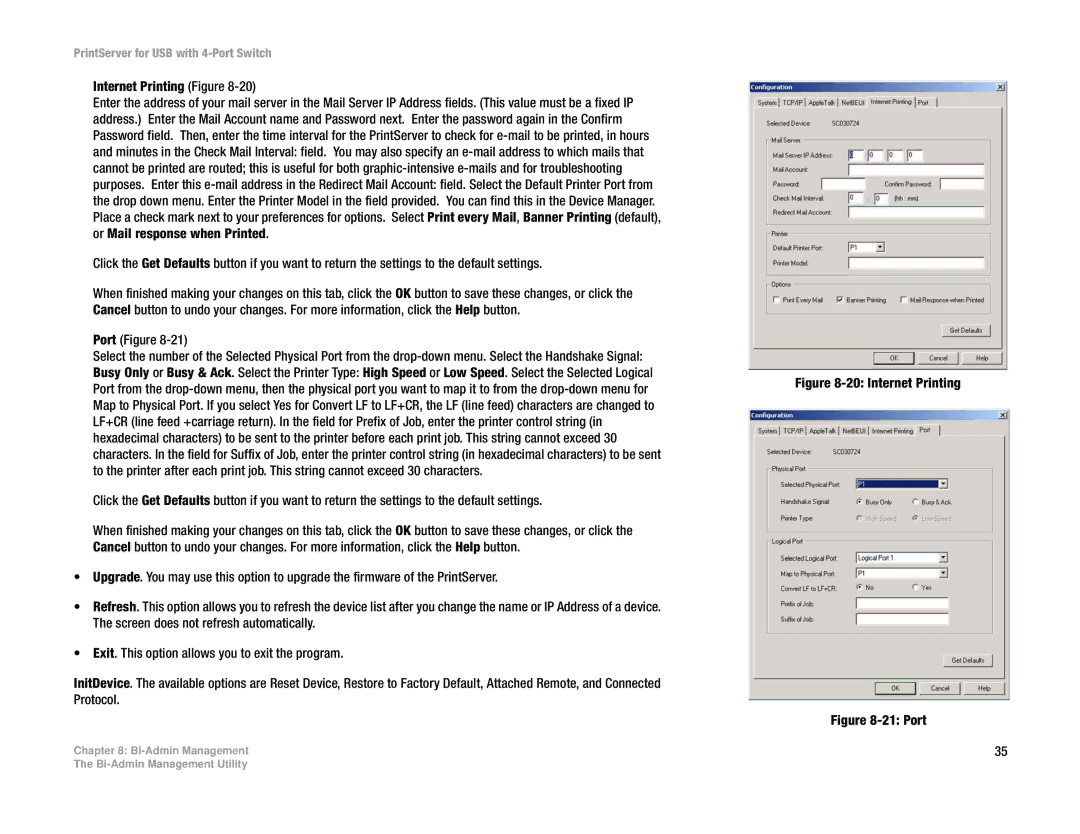
Internet Printing (Figure 8-20)

Enter the address of your mail server in the Mail Server IP Address fields. (This value must be a fixed IP address.) Enter the Mail Account name and Password next. Enter the password again in the Confirm Password field. Then, enter the time interval for the PrintServer to check for e-mail to be printed, in hours and minutes in the Check Mail Interval: field. You may also specify an e-mail address to which mails that cannot be printed are routed; this is useful for both graphic-intensive e-mails and for troubleshooting purposes. Enter this e-mail address in the Redirect Mail Account: field. Select the Default Printer Port from the drop down menu. Enter the Printer Model in the field provided. You can find this in the Device Manager. Place a check mark next to your preferences for options. Select Print every Mail, Banner Printing (default), or Mail response when Printed.

Click the Get Defaults button if you want to return the settings to the default settings.

When finished making your changes on this tab, click the OK button to save these changes, or click the Cancel button to undo your changes. For more information, click the Help button.

Port (Figure 8-21)

Select the number of the Selected Physical Port from the drop-down menu. Select the Handshake Signal: Busy Only or Busy & Ack. Select the Printer Type: High Speed or Low Speed. Select the Selected Logical Port from the drop-down menu, then the physical port you want to map it to from the drop-down menu for Map to Physical Port. If you select Yes for Convert LF to LF+CR, the LF (line feed) characters are changed to LF+CR (line feed +carriage return). In the field for Prefix of Job, enter the printer control string (in hexadecimal characters) to be sent to the printer before each print job. This string cannot exceed 30 characters. In the field for Suffix of Job, enter the printer control string (in hexadecimal characters) to be sent to the printer after each print job. This string cannot exceed 30 characters.

Click the Get Defaults button if you want to return the settings to the default settings.

When finished making your changes on this tab, click the OK button to save these changes, or click the Cancel button to undo your changes. For more information, click the Help button.

Upgrade. You may use this option to upgrade the firmware of the PrintServer.

Refresh. This option allows you to refresh the device list after you change the name or IP Address of a device. The screen does not refresh automatically.

Exit. This option allows you to exit the program.

InitDevice. The available options are Reset Device, Restore to Factory Default, Attached Remote, and Connected Protocol.

Chapter 8: Bi-Admin Management

Figure 8-20: Internet Printing

Figure 8-21: Port

35

The Bi-Admin Management Utility

Page 42
Image 42
Linksys PSUS4 manual Internet Printing