P 24/ 37
 Repair
[4]ADJUSTMENT
[4]-3. Guide fence
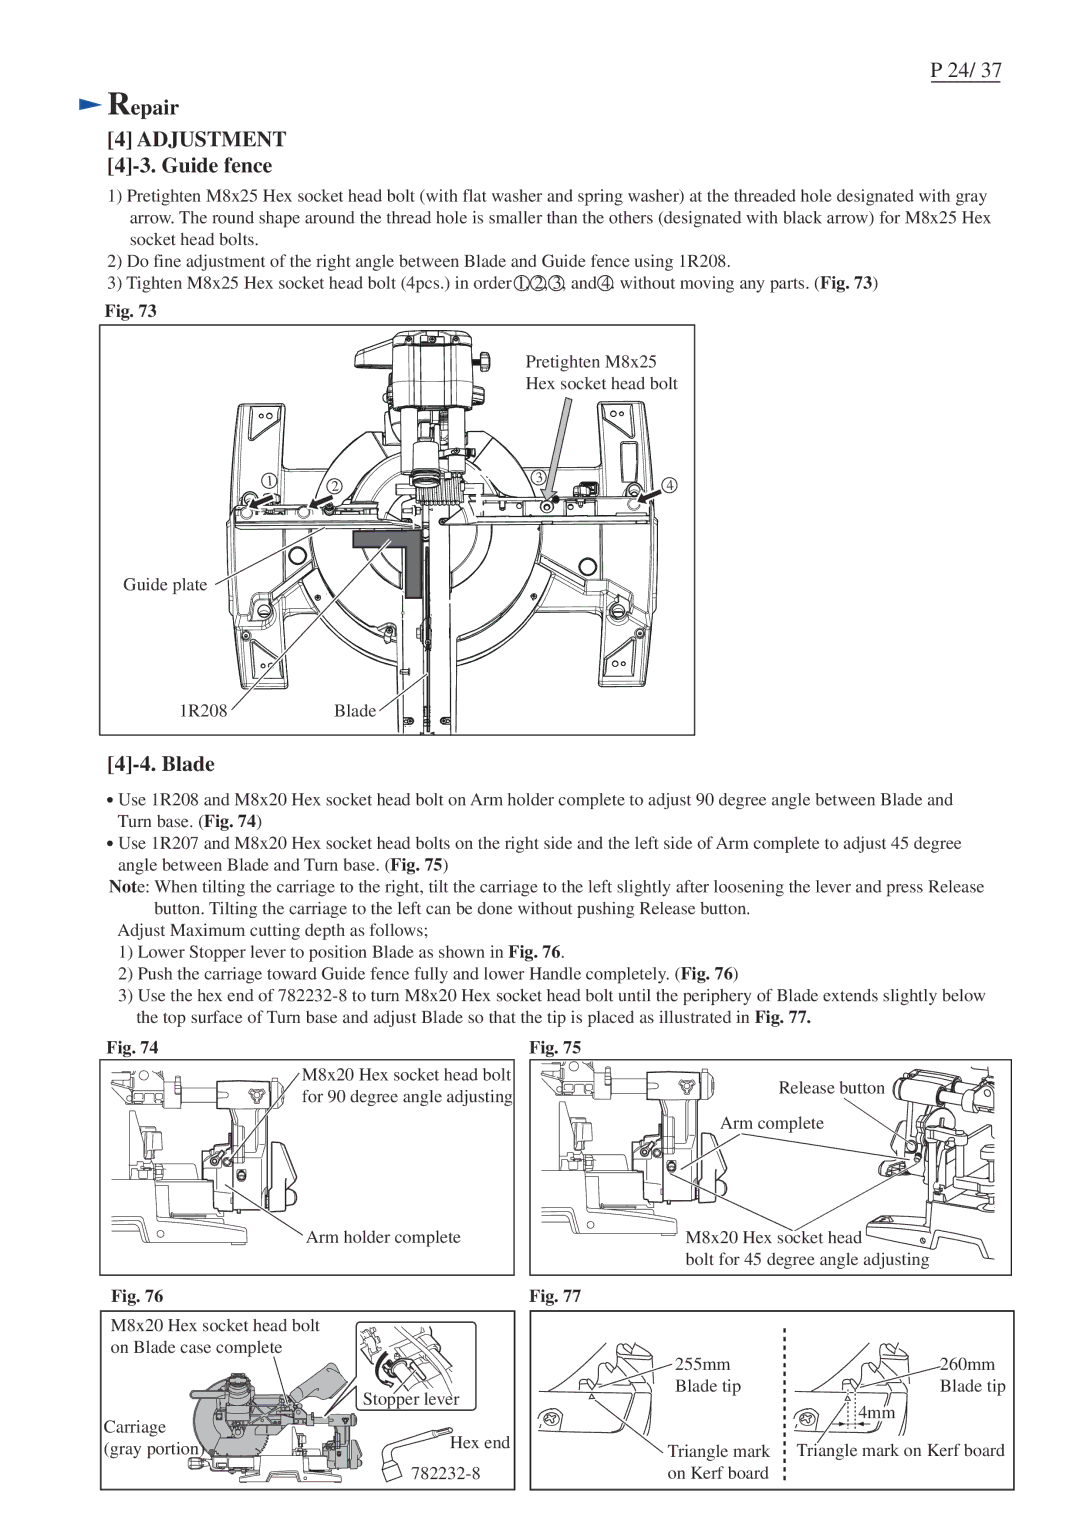
1)Pretighten M8x25 Hex socket head bolt (with flat washer and spring washer) at the threaded hole designated with gray arrow. The round shape around the thread hole is smaller than the others (designated with black arrow) for M8x25 Hex socket head bolts.
2)Do fine adjustment of the right angle between Blade and Guide fence using 1R208.
3)Tighten M8x25 Hex socket head bolt (4pcs.) in order 1, 2, 3, and 4. without moving any parts. (Fig. 73)
Fig. 73
|
|
| Pretighten M8x25 |
|
|
|
| Hex socket head bolt | |
| 1 | 2 | 3 | 4 |
|
| |||
|
|
| ||
Guide plate |
|
|
|
|
1R208 |
| Blade |
|
|
|
|
|
|
|
![]() Use 1R208 and M8x20 Hex socket head bolt on Arm holder complete to adjust 90 degree angle between Blade and Turn base. (Fig. 74)
Use 1R208 and M8x20 Hex socket head bolt on Arm holder complete to adjust 90 degree angle between Blade and Turn base. (Fig. 74)
![]() Use 1R207 and M8x20 Hex socket head bolts on the right side and the left side of Arm complete to adjust 45 degree angle between Blade and Turn base. (Fig. 75)
Use 1R207 and M8x20 Hex socket head bolts on the right side and the left side of Arm complete to adjust 45 degree angle between Blade and Turn base. (Fig. 75)
Note: When tilting the carriage to the right, tilt the carriage to the left slightly after loosening the lever and press Release button. Tilting the carriage to the left can be done without pushing Release button.
Adjust Maximum cutting depth as follows;
1)Lower Stopper lever to position Blade as shown in Fig. 76.
2)Push the carriage toward Guide fence fully and lower Handle completely. (Fig. 76)
3)Use the hex end of
Fig. 74
M8x20 Hex socket head bolt for 90 degree angle adjusting
![]() Arm holder complete
Arm holder complete
Fig. 76
Fig. 75
Release button |
Arm complete |
M8x20 Hex socket head |
bolt for 45 degree angle adjusting |
Fig. 77
M8x20 Hex socket head bolt on Blade case complete
Carriage (gray portion)
Stopper lever
![]()
![]() Hex end
Hex end ![]()
255mm | 260mm |
Blade tip | Blade tip |
| 4mm |
Triangle mark | Triangle mark on Kerf board |
on Kerf board |
|
