|
|
|
|
|
|
|
|
|
|
|
|
|
|
|
|
|
|
|
|
|
|
| Installation | ||
Installation |
|
|
|
|
|
|
|
|
|
|
|
|
|
|
|
|
|
|
|
|
|
|
|
|
|
|
|
|
|
|
|
|
|
|
|
|
|
|
|
|
|
|
|
|
|
|
|
|
|
| |
|
|
|
|
|
|
|
|
|
|
|
|
|
|
|
|
|
|
|
|
|
|
| |||
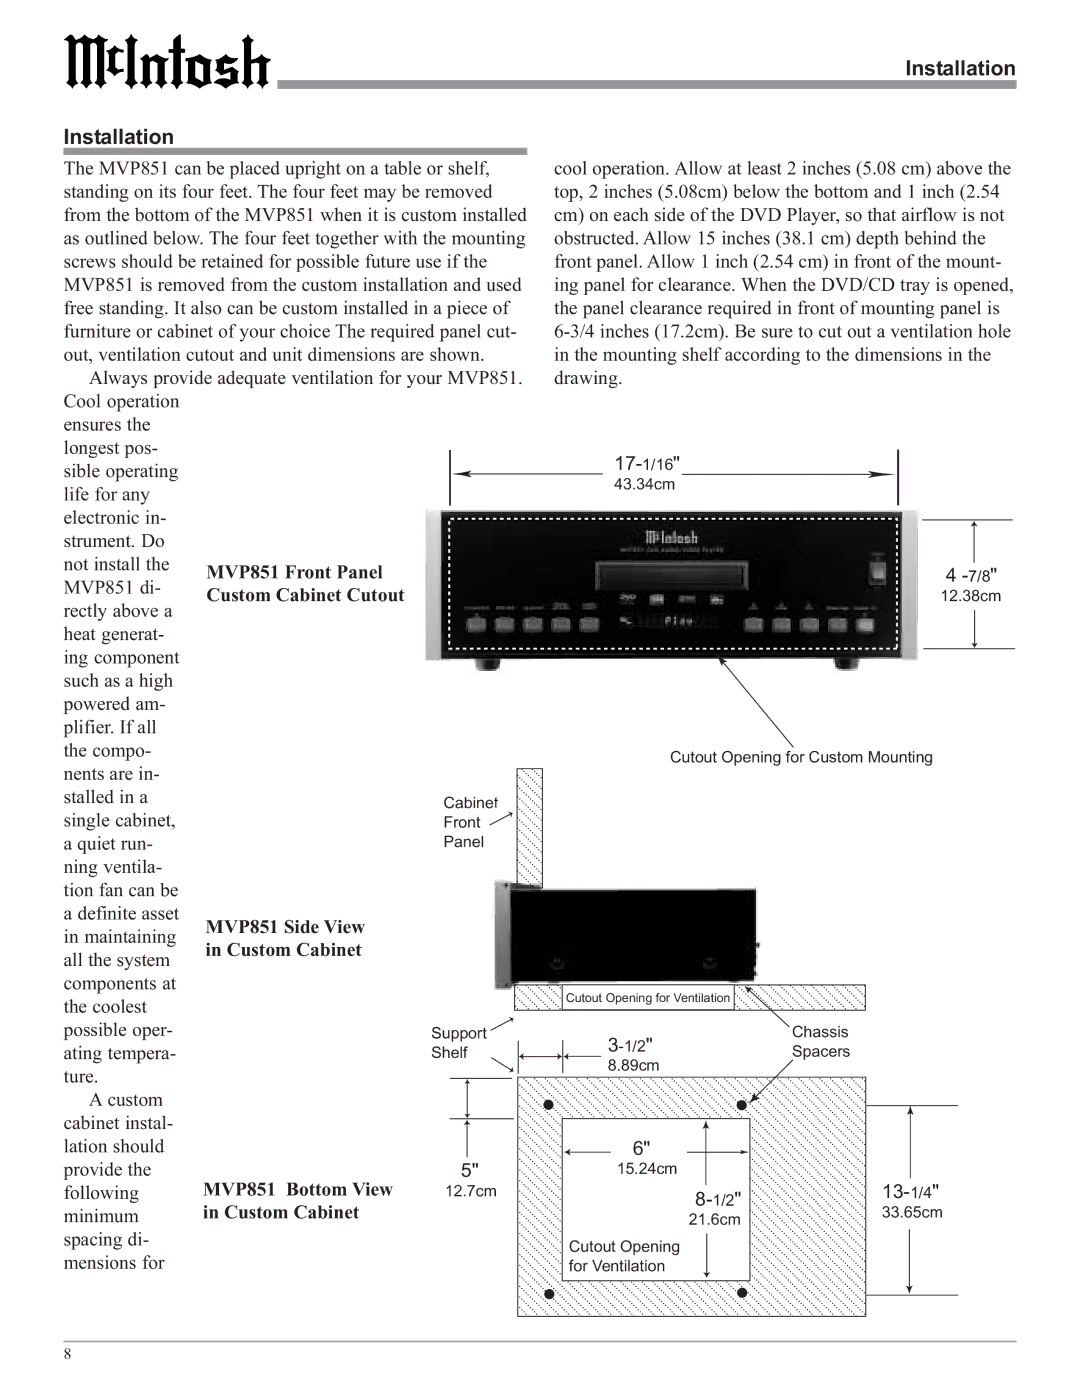
The MVP851 can be placed upright on a table or shelf, |
| cool operation. Allow at least 2 inches (5.08 cm) above the | |||||||||||||||||||||||
standing on its four feet. The four feet may be removed |
| top, 2 inches (5.08cm) below the bottom and 1 inch (2.54 | |||||||||||||||||||||||
from the bottom of the MVP851 when it is custom installed |
| cm) on each side of the DVD Player, so that airflow is not | |||||||||||||||||||||||
as outlined below. The four feet together with the mounting |
| obstructed. Allow 15 inches (38.1 cm) depth behind the | |||||||||||||||||||||||
screws should be retained for possible future use if the |
| front panel. Allow 1 inch (2.54 cm) in front of the mount- | |||||||||||||||||||||||
MVP851 is removed from the custom installation and used |
| ing panel for clearance. When the DVD/CD tray is opened, | |||||||||||||||||||||||
free standing. It also can be custom installed in a piece of |
| the panel clearance required in front of mounting panel is | |||||||||||||||||||||||
furniture or cabinet of your choice The required panel cut- |
| ||||||||||||||||||||||||
out, ventilation cutout and unit dimensions are shown. |
| in the mounting shelf according to the dimensions in the | |||||||||||||||||||||||
Always provide adequate ventilation for your MVP851. |
| drawing. |
|
|
|
|
| ||||||||||||||||||
Cool operation |
|
|
|
|
|
|
|
|
|
|
|
|
|
|
|
|
|
|
|
|
|
|
|
|
|
ensures the |
|
|
|
|
|
|
|
|
|
|
|
|
|
|
|
|
|
|
|
|
|
|
|
|
|
longest pos- |
|
|
|
|
|
|
|
|
|
|
|
|
|
|
|
|
|
| |||||||
sible operating |
|
|
|
|
|
|
|
|
|
|
|
|
|
|
|
|
| ||||||||
|
|
|
|
|
|
|
|
|
|
|
|
|
| 43.34cm |
|
|
|
|
| ||||||
life for any |
|
|
|
|
|
|
|
|
|
|
|
|
|
|
|
|
|
|
| ||||||
|
|
|
|
|
|
|
|
|
|
|
|
|
|
|
|
|
|
|
|
|
|
|
|
| |
electronic in- |
|
|
|
|
|
|
|
|
|
|
|
|
|
|
|
|
|
|
|
|
|
|
|
|
|
strument. Do |
|
|
|
|
|
|
|
|
|
|
|
|
|
|
|
|
|
|
|
|
|
|
|
|
|
not install the | MVP851 Front Panel |
|
|
|
|
|
|
|
|
|
|
|
|
|
|
|
|
|
|
|
|
|
|
| |
|
|
|
|
|
|
|
|
|
|
|
|
|
|
|
|
|
| 4 | |||||||
MVP851 di- |
|
|
|
|
|
|
|
|
|
|
|
|
|
|
|
|
|
| |||||||
Custom Cabinet Cutout |
|
|
|
|
|
|
|
|
|
|
|
|
|
|
|
|
|
|
|
|
| 12.38cm | |||
rectly above a |
|
|
|
|
|
|
|
|
|
|
|
|
|
|
|
|
|
|
|
|
|
|
|
|
|
|
|
|
|
|
|
|
|
|
|
|
|
|
|
|
|
|
|
|
|
|
|
|
|
| |
heat generat- |
|
|
|
|
|
|
|
|
|
|
|
|
|
|
|
|
|
|
|
|
|
|
|
|
|
ing component |
|
|
|
|
|
|
|
|
|
|
|
|
|
|
|
|
|
|
|
|
|
|
|
|
|
such as a high |
|
|
|
|
|
|
|
|
|
|
|
|
|
|
|
|
|
|
|
|
|
|
|
|
|
powered am- |
|
|
|
|
|
|
|
|
|
|
|
|
|
|
|
|
|
|
|
|
|
|
|
|
|
plifier. If all |
|
|
|
|
|
|
|
|
|
|
|
|
|
|
|
|
|
|
|
|
|
|
|
|
|
the compo- |
|
|
|
|
|
|
|
|
|
|
|
|
|
| Cutout Opening for Custom Mounting | ||||||||||
nents are in- |
|
|
|
|
|
|
|
|
|
|
|
|
|
| |||||||||||
|
|
|
|
|
|
|
|
|
|
|
|
|
|
|
|
|
|
|
|
|
|
|
|
| |
|
|
|
|
|
|
|
|
|
|
|
|
|
|
|
|
|
|
|
|
|
|
|
|
| |
stalled in a |
|
| Cabinet |
|
|
|
|
|
|
|
|
|
|
|
|
|
|
|
|
|
|
|
| ||
|
|
|
|
|
|
|
|
|
|
|
|
|
|
|
|
|
|
|
|
| |||||
single cabinet, |
|
| Front |
|
|
|
|
|
|
|
|
|
|
|
|
|
|
|
|
|
|
|
| ||
|
|
|
|
|
|
|
|
|
|
|
|
|
|
|
|
|
|
|
|
| |||||
a quiet run- |
|
| Panel |
|
|
|
|
|
|
|
|
|
|
|
|
|
|
|
|
|
| ||||
ning ventila- |
|
|
|
|
|
|
|
|
|
|
|
|
|
|
|
|
|
|
|
|
|
|
|
|
|
tion fan can be |
|
|
|
|
|
|
|
|
|
|
|
|
|
|
|
|
|
|
|
|
|
|
|
|
|
|
|
|
|
|
|
|
|
|
|
|
|
|
|
|
|
|
|
|
|
|
|
|
|
| |
a definite asset | MVP851 Side View |
|
|
|
|
|
|
|
|
|
|
|
|
|
|
|
|
|
|
|
|
|
|
| |
in maintaining |
|
|
|
|
|
|
|
|
|
|
|
|
|
|
|
|
|
|
|
|
|
|
| ||
in Custom Cabinet |
|
|
|
|
|
|
|
|
|
|
|
|
|
|
|
|
|
|
|
|
|
|
| ||
all the system |
|
|
|
|
|
|
|
|
|
|
|
|
|
|
|
|
|
|
|
|
|
|
| ||
|
|
|
|
|
|
|
|
|
|
|
|
|
|
|
|
|
|
|
|
|
|
|
|
| |
components at |
|
|
|
|
|
|
|
|
|
|
|
|
|
|
|
|
|
|
|
|
|
|
|
|
|
|
|
|
|
|
|
|
|
|
| Cutout Opening for Ventilation |
|
|
|
|
|
|
| ||||||||
the coolest |
|
|
|
|
|
|
|
|
|
|
|
|
|
|
|
|
| ||||||||
|
|
|
|
|
|
|
|
|
|
|
|
|
|
|
|
|
|
|
|
|
|
|
|
| |
|
|
|
|
|
|
|
|
|
|
|
|
|
|
|
|
|
|
|
|
|
|
|
|
| |
possible oper- |
|
| Support |
|
|
|
|
| Chassis | ||||||||||||||||
ating tempera- |
|
| Shelf |
|
|
|
|
| Spacers | ||||||||||||||||
|
|
|
|
|
|
|
| 8.89cm | |||||||||||||||||
ture. |
|
|
|
|
|
|
|
|
|
|
|
|
|
|
|
|
|
| |||||||
|
|
|
|
|
|
|
|
|
|
|
|
|
|
|
|
|
|
|
|
|
|
|
|
| |
A custom |
|
|
|
|
|
|
|
|
|
|
|
|
|
|
|
|
|
|
|
|
|
|
|
|
|
cabinet instal- |
|
|
|
|
|
|
|
|
|
|
|
|
|
|
|
|
|
|
|
|
|
|
|
|
|
|
|
|
|
|
|
|
|
|
|
|
|
|
| 6" |
|
|
|
|
|
|
|
|
|
| |
lation should |
|
|
|
|
|
|
|
|
|
|
|
|
|
|
|
|
|
|
|
|
|
|
| ||
|
|
|
|
|
|
|
|
|
|
|
|
|
|
|
|
|
|
|
|
|
| ||||
provide the | MVP851 Bottom View | 5" |
|
|
|
|
|
|
|
|
| 15.24cm |
|
|
|
|
|
|
|
| |||||
following | 12.7cm |
|
|
|
|
|
|
|
|
|
|
|
|
|
|
| |||||||||
|
|
|
|
|
| ||||||||||||||||||||
minimum | in Custom Cabinet |
|
|
|
|
|
|
|
|
|
|
| 33.65cm | ||||||||||||
|
|
|
|
|
|
|
|
|
|
|
|
|
| 21.6cm |
|
| |||||||||
|
|
|
|
|
|
|
|
|
|
|
|
|
|
|
|
|
|
|
|
| |||||
spacing di- |
|
|
|
|
|
|
|
|
|
|
| Cutout Opening |
|
|
|
|
|
|
|
| |||||
mensions for |
|
|
|
|
|
|
|
|
|
|
|
|
|
|
|
|
| ||||||||
|
|
|
|
|
|
|
|
|
|
| for Ventilation |
|
|
|
|
|
| ||||||||
|
|
|
|
|
|
|
|
|
|
|
|
|
|
|
|
|
|
|
|
|
|
|
|
|
|
|
|
|
|
|
|
|
|
|
|
|
|
|
|
|
|
|
|
|
|
|
|
|
|
|
|
|
|
|
|
|
|
|
|
|
|
|
|
|
|
|
|
|
|
|
|
|
|
|
|
|
|
|
|
|
|
|
|
|
|
|
|
|
|
|
|
|
|
|
|
|
|
|
|
|
|
|
|
8