Manuals
/
Multi-Tech Systems
/
Computer Equipment
/
Network Router
Multi-Tech Systems
RF802EW Assign a specific IP address for this user, Use Radius Authentication
Models:
RF802EW
1
39
118
118
Download
118 pages
51.53 Kb
36
37
38
39
40
41
42
43
Page 39
Image 39
Page 38
Page 40
Page 39
Image 39
Page 38
Page 40
Contents
User Guide
Model RF802EW Wireless Router/Access Point
PATENTS
User Guide
Record of Revisions
Wireless Router/Access Point
Chapter 5 - RouteFinder Manager
Chapter 2 - Hardware Installation
Chapter 3 - Software Installation and Configuration
Chapter 1 - Introduction
and Technical Support
Chapter 8 LAN-to-LAN Settings
Chapter 9 - Troubleshooting
Chapter 10 - Service, Warranty
Index
WINIPCFG and IPCONFIG
Chapter 1 - Introduction
Introduction
Chapter 1 - Introduction
The RouteFinder RF802EW
Back Panel
Power 5VDC
Reset
Front Panel
Kernal
Connecting a Remote Site via Cable Modem
Connecting a Local Site to the Internet
Typical Applications
Power Output
Specifications
Wireless
Access Point
Chapter 2 - Hardware Installation
Unpacking the RF802EW
Hardware Installation
Safety
Chapter 2 - Hardware Installation
Cabling the RouteFinder RF802EW
Cabling
Chapter 3 - Software Installation and Configuration
RouteFinder Setup Wizard
Software Installation and Configuration
Software Installation
Chapter 3 - Software Installation and Configuration
2. Click Install Software
Using RouteFinder Setup Wizard
Device IP Address Device MAC Address Device Firmware Version
6. The Setup Wizard Device IP Address dialog box displays
8. The Wireless Settings dialog box displays
Chapter 3 - Software Installation and Configuration
Use Local Client List
Remote Access
Password
Password Verification
Secret
RADIUS Access Server IP Address
Use RADIUS Server
RADIUS Accounting Server IP Address
IP Routing NAT Enabled and IP Routing NAT Disabled
12. The Setup Wizard DNS IP Address dialog box displays
Telephone Number
11. The Setup Wizard Modem Settings dialog box displays
14. The Setup Wizard Modem Setting dialog box re-displays
Select your modem and baudrate as described on the following pages
Testing your Connection
Chapter 4 - Telnet
Chapter 4 - Telnet
Using Telnet to Configure your RouteFinder
LAN -to- LAN Access
Router Password
WAN Ethernet Settings
Internet Access
Edit login script
Async Port Settings
Idle Timeout
Login script
Chapter 4 - Telnet Assign Remote IP
Remote Access
Remote Access Port Settings IP Assigned Method
Authentication Method
Router DNS IP Address
Client Filter Settings
Load Default Settings
RADIUS Access Server IP
Type any key to return to the main menu
Diagnostic
Chapter 5 - RouteFinder Manager
Chapter 5 - RouteFinder Manager
RouteFinder Manager
General Settings
LAN Ethernet Segment
2. Click PPP Settings
WAN Ethernet Segment
Async Port
Assign Remote Site an IP Address
IP Routing NAT Enabled
Tel Number
External Port IP
Allow Remote Dial-In
2. Click Remote Authentication Settings
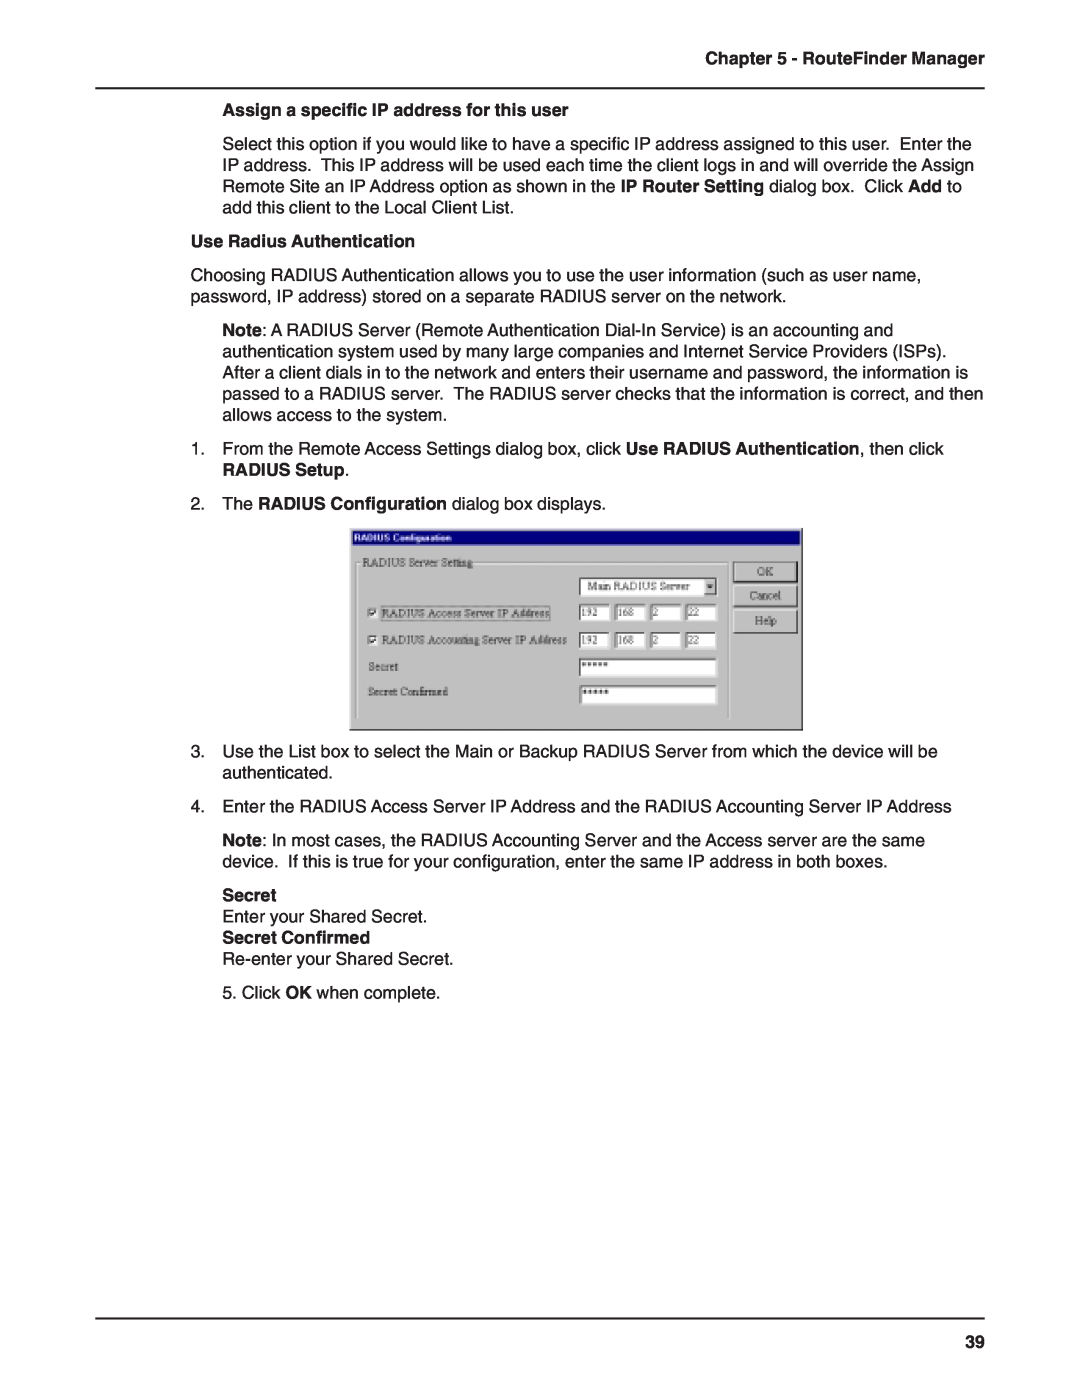
3. The Remote Connection Authentication dialog box displays
Callback Settings
No Callback
Remote Connection Authentication Settings
Use Local Setting
Client Information
Use Radius Authentication
Assign a specific IP address for this user
Secret Confirmed Re-enter your Shared Secret
Assign an IP Address Automatically
Remote Access Settings
Remote Client Authentication
IP Assigned Method for Remote Clients
Enable IP Mapping - Virtual Server
Baudrate
Port Settings
Send and SH
Edit Login Script for Remote Access
Writing a login script for IP Routing
1. From the Port Settings, click Edit Login Script
Example 3 Script for Unreliable ISP 2nd ISP backup
# Login Script
Meaning of Each Login Script Command
Login Script
Dial-up/Hang-up Settings
Modem String Settings
DNS IP Address
LAN DHCP Server
Chapter 5 - RouteFinder Manager Individual Port Options
Dial-up Retry Options
IP Address Mapping Reservation
Chapter 5 - RouteFinder Manager IP Address Pool
Routing Settings
Static Routing
Delete
LAN Ethernet PC 2
What is the purpose of the routing table?
Routing Table
PC 1 WAN Ethernet RF802EW-1 LAN Ethernet WAN Ethernet RF802EW-2
IP Address
Filter Settings
TCP/IP Service Port
Packets Defined by TCP/IP
2. In the Packets defined by User list, select From LAN or From WAN
Enable Client Filter Settings
2. Click Client Filter Settings
Packets defined by User
LAN Local Client List
Remote Clients Applies to Remote Access Ports
5. Enter the TCP/UDP Port Number and click Add
6. Click Privileged Clients
Encryption WEP
Wireless Settings
Device Name
Device Name and Password
Device Password
Refresh Device List
Save Settings to File
Load Settings
To save your settings to a file
To Upgrade your firmware
Upgrade Firmware
General Diagnostic
1. From the main Manager dialog box, click General Diagnostic
3. Record the information if necessary and click OK to exit
Chapter 6 - RouteFinder Monitor
Chapter 6 - RouteFinder Monitor
RouteFinder Monitor
Test Connection
Running RouteFinder Monitor
4. Click Terminate Connection
Terminate Connection
Save to File
3. Select Disconnect Port 1 or Disconnect Port
Overwrite database file
IP Address/Name
Save Now
Autosave
TCP/IP Tab
Event Messages
Total Connection Time
Device Power Turned On
Power-On-Time
Time Tab
Modem Ready
Async Port Modem Power
Status Tab
WAN Ethernet
Rx Bytes
Statistics Tab
Name
Tx Bytes
Chapter 7 - LAN Client Settings
Chapter 7 - LAN Client Settings
LAN Client Settings
Setting up Remote Access Clients
Accessing a Windows NT Server
Win98
Windows 95/98 1. Click Start Settings Control Panel
Adding the dial-up adapter NT Server Connection
Win95
WinNT
Adding TCP/IP NT Server Connection
Windows NT
Windows 95/98/NT
Windows 95/98
Adding Client for Microsoft Networks NT Server Connection
Set up Properties of Components NT Server Connection
Set Your Primary Network Logon NT Server Connection
Dial-up Adapter Windows 95/98
Identification Windows 95/98
Chapter 7 - LAN Client Settings Network Client Windows 95/98
Set Dial-up type NT Server Connection
Chapter 7 - LAN Client Settings Access Windows 95/98
2. Select Share-Level access control
Make Your New Connection NT Server Connection
Accessing a Novell Server
Dial in to your network NT Server Connection
Adding the dial-up adapter Novell Server Connection
Windows NT
Adding IPX/SPX Novell Server Connection
Set Up Properties of Components Novell Server Connection
Adding Client for NetWare Networks Novell Server Connection
Network Client Windows 95/98
Set Your Primary Network Logon Windows 95/98
Chapter 7 - LAN Client Settings 7. Click Properties
Dial in to your network Novell Server Connection
Set Your Access Control Novell Server Connection
Make Your New Connection Novell Server Connection
Set Dial-up type Novell Server Connection
Accessing a Windows NT Server and a Novell NetWare Server
Windows 95/98/NT 1. Click Start Settings Control Panel
Adding the dial-up adapter Novell/NT Server Connection
Adding TCP/IP Novell/NT Server Connection
Adding Client for Microsoft Networks Novell/NT Server Connection
Adding IPX/SPX Novell/NT Server Connection
Set Your Primary Network Logon Novell/NT Server Connection
Adding Client for NetWare Networks Novell/NT Server Connection
Set Up Properties of Components Novell/NT Server Connection
2. Click Properties
Network Protocol Windows 95/98
Set Your Access Control
2. Select the Share-Level access control option
Make Your New Connection NT/Novell Server Connection
Adding the dial-up adapter Unix Server Connection
Accessing a Unix Server
Set Dial-up type NT/Novell Server Connection
Dial in to your network NT/Novell Server Connection
Windows NT
Adding TCP/IP Unix Server Connection
Set Up Properties of Components Unix Server Connection
Make Your New Connection Unix Server Connection
Set Dial-up type Unix Server Connection
Dial in to your network Unix Server Connection
Make New Connection Windows 2000 only
2. Double-click the Network and Dial-up Connections folder
3. Double-click Make New Connection
Chapter 8 LAN-to-LAN Settings
Setting up a Windows machine to share files
LAN-to-LAN Settings
Setting up LAN-to-LAN Routing
Using the Find Computer command
Using LMHosts
Chapter 9 - Troubleshooting
Problem #1
Troubleshooting
Common Problems
Chapter 9 - Troubleshooting
Problem #5
Chapter 9 - Troubleshooting Problem #3
Problem #4
Create a backup of the file c\windows\system\oleaut32.dll
Problem #10
Problem #8
After installing my RF802EW, my modem connection seems to be slower
Problem #9
Chapter 10 - Service, Warranty and Technical Support
Limited Warranty
Chapter 10 - Service, Warranty and Technical Support
Addendum for North American Products
Addendum for International Products
Out of Warranty Repair Costs
MULTI-TECH SOFTWARE LICENSE AGREEMENT
Software User License Agreement
IMPORTANT - READ BEFORE OPENING THE SOFTWARE PACKAGE
SINGLE-USER SOFTWARE LICENSE AGREEMENT
This Agreement shall be governed by the laws of the State of Minnesota
Contacting Technical Support
Online Warranty Registration
Using email
Technical Support
Ordering Accessories
About the Internet
Email info@thesupplynet.com
Appendixes
Appendixes
Appendix A - Regulatory Compliance Information
Class B Statement FCC Part
Industry Canada
PING
WINIPCFG and IPCONFIG
Appendix B - Tools for your RF802EW
RouteFinder Monitor
TRACERT
Serial Cable
Appendix C - Cabling Diagrams
Pin Circuit Signal Name
WAN/LAN Cables
Glossary
DNS DomainNameSystem
D DHCP Dynamic Host Configuration Protocol
Glossary
B Baudrate
L LAN Local Area Network
ISP Internet Service Provider
Glossary IP Addresses
ISDN TA
Protocol
NetworkAddress
P Packet
Port Number
U UDP User Datagram Protocol
Glossary T TCP/IP Transmission Control Protocol/Internet Protocol
Index
Index
Top
Page
Image
Contents