Terminal Panel Features
| 1 |
|
| PO | WER | US |
|
|
|
|
|
|
| |
|
|
|
|
|
|
|
|
|
|
|
|
| ||
|
|
|
|
|
|
|
|
|
|
|
|
|
| |
|
| 2 |
|
|
|
| ON/ |
|
|
|
|
|
|
|
|
|
|
|
|
| STAND | BY |
|
|
|
|
|
| |
|
|
|
|
|
|
| 3 |
|
|
|
|
|
| |
|
|
|
|
|
|
|
|
| SOURCE |
|
|
|
| |
|
|
|
|
|
|
| 4 |
|
|
|
|
|
| |
|
|
|
|
|
|
|
|
|
|
|
|
|
| |
A |
|
|
|
|
|
|
|
|
| PC |
|
|
|
|
U |
|
|
|
|
|
|
|
|
|
|
|
|
| |
D |
|
|
|
|
|
|
|
|
|
|
|
|
| |
| IO |
|
|
|
|
|
|
|
|
| CARD |
| AUTO | |
|
|
|
|
|
|
|
|
|
|
|
| |||
|
|
|
|
|
|
|
|
|
|
|
| ADJUST | ||
|
| R |
|
|
|
|
|
|
|
|
| ACCESS |
|
|
|
| G |
|
|
|
|
|
|
| 5 |
|
|
|
|
|
| B |
|
|
|
|
|
|
|
|
|
|
| |
|
|
| S- |
|
|
|
|
|
|
|
|
|
| |
|
|
| V |
|
|
|
|
|
|
|
|
|
| |
|
|
|
| ID |
|
|
|
|
|
|
|
|
| |
|
|
|
|
| E |
|
|
|
|
|
|
|
|
|
|
| P |
|
| O |
|
|
|
|
|
|
|
| |
|
| C C |
|
|
|
|
|
|
|
|
|
|
| |
|
|
| O |
|
|
|
|
|
|
|
| 6 |
|
|
|
|
| N |
|
|
|
|
|
|
|
|
| ||
|
|
|
| T | L |
|
|
|
|
|
|
| ||
|
|
|
| R |
|
|
|
|
|
|
|
|
| |
|
|
|
|
| O |
| V |
|
|
|
|
|
|
|
|
|
|
|
|
|
|
|
|
|
|
|
|
| |
|
|
|
|
|
|
| ID |
|
|
|
|
|
|
|
|
|
|
|
|
|
| E |
|
|
|
|
|
|
|
|
|
|
|
|
|
| O |
|
|
|
|
|
|
|
|
|
|
|
|
|
|
| U |
|
|
|
|
|
|
|
|
|
|
|
|
|
| S | P |
|
|
|
| |
|
|
|
|
|
|
|
|
| B |
|
|
|
| |
|
|
|
|
|
|
|
|
|
| C C |
|
|
|
|
|
|
|
|
|
|
| 7 |
|
| A |
|
|
|
|
|
|
|
|
|
|
|
|
| R |
|
|
|
| |
|
|
|
|
|
|
|
|
| D |
|
|
|
| |
|
|
|
|
|
|
|
|
|
|
|
|
|
| |
|
|
|
|
|
|
|
|
| 8 |
|
| AC | IN | |
|
|
|
|
|
|
|
|
|
|
|
|
| ||
E N
T E R
MENU
SELECT
CANCE L
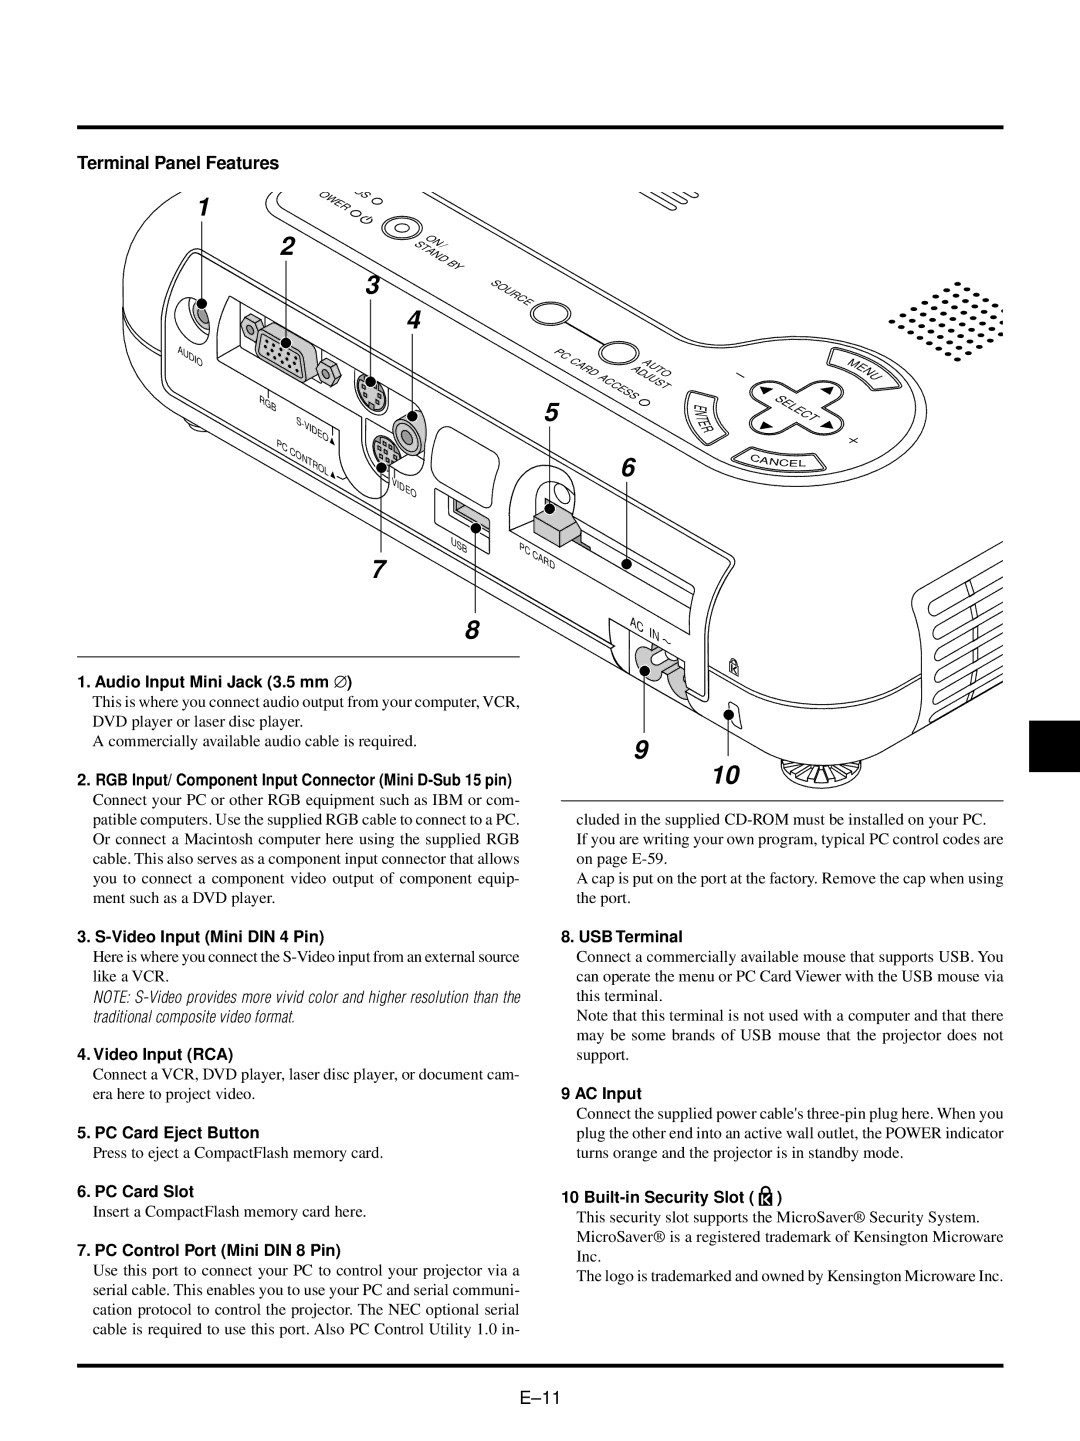
1. Audio Input Mini Jack (3.5 mm ∅)
This is where you connect audio output from your computer, VCR, DVD player or laser disc player.
A commercially available audio cable is required.
2.RGB Input/ Component Input Connector (Mini D-Sub 15 pin)
Connect your PC or other RGB equipment such as IBM or com- patible computers. Use the supplied RGB cable to connect to a PC. Or connect a Macintosh computer here using the supplied RGB cable. This also serves as a component input connector that allows you to connect a component video output of component equip- ment such as a DVD player.
9
10
cluded in the supplied
A cap is put on the port at the factory. Remove the cap when using the port.
3.
Here is where you connect the
NOTE:
4.Video Input (RCA)
Connect a VCR, DVD player, laser disc player, or document cam- era here to project video.
5.PC Card Eject Button
Press to eject a CompactFlash memory card.
6. PC Card Slot
Insert a CompactFlash memory card here.
7. PC Control Port (Mini DIN 8 Pin)
Use this port to connect your PC to control your projector via a serial cable. This enables you to use your PC and serial communi- cation protocol to control the projector. The NEC optional serial cable is required to use this port. Also PC Control Utility 1.0 in-
8. USB Terminal
Connect a commercially available mouse that supports USB. You can operate the menu or PC Card Viewer with the USB mouse via this terminal.
Note that this terminal is not used with a computer and that there may be some brands of USB mouse that the projector does not support.
9 AC Input
Connect the supplied power cable's
10 Built-in Security Slot (  )
)
This security slot supports the MicroSaver® Security System. MicroSaver® is a registered trademark of Kensington Microware Inc.
The logo is trademarked and owned by Kensington Microware Inc.