Manuals
/
NetComm
/
Computer Equipment
/
Network Router
NetComm
NP725 manual Web Management Interface
Models:
NP725
1
30
55
55
Download
55 pages
22.85 Kb
27
28
29
30
31
32
33
34
<
>
Install
Warranty
Basic Configuration
NP725 - Wireless Access Point
RESET Button
Check VAP Profile Settings
Power
Management Services
System Upgrade
NTP Enabled
Page 30
Image 30
Chapter 4. Web Management Interface
27
Page 29
Page 31
Page 30
Image 30
Page 29
Page 31
Contents
NP725 - Wireless Access Point
User Guide
NP725 User Guide
Chapter
Table of Contents
Chapter
System Overview
Legal & Regulatory Information
4.5.3
4.5.4
WDS List Status
Chapter 1. Introduction
1.2 Product Features
1.1 Overview
Chapter 1. Introduction
The AP-2 plays the role as a wireless bridge
1.3 Deployment Topology Examples
Three NP725s construct a network with wired and wireless segments
Chapter 1. Introduction
2.2 Hardware
2.1 Package Contents
Chapter 2. System Overview
Rear Panel
RESET Button
Chapter 2. System Overview
LAN 1 / LAN2
Chapter 2. System Overview
2.3 System Requirement and Preparation
Preparations
Top Panel
Chapter 3. Installation
3.1 Wireless LAN Access Point Connection
Chapter 3. Installation
3.2 Basic Configuration
Chapter 3. Installation
Change Password
Chapter 3. Installation
Configure AP Settings
Check VAP Profile Settings
Choose Security Type
Chapter 3. Installation
Check AP Status
1 Select AP menu 2 Select Security submenu to continue
Chapter 3. Installation
Change Security Type to WEP
Chapter 3. Installation
Change Security Type to
Chapter 3. Installation
Change Security Type to WPA-PSK
Chapter 3. Installation
Change Security Type to WPA-Radius
Configure the Peer
Chapter 3. Installation
Configure WDS Settings
Obtain WDS List Status
Chapter 3. Installation
Now, the system has been installed and configured successfully
Congratulations
Chapter 4. Web Management Interface
Introduction
Chapter 4. Web Management Interface
Log into Web Management Interface
Login
Logout
Chapter 4. Web Management Interface
4.1 System
4.1.1 System Information
System Information
¾ Device Time Current system time
¾ Synchronization There are two options of setting system time
Chapter 4. Web Management Interface
¾ Time Zone Take UTC offset to set this field
1 NTP Enabled
Chapter 4. Web Management Interface
4.1.2 Network Settings
Chapter 4. Web Management Interface
4.1.3 Management Services
Chapter 4. Web Management Interface
4.2 AP
4.2.1 Virtual AP Overview
Chapter 4. Web Management Interface
Security Type The hyperlink showing security type connects to the screen of Security Settings
Chapter 4. Web Management Interface
4.2.2 General Settings
Power
Mode
4.2.3 VAP Configuration
Chapter 4. Web Management Interface
4.2.4 Security Settings
Chapter 4. Web Management Interface
802.1X Provides RADIUS authentication and dynamic WEP
WPA-PSK Provides shared key authentication and WPA data encryption
Chapter 4. Web Management Interface
4.2.5 
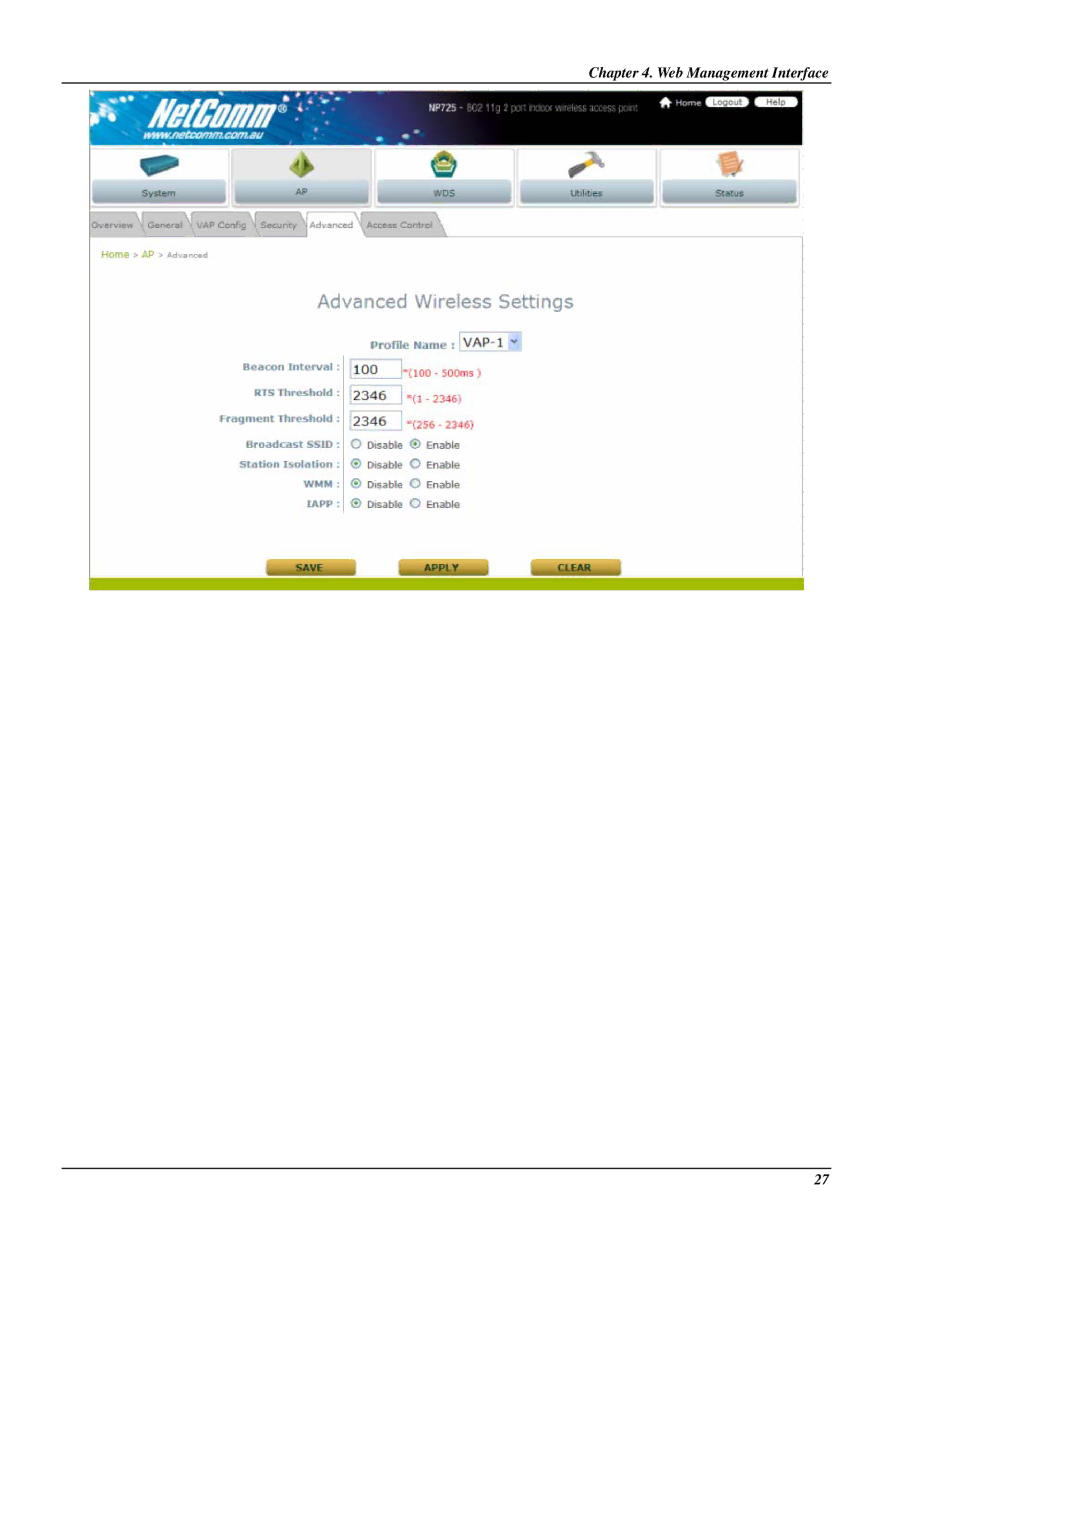
Advanced Wireless Settings
Chapter 4. Web Management Interface
4.2.6 Access Control Settings
Disable
Allow List
Chapter 4. Web Management Interface
Deny List
RADIUS ACL
Chapter 4. Web Management Interface
4.3 WDS
4.3.1 WDS Link Overview
Chapter 4. Web Management Interface
4.3.2 WDS Link Settings
Chapter 4. Web Management Interface
4.4.1 Change Password
4.4 Utilities
Chapter 4. Web Management Interface
4.4.2 Configuration Save / Restore
Chapter 4 Web Management Interface
4.4.3 System Upgrade
Chapter 4. Web Management Interface
4.4.4 Reboot
Chapter 4. Web Management Interface
4.5 Status
4.5.1 System Overview
Chapter 4. Web Management Interface
Channel
RF Card
Band
BSSID
4.5.2 Associated Client Status
Chapter 4. Web Management Interface
4.5.3 WDS List Status
Chapter 4. Web Management Interface
4.5.4 Event Log
Chapter 4. Web Management Interface
4.6 Online Help
Chapter 4. Web Management Interface
The Help button is at the upper right corner of the display screen
4.7Legal & Regulatory Information
Customer Information
Chapter 4. Web Management Interface
Product Warranty
Chapter 4. Web Management Interface
GNU General Public License
Limitations of Warranty
Chapter 4. Web Management Interface
P 02 9424 2070 F 02 9424
Product Warranty
Technical Support
DYNALINK NZ 224b Bush Road, Albany, Auckland, New Zealand