HT-R990
10 cm 4 at the rear. The rear edge of the shelf or
Local regulations when disposing of batteries
Board above the apparatus shall be set 10 cm
Away from the rear panel or wall, creating a flue-like
Precautions
Make sure you have the following accessories
Supplied Accessories
Installing the batteries
Aiming the remote controller
Contents
Services available may vary depending on the region
Features
Amplifier
Processing
Music Optimizer is a trademark of Onkyo Corporation
THX
Front Panel
Front & Rear Panels
For detailed information, see the pages in parentheses
Display
UREMOTE Control jack
Power cord
See Connecting the AV Receiver for connection pages 12 to
Rear Panel
Controlling the AV Receiver
Remote Controller
Connecting the Speaker Cables
Connecting the AV Receiver
Connecting Your Speakers
Speaker Connection Precautions
Speaker Configuration
Number of channels
Surround Back or Front High L terminals
Using a Powered Subwoofer
Using Dipole Speakers
About AV Connections
Connecting AV components
AV Cables and Jacks
Hdmi cable
Audio Return Channel ARC function
Connecting Components with Hdmi
Jack Components Assignable
Audio Return Channel is set to Auto
Jack/Port Components Assignable
Connecting Your Components
How to record a video source
Connecting a Recording Component
Connecting Onkyo uComponents
System On/Auto Power On
Remote Control
Connecting the Power Cord
Connecting the Antennas
Be careful not to injure yourself when using thumbtacks
Plug the power cord into an AC wall outlet
Turning On
Turning On/Off the AV Receiver
Turning Off
AV receiver comes on, the display lights
Playback
Controlling Contents of USB or Network Devices
Selecting the Language for Onscreen Setup Menus
Enter
Understanding Icons on the Display
Playing an iPod/iPhone via USB
Listening to Internet Radio
Playing a USB Device
Top menu of Internet Radio
Listening to Other Internet Radio
Registering My Favorites*1
Windows Media Player 12 Setup
Windows Media Player 11 Setup
Playing Music Files on a Server
Remote Playback
Using the Tuner
Using Remote Playback
Tuning into Radio Stations
Listening to AM/FM Radio
Mode
Presetting AM/FM Stations
Using RDS excluding North American models
Listening to Traffic News TP
Displaying Radio Text RT
Finding Stations by Type PTY
Measurement procedure
Using Basic Functions
Using the Automatic Speaker Setup
` Cancel
When you’ve finished making the settings, press
Use q/wto select a target, and use e/rto change the setting
Press Enter Disconnect the speaker setup microphone
Changing the Speaker Setup Manually
Error Messages
Selecting Listening Modes
Using the Listening Modes
About Listening Modes
Following audio formats are supported by the listening mode
Explanatory Notes
Input Source
Listening Modes
Onkyo-Original DSP Listening Modes
Dolby Pro Logic
Resolution Audio
Dolby Pro Logic IIz
Height
DTS Neo6 Music
DTS Neo6 Cinema
DTS Neo6
THX Cinema
Listening Mode Description Input Speaker Source Layout
Setting the Display Brightness
Using the Home Menu
Using the Sleep Timer
Displaying Source Information
Using Headphones
Muting the AV Receiver
Changing the Input Display
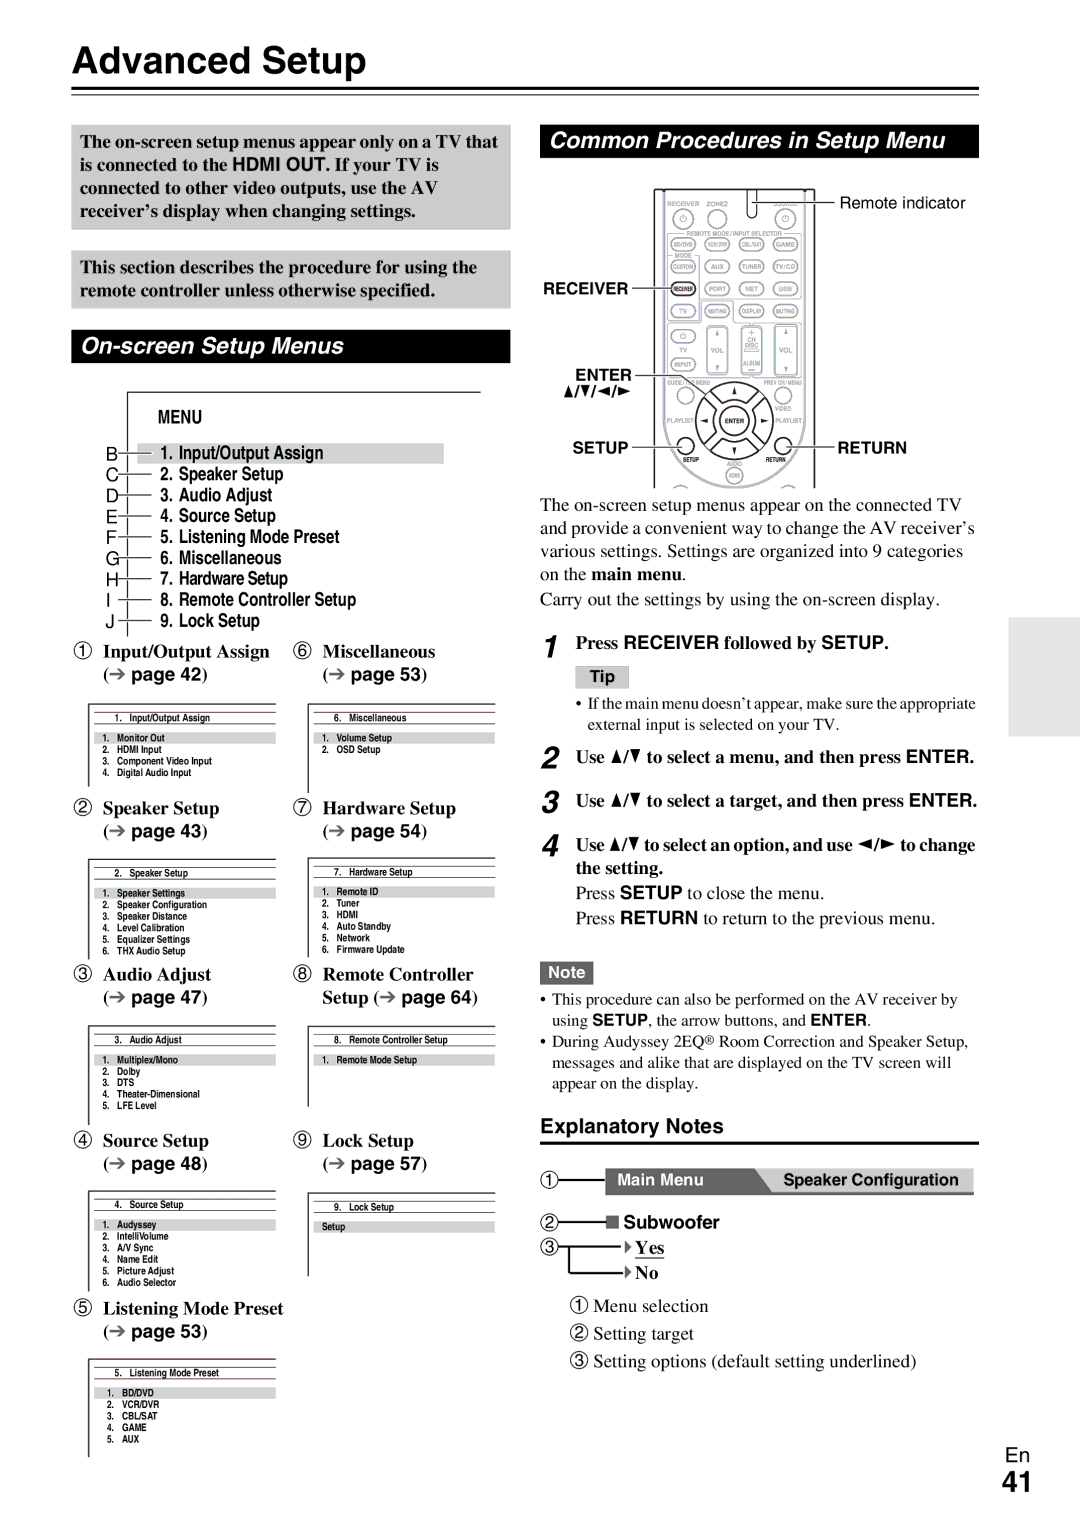
Common Procedures in Setup Menu
Advanced Setup
On-screen Setup Menus
Explanatory Notes
Input/Output Assign
Resolution
Monitor Out
Hdmi Input
Speaker Settings
Speaker Setup
Powered Zone
Component Video Input
Subwoofer, Center, Surround, Surround
Speaker Distance
Front High*1*2*4
Surround Back Ch
Level Calibration
Equalizer Settings
Subwoofer*1
Equalizer
Preserve THX Settings
THX Audio Setup
Surr Back Speaker Spacing
BGC
Dolby
Audio Adjust
Multiplex/Mono
Theater-Dimensional
Source Setup
LFE Level
Audyssey
Reference Level
Dynamic Volume
Name Edit
IntelliVolume
Sync
Picture Adjust
Audio Selector
Charge Mode
Volume Setup
Listening Mode Preset
Miscellaneous
DTS/DTS-ES/DTS-HD
Remote ID
Hardware Setup
OSD Setup Tuner
Auto Standby
Dhcp
Firmware Update
Network
Using the Audio Settings
Remote Controller Setup
Lock Setup
Re-EQ
Late Night
Music Optimizer
Connecting the Zone Speakers to an Additional Amplifier
Connecting Your Zone 2 Speakers Directly to the AV receiver
Zone
Making Zone 2 Connections
Operating on the remote controller
Adjusting the Volume for Zone
Controlling Zone 2 Components
Muting Zone
UP-A1 Dock
Using the Onkyo Dock
IPod/iPhone Playback via Onkyo Dock
RI Dock
Controlling Your iPod/iPhone
With the RI Control
Without the RI Control
Available buttons
Looking up for Remote Control Code
Preprogrammed Remote Control Codes
Entering Remote Control Codes
Controlling Other Components
Resetting Remote Mode Buttons
Remote Control Codes for Onkyo Components Connected via u
Resetting the Remote Controller
Controlling Other Components
Cassettetape deck
Components Buttons
TV VOL q/w
Number +10
Audio
Troubleshooting
Power
Speaker volume cannot be set as required
There’s no sound with a certain signal format
About DTS signals
Only the front speakers produce sound
Tuner
Remote Controller
Video
Recording
UP-A1 Dock for iPod/iPhone
Zone
Music Server and Internet Radio
Others
USB Device Playback
Component Video OUT
Important Note Regarding Video Playback
Network Requirements
Network/USB Features
Connecting to the Network
USB Device Requirements
Server Requirements
Server playback
Remote playback
About Dlna
Supported Audio File Formats
Update procedure
Firmware Update
Updating the Firmware via Network
Before you start
Errors during an update via network
Troubleshooting
Error Code Description
Updating the Firmware via USB
Errors during an update via USB
Video Connection Formats
Connection Tips and Video Signal Path
Signal Selection
OUT
Audio Connection Formats
About Copyright Protection
About Hdmi
Supported Audio Formats
Operations that can be performed with Connection
Using an RIHD-compatible TV, Player, or Recorder
About p-compatible components
Confirm the connecting and setting
How to connect and setup
Confirm the settings
Operate with the remote controller
Amplifier Section
Specifications
Video Section
Tuner Section
Output
Video Resolution Chart
Output
Input 4K *2 1080p/24 1080i 720p 480p/576p 480i/576i
Remarques importantes pour votre sécurité
Alimentation
Précautions
Prévention de la perte d’acuité auditive Prudence
Piles et exposition à la chaleur Avertissement
Mise en place des piles
Accessoires fournis
Pointage de la télécommande
Table des matères
Commande d’autres appareils
Branchements
Opérations plus sophistiquées
Amplificateur
Fonctionnalités
Traitement
Divers
THX
Panneau avant
Panneaux avant et arrière
Écran
Prises Hdmi in et OUT
Prise uREMOTE Control
Panneau arrière
Commandes de l’Ampli-tuner AV
Télécommande
Branchement des câbles d’enceinte
Branchement de l’Ampli-tuner AV
Branchement de vos enceintes
Précautions concernant le branchement des enceintes
Configuration des enceintes
Nombre de canaux
Enceinte Couleur
Utilisation d’un subwoofer amplifié caisson de basses
Utilisation d’enceintes dipolaires
Raccordement d’appareils audiovisuels
Propos des branchements audiovisuels
Câbles et prises AV
Câble Hdmi
Fonction de canal audio de retour ARC
Branchement d’appareils au moyen d’un câble Hdmi
Prise Appareils Affectable
« Audio Return Channel » est réglé sur « Auto »
Prise/port Appareils Affectable
Raccordement de vos appareils
Comment enregistrer une source vidéo
Raccordement d’appareils Onkyo u
Télécommande
Branchement d’un appareil d’enregistrement
Mise en marche du système/Allumage automatique
Montage de l’antenne cadre AM
Branchement des antennes
Branchement du cordon d’alimentation
Mise sous tension
Mise sous/hors tension de l’Ampli-tuner AV
Extinction
’ampli-tuner AV s’allume ainsi que l’afficheur
Sélection de la langue pour les menus de configuration OSD
Commande du contenu de périphériques USB ou réseau
Lecture
Lecture depuis l’appareil raccordé
Lecture sur un iPod/iPhone via USB
Compréhension des icônes de l’afficheur
Écoute de webradio
Lecture sur un périphérique USB
Menu principal des webradios
Écoute d’une autre webradio
Enregistrement de Mes Favoris*1
Lecture distante
Configuration de Windows Media Player
Lecture de fichiers musicaux sur un serveur
Utilisation de la lecture distante
Écoute de la radio AM/FM
Utilisation du tuner
Recherche de stations de radio
Utilisation du RDS sauf les modèles pour l’Amérique du Nord
Pré-réglage de stations de radio AM/FM
Écoute d’informations sur la circulation routière TP
Affichage d’informations textuelles RT
Recherche de stations par type PTY
Utilisation des fonctions de base
Utilisation de la configuration automatique des enceintes
Procédure de mesure
Output Level sur THX Position
Lorsque vous avez terminé les réglages, appuyez Sur Enter
`Cancel
Les options sont
Ces réglages sont appliqués à tous les sélecteurs d’entrée
` Retry Réessayez ` Cancel
Modification manuelle de la configuration des enceintes
Messages d’erreur
Utilisation d’un subwoofer caisson de basses
Sélection des modes d’écoute
Utilisation des modes d’écoute
Disposition des enceintes
Propos des modes d’écoute
Source d’entrée
Modes d’écoute
Mode d’écoute Description Source Disposition ’entrée
Modes d’écoute DSP exclusifs d’Onkyo
Surround Pro Logic TV, DVD, VHS, par exemple
Utilisé au lieu de Dolby Pro Logic
DVD, par exemple
Logo Dolby Pro Logic
Sont activés
VHS, par exemple
Seul Timbre Matching est activé
Être utilisée Le témoin PLIIx s’affiche à l’écran
Mode d’écoute Description Source Disposition ’entrée
Utilisation de la minuterie de désactivation automatique
Utilisation du menu principal
Réglage de la luminosité de l’écran
` Vous pouvez changez les réglages suivants
Affichage des informations relatives à la source
Activation du mode sourdine de l’Ampli-tuner AV
Utilisation d’un casque
Modification de l’affichage de l’entrée
Procédures courantes dans le menu de configuration
Configuration avancée
Menus de configuration OSD
Subwoofer
Sélecteur d’entrée
Input/Output Assign Association d’entrée/de sortie
Voici les affectations par défaut
Sélecteur d’entrée Affectation par défaut
Speaker Setup Configuration des enceintes
Sélectionnez si l’ordinateur PC est connecté à PC
Speaker Configuration
Puis utilisez e/ rpour sélectionner une
Level Calibration Equalizer Settings
Enceinte
Puis e/rpour régler le niveau sonore à cette fréquence
THX Audio Setup
` -3 à 0 à +3
Audio Adjust Ajustement audio
’audio mono est restitué par l’enceinte centrale
Préparation
Source Setup Configuration de la source
Sélectionner si l’angle d’écoute est de
` -QdB,-20dB,-10dB ou 0dB
Active le mode Medium Compression
Active le mode Light Compression
Propos de Audyssey Dynamic Volume
Audyssey Dynamic EQ Décalage du niveau de référence ` 0dB
Pour corriger un caractère
Ce réglage détermine la taille de l’image
’ajuste pas la qualité de l’image change la résolution
Tous les réglages peuvent être réalisés manuellement
« Through »
’ampli-tuner AV restitue toujours des signaux analogiques
` Hdmi
Miscellaneous Divers
Listening Mode Preset Mode d’écoute préréglé
Le menu suivant apparaît
La plage d’affichage est Min, 0.5 à 99.5, Max
Hardware Setup Configuration du matériel
OSD Setup
Auto Standby
Qu’est-ce que le DNS ?
Qu’est-ce que le protocole Dhcp ?
« 10.0.0.0 » à « 10.255.255.255 »
« 172.16.0.0 » à « 172.31.255.255 »
Lock Setup Configuration du verrouillage
Remote Controller Setup Configuration de la télécommande
Réglages de commande de la tonalité
Utilisation des réglages audio
Faible réduction dans la plage dynamique
Pièce principale
Réalisation des branchements de la zone
Réglage du volume de la zone
Commande des appareils de la zone
Activation du mode sourdine dans la zone
Utilisation sur la télécommande
Station d’accueil UP-A1
Lecture sur iPod/iPhone via une station d’accueil Onkyo
Utilisation de la station d’accueil Onkyo
Avec la commande RI
Commande de votre iPod/iPhone
Sans la commande RI
Station d’accueil RI
Station
Boutons disponibles
’accueil Onkyo
Boutons
Codes de télécommande préprogrammés
Commande d’autres appareils
Recherche d’un code de télécommande
Saisie des codes de télécommande préprogrammés
Commande d’autres appareils
Réinitialisation de la télécommande
Commande d’un téléviseur
Réinitialisation des boutons de
Numéro +10
Platineà cassette
Alimentation
Dépannage
’ampli-tuner AV ne s’allume pas
’ampli-tuner AV s’éteint de manière inattendue
Seuls les enceintes avant reproduisent un son
Certains formats de signal ne produisent aucun son
Seule l’enceinte centrale reproduit un son
’enceinte centrale ne reproduit aucun son
Vidéo
Télécommande
Enregistrement
Station d’accueil UP-A1 pour iPod/iPhone
Lecture sur un périphérique USB
Serveur musical et radio en ligne
Autres
Monitor OUT
Atténuation de la vidéo
Remarque importante concernant la lecture de vidéos
Spécifications du réseau
Fonctionnalités réseau/USB
Connexion au réseau
Spécifications du serveur
Configuration requise des périphériques USB
Lecture sur un serveur
Lecture distante
Propos de Dlna
Formats de fichiers audio pris en charge
Mise à jour du logiciel via un réseau
Mise à jour du logiciel
Avant de commencer
Procédure de mise à jour
Erreurs pendant une mise à jour via un réseau
Dépannage
Mise à jour du logiciel via USB
Erreurs pendant une mise à jour via USB
Formats de connexion vidéo
Conseil de connexion et trajet du signal vidéo
Sélection du signal
Téléviseur, vidéoprojecteur, etc
Formats de connexion audio
Propos de la protection des droits d’auteur
Propos de l’interface Hdmi
Formats audio pris en charge
Opérations réalisables avec un branchement p
Propos des appareils compatibles p
Lecteurs/enregistreurs
Pour les téléviseurs compatibles p
Comment procéder à la connexion et au réglage
Utilisation à l’aide de la télécommande
Vérifiez la connexion et le réglage
Vérifiez les réglages
Section amplificateur Généralités
Caractéristiques techniques
Section vidéo
Section tuner
Résolutions disponibles 3840 ⋅ 2160 24/25/30 Hz
Tableau des résolutions vidéo
Sortie
Entrée 4K *2 1080p/24 1080i 720p 480p/576p 480i/576i
Mémo
Mémo
4 0 0 6 6