F0213MG0
Model No. DMC-FT5/DMC-TS5
Contents
Taking Pictures Using the Built-in Flash
About the LCD Monitor Using the Zoom
Switching to the appropriate flash setting
Take the Outdoors Scene Expressively
121
118
128
132
Using the barometer 142 Using the compass 144
Using the altimeter 136
Using the Playback Menu 156
135
Using Lumix Club 206
Connecting Easily to a Smartphone/tablet NFC 182
How to Use the Wi-Fi Setup Menu 211
Selecting the connection method 185
Lens or LCD monitor may be damaged
Care of the camera
Conditions in which inner side of the lens may be fogged
Camera What to do when inner side of the lens is fogged
About the information of recording location
When used during overseas travel etc
About the positioning
About the compass, altimeter, depth meter, and barometer
Waterproof/Dustproof Performance
Press 2 to select Yes, and press MENU/SET
Handling of the camera
Press 2/1 to change the picture
Return to the previous screen View the next screen
Close the side door securely
Rinse with water with the side door closed
Using the camera underwater
Before Use
Standard Accessories
Or Press
Names and Functions of Main Parts
Microphone
Battery slot P22
GPS antenna P121
NFC antenna P182 Hdmi socket P213
Charging
Charging the Battery
Use the dedicated charger and battery
Battery indication
About the Charge indicator On Charging Off
Battery indication is displayed on the LCD monitor
When the Charge indicator flashes
Recording conditions by Cipa standard
Recording still pictures
MP4
Playback
Confirm that there is no foreign object. P12
Inserting and Removing the Card optional/the Battery
Do not touch the connection terminals of the card
About the water leakage warning message
About the Built-in Memory/the Card
Following operations can be performed using this unit
Built-in Memory
Card
Preparation
Aspect ratio X, Quality a
Number of recordable pictures
FHD/50p
Available recording time when recording motion pictures
Press camera ON/OFF button
Setting Date/Time Clock Set
Requirements for Underwater use
For details, refer to P11
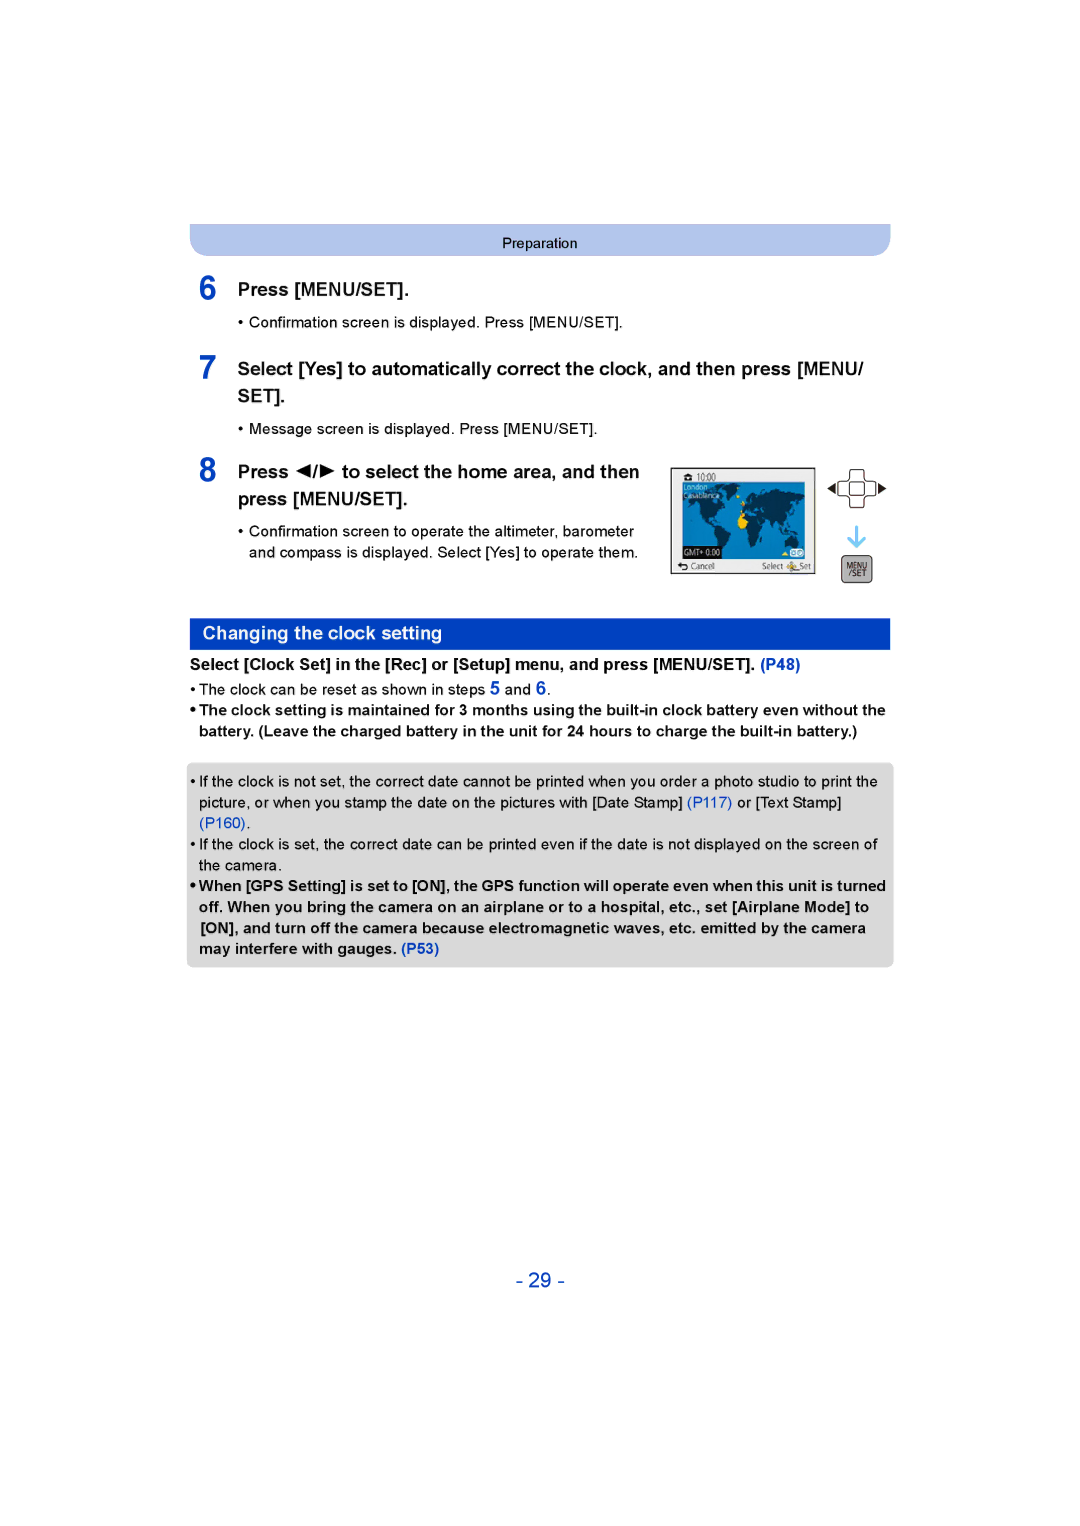
Press 2/1 to select the home area, and then press MENU/SET
Changing the clock setting
Press MENU/SET
Fit the strap and hold the camera carefully
Tips for taking good pictures
Preventing jitter camera shake
Direction Detection Function Rotate Disp
Selecting the Recording Mode
Press Mode
Taking Pictures using the Automatic Function
Recording Mode
Shutter button
When recording motion pictures
When taking pictures
Scene Detection
Portrait Scenery Low Light Macro
Menus specific to Intelligent Auto Mode Burst P111
Changing the settings
Color Mode
Motion Deblur
About the flash P66
IHDR
ISO sensitivity Aperture value Shutter speed
Taking Pictures with Your Favourite Settings
About focus range
Focusing
Range of focus during the Intelligent Auto Mode
Picture
Applicable modes
Recording Motion Pictures
Start recording by pressing the motion picture button
Avchd Progressive
About the recording format for recording motion pictures
MP4
About the compatibility of the recorded motion pictures
Selected Recording Mode
Press Press 2/1 to select pictures
Playing Back
Playing Back Motion Pictures
Then press 3 to play back
Displaying Multiple Screens Multi Playback
Using the Playback Zoom
Press L W on the zoom button
Press Z T on the zoom button
Press 3 to pause motion picture playback Press MENU/SET
Creating Still Pictures from a Motion Picture
Playing Back Group Pictures
Recording format Picture size
Fast forward, Forward while pausing
Fast rewind, Rewind while pausing
Continuously playing back Group Pictures
Operations during Group Pictures playback
Deleting Pictures
Once deleted, pictures cannot be recovered
To delete a single picture
Select the picture to be deleted, and then press
To delete multiple pictures up to 100 or all the pictures
When Delete Multi is selected Press MENU/SET
Setting menu items
Setting the Menu
Press 3/ 4 to select the menu item and then Press MENU/SET
Press 3/4 to select the setting and then press MENU/SET
Using the Quick Menu
Setting Date/Time
About the Setup Menu
Clock is updated automatically using the GPS function
Check before use
World Time
Destination Travel destination area
Home Your home area
Location SET
Travel Setup SET
Travel destination is recorded at the time of recording
Travel Date
Beep Tone 1 / 2 Shutter Vol
Beep Level
High
Brightness
Rec. Info Pattern ON/OFF
¢ Can be set only when Recording Mode is set
Monitor Luminance
Guide Line
Angle of view for Motion Picture Recording can be checked
It allows you to easily check a picture’s exposure
Histogram
Video Rec Area
LED Light
To use a simple light
Economy
Auto Power Off
2MIN./5MIN./10MIN./OFF ECO Monitor Power Save
Pictures are displayed until one of the buttons is pressed
Reset the file number of the next recording to
SEC 2 SEC Hold
Video output is set to Ntsc system
Video Out Ntsc
PAL
Video output is set to PAL system
Viera Link
Operation is performed with the buttons on this unit
3D Playback
Rotate Disp
Displays the amount of jitter the camera has detected
Set the language displayed on the screen
Version Disp
~ Language
Press DISP. to change
About the LCD Monitor
LCD monitor
Number of recordable pictures Available recording time
GHI
Playback Mode
Press W on the zoom button
Using the Zoom
Press T on the zoom button
Optical Zoom
Digital Zoom
Extra Optical Zoom EZ
Intelligent Zoom
Switching to the appropriate flash setting
Taking Pictures Using the Built-in Flash
Press 1 ‰
Press 3/ 4 to select the item and then press
Available flash range
Available flash settings by Recording Mode
Flash setting Shutter speed Sec
Shutter speed for each flash setting
Taking Close-up Pictures AF Macro/Macro Zoom
Enlarge when taking the picture
From the lens by pressing the zoom button upmost to Wide 1k
You can take a picture with the Digital Zoom up to 3k while
Picture is taken 2 seconds after shutter is pressed
Taking Pictures with the Self-timer
Picture is taken 10 seconds after shutter is pressed
Underexposed Properly exposed
Compensating the Exposure
Compensate the exposure
Towards positive Towards negative
Is set for the flash when Auto Bracket is set
Taking Pictures Using Auto Bracket
With Auto Bracket d1 EV 1st picture 2nd picture
D0 EV J1 EV I1 EV
Press 2/1 to adjust, and then press MENU/SET
Taking picture by setting the exposure manually
Press
Available Aperture Value Wide
Manual Exposure Assistance
Press 3/4 to select image effects and then press MENU/SET
Taking Pictures with different image effects
Retro
Expressive
High Key
Low Key
Dynamic Monochrome
Sepia
Impressive Art
High Dynamic
Toy Effect
Cross Process
Miniature Effect
Items that can be set
Star Filter
Soft Focus
One Point Color
This effect blurs the overall image to produce a soft feel
Take the Outdoors Scene Expressively
Sports Mode
Snow Mode
About the Depth indicator
Beach & Snorkeling Mode
About the white balance
Aim the AF area at the subject Press 2 to fix the focus
Advanced Underwater Mode
Fixing the focus underwater AF Lock
After confirming the recording direction, press MENU/SET
Taking panorama pictures Panorama Shot Mode
Second Seconds
Technique for Panorama Shot Mode
Recording from left to right
Vertical
About playback
Taking pictures that match the scene being recorded
Soft Skin
Portrait
Scenery
This allows you to take pictures of a wide landscape
Night Portrait
Technique for Night Portrait Mode
Night Scenery
Handheld Night Shot
Food
What Is HDR?
Baby1/Baby2
To cancel Age and Name Select the OFF setting in step
Pet
Birthday Name
High Sens
Sunset
Starry Sky
Glass Through
Technique for 3D Photo Mode
3D Photo Mode
To avoid mistakes in 3D recording
You cannot record 3D pictures in vertical orientation
Entering Text
Aspect Ratio
Using the Rec Menu
For details on Rec menu settings, refer to P48
Aspect Ratio
Picture Size
Aspect Ratio Y
Aspect Ratio W
Quality
Sensitivity
To ISO sensitivity setting
100/200/400
800/1600
White Balance
Auto White Balance
Setting the White Balance manually
100
Press MENU/SET to finish
Finely adjusting the White Balance
101
102
AF Mode
About š Face Detection
103
Quick AF
Settings ON/OFF
104
Face Recog
105
106
Face Settings
Take the picture adjusting the face with the guide
Select item to edit with 3/4, and then press MENU/SET
107
Press 3/ 4 to select the focus icon, and then press Menu
Delete
108
Min. Shtr Speed
109
Exposure
Resolution is activated
Resolution
110
Approx times while limiting deterioration of the picture
Flash setting is fixed to ‰
Settings Description of settings Number Recordable Pictures
111
Burst
Aspect ratio
Flash setting is fixed to Πexcept for
112
113
Taken with 2/1, adjust with 3/4, and then press Menu
Time Lapse Shot
Then press MENU/SET to set
114
115
Color Mode
Color Reproduction
AF Assist Lamp
Stabilizer
116
Red-Eye Removal
Date Stamp
117
Clock Set
You can take a picture with date and time of recording
For details on Motion Picture menu settings, refer to P48
Using the Motion Picture Menu
118
Rec Format
When MP4 is selected
When Avchd is selected
119
Rec Quality
120
Settings AUTO/OFF
Continuous AF
Wind Cut
Receiving signals from GPS satellites
Recording using the GPS function
121
About the GPS
It is displayed when on is set
You can confirm and update the current reception status
GPS status indicator
122
About the Icon indicating positioning results
123
About the Icon indicating positioning status
Displayed location name information
When positioning is taking a long time
124
125
Update the GPS information
Press MENU/SET in the information confirmation screen
About automatic updating of positioning
126
When not storing specific location name information
Change the recorded location name information
Select Delete country, etc., in above step
Register additional landmarks
127
Changing the proxy settings
Update using the GPS Assist Tool
Reducing the Time Required for Positioning
128
Update by connecting this unit to a PC Preparation
Click Update on the screen of the PC
129
Launch the GPS Assist Tool with the PC
130
131
Update using the Wi-Fi Function
Check the validity period of the GPS assist data
Press 3/ 4 to select Expiry Date, and then press MENU/SET
132
GPS Logs
Record GPS Logs
Set Recording interval and Recording duration
Output GPS logs to files
133
GPS log storage location
Card
134
Settings Description of settings DAY
Delete GPS Logs
Deletes 1 GPS log
135
Sensors compass/altimeter/barometer are operated
136
Using the altimeter
About altitude conversion
Altitude
Press 2/ 1 to select the items, and press 3/ 4 to set
Adjusting the Altimeter
137
138
Adding an altimeter log
139
Viewing the altimeter log
140
About the altitude graph
Moves the log left and right
Deleting the altimeter log
141
Press 3/ 4 to select Delete Log, and then press MENU/SET
Exit the menu after it is executed
142
Using the barometer
About the measured altitude and atmospheric pressure
143
About the declination adjustment
Using the compass
144
Bearings are measured based on the direction the lens
145
Adjusting the compass
When is displayed on the compass, perform Calibrate compass
You can play back the recorded pictures in various methods
Various methods of playback
146
Slide Show
147
Operations performed during slide show
Cursor displayed during playback is the same as 3/4/2/1
148
Changing the slide show settings
Effect
Repeat
Filtering Play
149
Press 3/4 to select an item and then press MENU/SET
Select the item with 3/ 4, and press MENU/SET
Category Recording information e.g. Scene Modes
150
Changing the filtering date
151
Calendar
152
Press 3/4/2/1 to select the date you want to search
Press MENU/SET to display the list of images
153
Having Fun with Recorded Pictures Retouch
Auto Retouch
Press 2/1 to select a picture, and then press
Press 2/1 to select an picture, and then press
154
Creative Retouch
155
Location Logging
Using the Playback Menu
156
157
Enter the text. P94
158
Title Edit
159
Press 3/4 to select the settings, and then press MENU/SET
Place-Name Edit
Select Place-Name Edit on the Playback menu. P48
Press 3/4/2/1 to select the pictures
160
Text Stamp
Baby/Pet
161
Face Recognition
Retouch
162
Press Q.MENU Press 3 to select OK, and then press MENU/SET
163
It cannot be restored once divided
Video Divide
Press 3 at the location to divide
Press 3/4 to select Start, and then press MENU/ SET
164
Time Lapse Video
Press 2/1 to select the size, and then press MENU/SET
165
Resize
Reduction Enlargement 2/1 Move
166
Cropping
Favorite
167
Select Favorite on the Playback menu. P48
Select the picture, and then press
Print Set
168
To print the date
169
Protect
170
Face Rec Edit
171
Copy
172
Use the camera as a wireless LAN device
Wi-FiRfunction
173
Before Use
Images that can be sent
About the Wi-Fi connection lamp
174
175
What you can do with the Wi-Fi function
Them back on the camera
Smartphone/tablet, or save and edit it on PC
176
Installing the smartphone/tablet app Panasonic Image App
Remote Shooting
Press Wi-Fi
Connecting to a smartphone/tablet
177
Press 3/4 to select Remote Shooting, and then press Menu
Playing back pictures in the camera
178
Taking pictures via a smartphone/tablet remote recording
History Connection
179
Favorite Connection
180
Registering to favourites
Enter a registration name
Select the destination with 3/4, and then press
181
Remove from Favorite Change the Order in Favorite
Change the Registered Name
182
Connecting Easily to a Smartphone/tablet NFC
Compatible models
Preparation On the camera
183
About NFC
184
Select this option when you are not sure about the WPS
Connecting via a wireless access point
To a wireless access point
Selecting the connection method
Press 3/4 to select the encryption type, and press MENU/SET
186
Common Key
Open No Encryption/WEP
187
Connecting directly
188
Playback on TV
Press 3/4 to select Playback on TV, and then press Menu
Take or play back pictures on this unit
189
Send Images While Recording
When sending images to smartphone/tablet
190
Take pictures
Start Image App on your smartphone/tablet.¢ P176
191
192
Direct, WPS Connection, or Manual Connection. P187
When sending images to PC
193
194
195
When sending images to Cloud Sync. Service
196
When sending images to WEB Service
197
When sending images to AV device
When sending images to External, the following are required
198
Send Images Stored in the Camera
Press 3/4 to select Single or Multi and then press MENU/SET
Select and send the images. P200
199
Multi setting
Select and send the images Single setting
200
Press 2/1 to select the picture Press MENU/SET
201
202
203
204
205
When sending images to Printer
206
Using Lumix Club
About the Lumix Club
Refer to the Lumix Club site for details
Check the login ID and press MENU/SET
Enter a password and press MENU/SET
Check or change the acquired login ID/password
Enter the login ID or password, and press MENU/SET
208
Check the details if the terms of use have been updated
Delete your login ID and account from the Lumix Club
Using WEB services
Select Yes in the login ID delete confirmation screen
209
Device settings
Configuring the external AV device settings
210
Change or delete information on registered AV device
211
How to Use the Wi-Fi Setup Menu
212
Setup
Wi-Fi Password
213
Playing Back Pictures on a TV Screen
Connect the camera and a TV
To connect with an Hdmi micro cable optional
214
What is the Viera Link Hdmi Hdavi Control?
Using Viera Link Hdmi
215
Preparations Set the Viera Link to ON. P60
Other linked operations Turning this unit off
Automatic input switching
216
217
Playing back 3D pictures
Preparations Set 3D Playback P60 to 3D
Select 3D Play in Filtering Play in the Playback Mode. P149
218
219
Saving still pictures and motion pictures on your
About the supplied software
220
PHOTOfunSTUDIO 9.1 PE Windows XP/Vista/7/8
LoiLoScope 30 day full trial version Windows XP/Vista/7/8
MB or more for installing software
Installing supplied software
221
Check the environment of your PC
Preparations Install PHOTOfunSTUDIO to the PC
Copy the images to a PC using PHOTOfunSTUDIO
222
Press 3/4 to select PC, and then press MENU/SET
223
Copying to a PC without using PHOTOfunSTUDIO
For Windows
For Mac Drive Noname is displayed on the desktop
224
Connection in the PTP Mode Set USB Mode to PictBridgePTP
225
Saving still pictures and motion pictures on a Recorder
This Site is English only
Dubbing with non-compatible equipment
Press 3/4 to select PictBridgePTP, and then press MENU/SET
Printing the Pictures
226
Selecting multiple pictures and printing them
227
Selecting a single picture and printing it
228
Print Settings
Print with Date
Num.of prints
Paper Size
229
Layout Layouts for printing that can be set with this unit
When printing different pictures on 1 sheet of paper
230
Recording
Screen Display
231
Age¢2 P91, 107 Title P158
232
233
234
When using in a cold climate or at low temperatures
235
About the LCD Monitor
Cleaning
236
Bring charged spare batteries when going out
Do not remove or damage the external label on the battery
Dispose of unusable battery
237
Charger
238
239
When uploading images on WEB services
About the personal information
Disclaimer
240
When not using the camera for a long period of time
About the picture data
About tripods or unipods
Restrictions
No Warranty
241
242
Disclaimer of Warranty
Disclaimer of Liability
Export Control
About copyright
243
About navigation functions
This camera is not equipped with a navigation function
Resources Canada. All rights reserved
244
245
Landmark types
246
247
Message Display
Read Error/Write Error Please check the card
Please turn camera off and then on again/System Error
248
Insert SD card again/Try another card
249
This battery cannot be used
Folder cannot be created
Recording failed
250
Login failed. Please check Login ID and Password
Connection failed
Cannot connect to server
251
Troubleshooting
Battery and power source
About the GPS
252
Recording
253
Recorded picture looks rough Noise appears on the picture
Taking pictures using Auto Bracket is not possible
254
Lens
255
Flash
256
LCD monitor
Displaying images takes long in Multi Playback
257
Playback
Red part of the recorded image has changed colour to black
258
Thumbnail is displayed appears on the screen
Sound of the recorded motion pictures sometimes breaks up
259
About the Wi-Fi function
Images cannot be transmitted to the WEB service
Have forgotten the login ID or password for the Lumix Club
It takes time to transmit an image to the WEB service
260
261
Have forgotten the password for the Wi-Fi
There is an image that could not be transmitted
Transmission of the image fails midway
262
Cannot be connected using NFC
Motion picture cannot be transmitted
Cannot send images to an AV device
TV, PC and printer
263
Card is not recognised by the PC. Sdxc memory card is used
264
Ends of the pictures are cut at printing
Panorama picture is not printing correctly
Others
265
266
267
268
License Issues
269
270
271
272
273
274
275
276