Digital Camera
Customers only F0513WT0
P326
P322
P325
P328
About the indication of the applicable mode Applicable modes
About the symbols in the text
Contents
Taking Pictures that match the Scene being recorded
Taking Pictures using the Automatic Function
106
110
131
119
129
133
176
161
171
178
Using the Playback Menu 222
Using the Motion Picture Menu 219
Recording Motion Picture 211
About Connections 280
Wi-Fi Setup Menu 288
Registering to the Lumix Club 274
Saving still pictures and motion pictures on your PC 298
Others
310
Care of the camera
Do not subject to strong vibration, shock, or pressure
Standard Accessories
Card is optional
Names and Functions of Components
Camera body
Speaker P57
Diopter adjustment dial P66
Focus distance reference mark P175
Stereo microphone P221
FS014042 Lumix G Vario 14-42 mm/ F3.5-5.6 ASPH./MEGA O.I.S
FS45150 Lumix G Vario 45-150 mm/ F4.0-5.6 ASPH./MEGA O.I.S
Taking pictures at a high angle
Monitor
Free angle shooting
Taking pictures at a low angle
Drag
Touch screen
Touch
Pinch enlarge/reduce
ON/OFF
Not available in these cases
Can be used
Displayed on the right of the screen
Rear Dial
Cursor buttons/MENU/SET button
Rotating left or right Pressing the rear dial
Move the lever to left or right to operate
Aperture setting is operable
Function Lever
Zoom operations are operable
Leica mount specification lens
Micro Four Thirds mount specification lens
Four Thirds mount specification lens
About the Lens
About the lens and functions
Attaching the lens
Changing the Lens
Preparations Remove the lens rear cap from the lens
Preparations Attach the lens cap
To enable/disable the shutter release without lens
Detaching the lens
Menu CustomShoot w/o Lens
Attaching the Lens Hood
Fitting to the mark
Preparation
Attaching the Shoulder Strap
Shoulder strap eyelet
Connect the charger to the electrical outlet
Charging the Battery
Charging
About batteries that you can use with this unit
Battery indication
Charge indicator is turned on during charging
Charge indicator turns off
Charging time
When the interchangeable lens H-FS14140 is used
Approx pictures
When the interchangeable lens H-FS1442A is used
Recording conditions by Cipa standard
When the interchangeable lens H-FS45150 is used
Recording motion pictures when using the monitor
Approx min
MP4 Recording with picture quality set to FHD/30p
Playback when using the monitor
Inserting and Removing the Card optional/ the Battery
Do not touch the connection terminals of the card
Preparation
About cards that can be used with this unit
Access to the card
About the Card
About the motion picture recording and SD speed class
Formatting the card initialization
Available recording time when recording motion pictures
Number of recordable pictures
Remaining Time
Menu CustomRemaining Disp
Setting Date/Time Clock Set
Changing the Clock Setting
Select Clock Set in the Setup menu. P43
Press MENU/SET
Setting the Menu
Setting menu items
Touch the menu icon
When operating buttons
Touch the menu item
Touch the Setting to set
Menu RecQuality›
Touch or another of the menu toggle icons a
Press Switching to other menus
Switching to the Setup menu from Rec menu
Close the menu Touch or press the shutter button halfway
Setting the top menu screen background
Setting the menu screen background
Setting the menu screen background
Press Q.MENU to display the Quick Menu
Calling frequently-used menus instantly Quick Menu
On-monitor recording information in Monitor style P72
Press Q.MENU to exit the menu once the setting is complete
When using the viewfinder
Rotate the rear dial to select the setting, then press
Items that have been selected in advance can be set
Select the menu in the top row and drag it to Bottom row
Change the Quick Menu to your preferred item
Rec menu/Recording functions
Custom menu
Motion Picture menu
Touch Exit
Touch the function you want to assign
You can assign frequently-used functions to
Particular buttons or icons
Select Fn Button Set in the Custom menu. P43
Making the function button settings for recording
Touch Touch Fn6 or Fn7
Making the function button settings for playback
Playback Menu/Playback functions
Home Your home area
Configuring basic settings of this unit Setup Menu
Destination Travel destination area
Clock Set
Location
Travel Setup
Wi-Fi Function/Wi-Fi Setup
SET Travel destination is recorded at the time of recording
Brightness
Beep Volume Shutter Vol High Low OFF
Touch the item Drag the slide bar to adjust
Contrast · Saturation
…3 MODE3
„ Auto
…1 MODE1
Make the monitor darker
5MIN./2MIN./1MIN
Sleep Mode
10MIN./5MIN./2MIN./1MIN./OFF Auto LVF/Monitor Off
Select on connection
1080i
169
1080p
720p
Menu Resume
Viera Link
3D Playback
Menu Information
Recording or setup/custom settings are reset to the default
Reset the file number of the next recording to
Set the language displayed on the screen
Pixel Refresh
Sensor Cleaning
Card is formatted
Format
Enter characters
Entering Text
Touch Set
Tips for taking good pictures
Detects orientation of camera Direction Detection Function
About the eye sensor automatic switching
Using the Viewfinder
Switching the Monitor/Viewfinder
Diopter adjustment
On the Touch Pad
Setting the focus position with the Touch Pad
About the Eye Sensor AF
Pad
Taking a Still picture
Aperture value B Shutter speed
Hold
To cancel the Touch Shutter function
Taking pictures using the Touch Shutter function
Touch Touch ×
Recording Motion Picture
Start recording by pressing the motion picture button
Press DISP. to change
Switching the Information Displayed on the recording screen
Monitor style
Viewfinder style
Viewfinder style Monitor style
Guideline is not displayed in the Panorama Shot Mode
Correcting tilt to the left
About the tilt sensor display
Correcting downward tilt
Playing Back Pictures/Motion Pictures
Playing Back Pictures
Using the Playback Zoom
Displaying multiple screens Multi Playback
Touch
To return to Normal Playback Touch the picture
Displaying Pictures by Recording Date Calendar Playback
Touch CAL on the Multi Playback screen
Increase volume level
While pausing
Reduce volume level
Playing Back Motion Pictures
Touch during Motion Picture playback
Creating Still Pictures from a Motion Picture
Playing Back Group Pictures
Continuously playing back Group Pictures
Touch the group picture icon
Playing back each Group Pictures
Press DISP. to switch the monitor screen
Changing the information displayed on the playback screen
If there are any white saturated areas, we
Playback Mode, select the picture to delete and touch
Once deleted, pictures cannot be recovered
Deleting Pictures
Touch Delete Single
Playback Mode, touch Touch Delete Multi or Delete All
When Delete Multi is selected Touch OK
To delete multiple pictures up to 100¢ or all the pictures
Select the mode by rotating the mode dial
Selecting the Recording Mode
Press
Panorama Shot Mode P106
Creative Video Mode P217
Custom Mode P129
Scene Guide Mode P110
It will switch to Intelligent Auto or Mode by pressing
Taking Pictures using the Automatic Function
Recording Mode
Align the screen with the subject
Scene Detection When taking pictures
When recording motion pictures
Portrait Scenery Low Light Macro
About the flash
Open the flash when the flash is to be used. P139
Backlight Compensation
Recording with Camera-Recommended Effects
Touch the example image to select image effects filters
Drag the slide bar to set
Touch Touch to display the setting screen
Taking a picture with a blurred background Defocus Control
Record pictures or motion pictures
Setting brightness
Setting color
Taking Pictures with Your Favorite Settings
Program AE Mode
Setting shutter speed
Program Shift
Aperture value Reduces Increases It becomes easier to
Aperture-Priority AE Mode
Taking Pictures by Specifying the Aperture/ Shutter Speed
Defocus
Shutter speed Slow Fast It becomes easier to
Shutter-Priority AE Mode
100
Express movement Freeze movement
Reduces Increases
Manual Exposure Mode
101
Slow Fast
+3 Set to faster shutter speed or larger aperture value
102
Manual Exposure Assistance
About B Bulb
103
Set a function button to Preview. P52
Switch to confirmation screen by pressing Fn1
104
Depth of field properties
105
How to tell if the exposure is not adequate
When exposure is not adequate Press Fn1
Set a function button to One Push AE. P52
106
Taking panorama pictures Panorama Shot Mode
Set the mode dial to
Check the recording direction, and then touch Start
Touch Set
107
Adding an image effect
Recording from left to right
Technique for Panorama Shot Mode
108
109
About playback
It is also possible to display
Taking Pictures that match the Scene being
110
To enjoy a variety of picture effects
Silky Skin
111
Clear Portrait
Backlit Softness
Relaxing Tone
112
Clear in Backlight
Sweet Childs Face
Bright Blue Sky
113
Distinct Scenery
Romantic Sunset Glow
Clear Nightscape
114
Glistening Water
Cool Night Sky
Artistic Nightscape
115
Warm Glowing Nightscape
Glittering Illuminations
Soft Image of a Flower
116
Clear Night Portrait
Soft focus creates a diffused image
Cute Dessert
117
Appetizing Food
Freeze Animal Motion
Monochrome
118
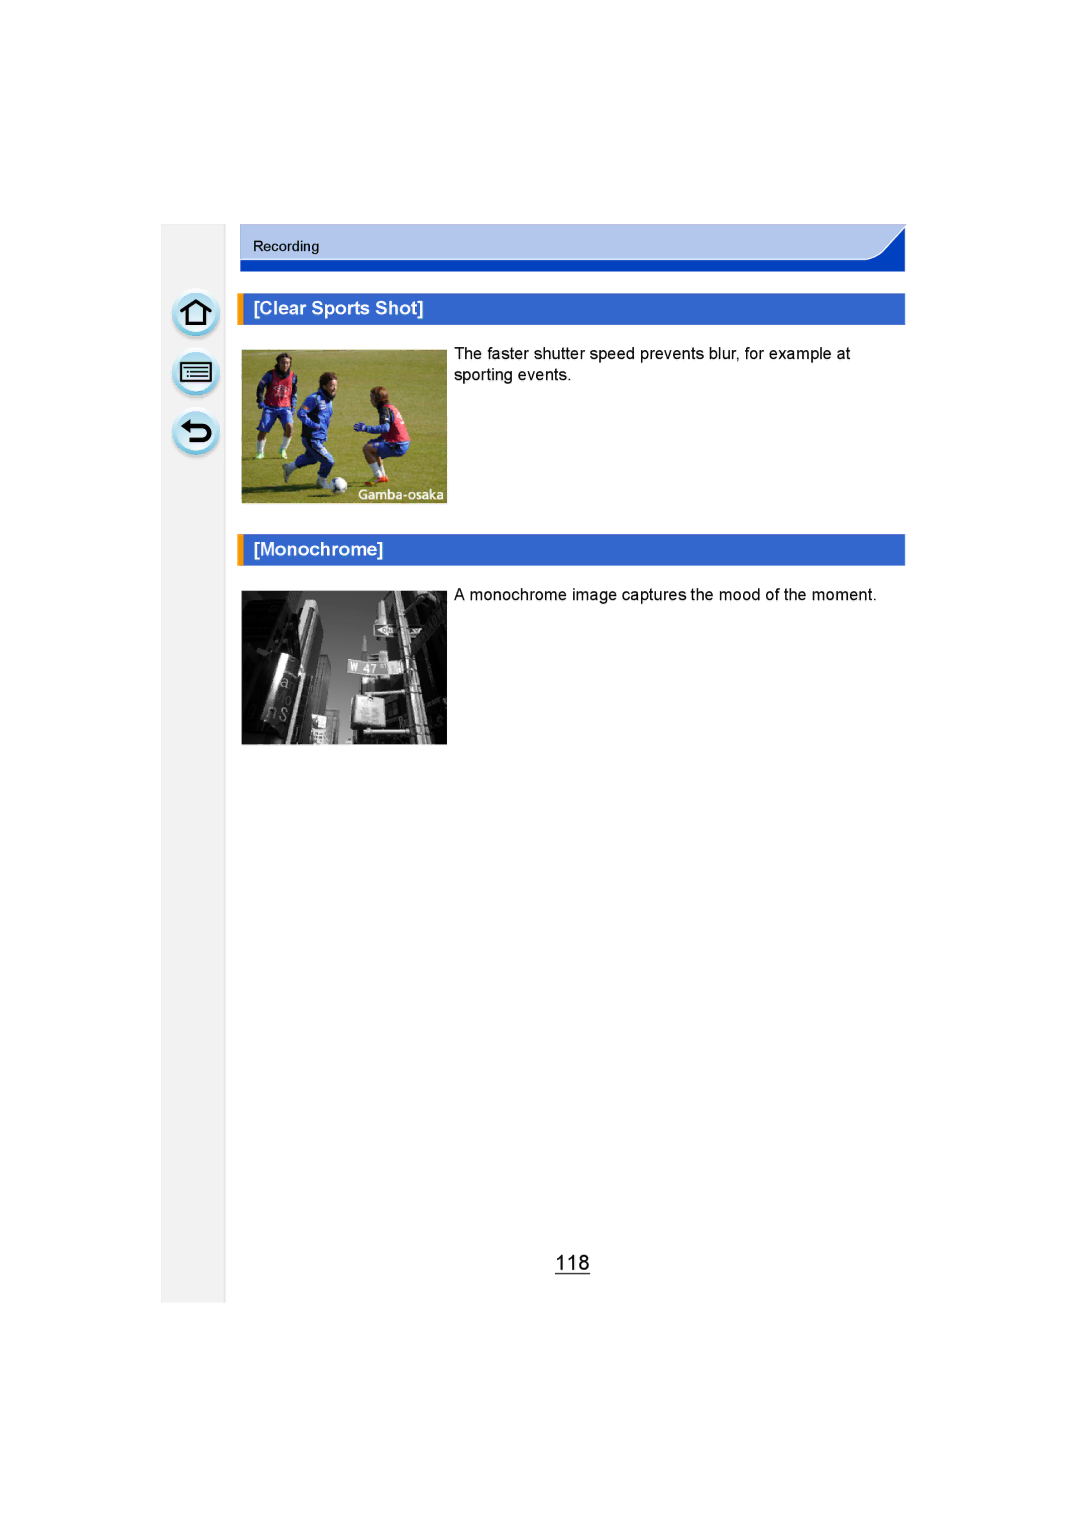
Clear Sports Shot
Monochrome image captures the mood of the moment
119
Taking Pictures with different image effects
Effects filters
120
Adjust the effect to fit your preferences
Taking a picture with a blurred background Defocus Control
Retro
121
Expressive
Old Days
Sepia
122
Low Key
Dynamic Monochrome
Cross Process
123
High Dynamic
Toy Effect
Toy Pop
124
Bleach Bypass
Miniature Effect
Setting the type of defocus
125
Pinch out/pinch in P17 to change the size In-focus portion
Fantasy
126
Soft Focus
Star Filter
One Point Color
Touch the part where you want to leave the color
127
Sunshine
128
Setting the light source
Point for when placing the center of the light source
You can change the position and size of the light source
Custom set Description of settings
Registering your preferred settings Custom Mode
Settings are registered for on the mode dial
129
Rec menu Setup menu Custom menu
Recording using registered custom set
Changing the settings
130
Optical Image Stabilizer
131
132
Side
Taking Pictures with the Zoom
133
Enlarges distant subject
Raising the telescopic effect
134
Ex. Tele Conv
135
OFF
Photo
136
Position
Video
137
Digital Zoom
Perform zoom operations by dragging the slide bar
Zooming using touch operations
138
You can perform zoom operations by touching. Touch zoom
Taking pictures by using the flash
139
Using the flash skillfully
140
141
Changing Flash Mode
Set the built-in flash to match the recording
Flash setting Shutter speed Sec
Shutter speed for each flash setting
Available flash settings by Recording Mode
Flash setting
Mode
143
Scene Guide
Clear Nightscape
144
Setting to the 2nd Curtain Synchro
Becomes dynamic
Adjust the flash output
145
Setting the wireless flash
146
Manual Flash Adjust
Firing Mode
Flash Adjust
147
Placement example
Controllable range of the wireless flash
148
Properly UnderexposedOverexposed Exposed
Compensating the Exposure
149
Compensate the exposure
150
Set a function button to Touch AE. P52
Easily Optimizing the Brightness for a Specified Area
151
Touch Touch AE6
152
Optimizing the focus and brightness for a touched position
153
Setting the Light Sensitivity
154
Characteristics of the ISO sensitivity
155
156
Adjusting the White Balance
Press Select the White Balance by rotating the rear dial
157
Auto White Balance
158
Setting the White Balance manually
Setting the color temperature
Select 1 , 2 and then touch Select White Set
Select the White Balance and then touch Adjust
Finely adjusting the White Balance
159
White Balance Bracket
160
Horizontal a to B Vertical G to M
161
Set the Focus Mode to AFS, AFF or AFC. P162
Taking Pictures with Auto Focus
Press Touch the item
Select Focus Mode from the Rec menu. P43 Touch the item
About the focus mode AFS/AFF/AFC
162
When recording using AFF, AFC
163
About š Face Detection
Type of the Auto Focus Mode
164
Position and size of the AF area can be changed. P167
When operating buttons
Setting up AF Tracking
When operating the touch screen
165
About 1-Area
166
About 23-Area
About Pinpoint
167
When selecting š, Ø
When selecting
Position and size of the AF area can be changed
168
Setting the desired focus method
169
170
Release
Taking Pictures with Manual Focus
171
Enlarge by pressing
172
Pressing
MF Assist is not displayed
Changing the display of the MF Assist
173
Displaying the MF Assist
Moving the enlarged area
174
Technique for Manual Focus
About the focus distance reference mark
175
Focus range
While pressing AF/AE LOCK, move
Fixing the Focus and the Exposure AF/AE Lock
176
Camera as you compose the picture and then
177
Press Select a drive mode
Select a Drive Mode
178
179
Taking Pictures using Burst Mode
Depends on the capacity of the card¢3
Focus Mode Focus/Release Priority
Normal focusing¢2
Predicted focusing¢3
180
181
With Auto Bracket Sequence 0/s/r 1st picture 2nd picture
Taking Pictures using Auto Bracket
182
D0 EV J1/3 EV I1/3 EV
Settings Burst `/0
183
Picture is taken 10 seconds after shutter is pressed
Taking Pictures with the Self-timer
184
Picture is taken 2 seconds after shutter is pressed
185
186
Using the Rec Menu
Photo Style
187
Adjusting the picture quality
Touch Custom setting
Touch / to select the type of Photo Style
Aspect Ratio
188
Picture Size
189
Focus Mode
Quality
190
Metering Mode
Self Timer
Burst Rate
Settings HIGH/STANDARD/LOW/EXTENDED/OFF
Resolution
Settings AUTO/HIGH/STANDARD/LOW/OFF
191
Dynamic Range
What is HDR?
192
Auto Align
You can shoot up to four exposures per image
193
Multi Exp
Session
194
About Automatic Gain Control setting
Combining RAW images in the card
195
Time Lapse Shot
196
Touch Start Press the shutter button fully
197
Stop Motion Animation
198
Touch OK
Panorama Settings
199
Adding pictures to the Stop Motion Animation group
Electronic Shutter
Settings ON/OFF
200
Flash
Red-Eye Removal
Settings 200/400/800/1600/3200/6400/12800/OFF
201
ISO Limit Set
ISO Increments
ISO sensitivity can be set up to maximum ISO25600
202
Extended ISO
Long Shtr NR
203
Shading Comp
Digital Zoom
204
Ex. Tele Conv
Color Space
205
Playback Mode
Face Recog
Face Recog. only works when the AF Mode is set to š
206
Take the picture adjusting the face with the guide
Face Settings
Point of recording when registering the face images
207
Set the item
208
Touch the face image to delete
209
Change or delete the information for a registered person
Recommended Filter
Profile Setup
210
Enter Name
211
Setting the format, size and frame rate
This data format is suitable for when playing back on a
High-definition TV, etc
212
When Avchd is selected
When MP4 is selected
About the compatibility of the recorded motion pictures
Indication of the icon
Camera automatically keeps focusing on subjects during
213
Recording.¢
214
Recording Motion Picture
Selected Recording Mode Recording Mode while
215
Motion picture
Recording still pictures while recording motion pictures
216
Priorities
Start recording
217
Stop recording
218
Touch icon to display the setting screen
Drag the slide bar to set
Using the Motion Picture Menu
219
Rec Highlight
Settings 1/50/1/60/1/100/1/120/OFF
220
Flkr Decrease
Mic Level Adj
221
Mic Level Disp
Special Mic
222
Using the Playback Menu
2D/3D Settings
Slide Show
Operations during a slide show
Changing the slide show settings
223
Dial
Duration
224
Duration or Repeat can be set
Repeat
Playback Mode
225
226
Location Logging
Erasing details enlarging the display
227
Clear Retouch
Touch Save
228
229
Single setting
Multi setting
Title Edit
230
Text Stamp
Select the item to stamp
231
Touch Touch OK
232
Video Divide
233
Touch at the location to divide
Time Lapse Video
234
Is, the smoother the motion picture will be
235
Stop Motion Video
Resize
236
Touch the size you wish to change Touch a picture. repeat
Cropping
237
Touch Enlarge Touch Reduce Drag Move
Rotate The picture is rotated manually
238
Rotate/Rotate Disp
Select the rotation direction
239
Favorite
Print Set
240
Touch / to set the number of prints, and then touch Set
241
To print the date
242
Multi setting Touch the picture you wish to protect
Protect
Face Rec Edit
243
Delete Confirmation
244
Wi-FiRfunction/NFC function
Use the camera as a wireless LAN device
Before Use
245
About the Wi-Fi connection lamp
About the Wi-Fi button
This unit is compatible with NFC
Describing method Wi-Fi New ConnectionRemote Shooting & View
246
What you can do with the Wi-Fi function
247
248
Installing the smartphone/tablet app Panasonic Image App
Controlling with a Smartphone/Tablet
Image App is an application provided by Panasonic
Press and hold Wi-Fi
Connecting to a smartphone/tablet
249
250
When connecting with Via Network
Changing the connection method
Preparation On the camera On your smartphone/tablet
Connecting to a smartphone/tablet by using the NFC function
251
Launch Image App on your smartphone/tablet
252
Taking pictures via a smartphone/tablet remote recording
253
Saving images stored in the camera
254
Sending images in the camera to an SNS
255
Drag an image to send it to an SNS, etc
Methods for sending and images that can be sent
256
Click the followings to jump to the beginning of each menu
Select a device you want to connect
257
Take pictures
Sending selected images Send Images Stored in the Camera
Multi Select setting Select the picture. repeat
258
Select Single Select or Multi Select
259
Displaying pictures on a TV
Take or play back pictures on this unit
260
When sending images to Printer
Sending selected images Send Images Stored in the Camera
Wireless access point AV device Home
When sending images to AV device
261
When sending images to External, the following are required
262
263
Multi Select setting
Select the picture. repeat
When sending images to PC
264
265
To create a folder that receives images
266
Select the folder you want to send
267
Wireless access point Web service Cloud Sync. Service
Using Web services
When sending images to web service
268
269
Registering web services
270
271
When sending images to Cloud Sync. Service
272
273
274
Acquiring a new login ID New account
Registering to the Lumix Club
About the Lumix Club
Be sure to make a note of the login ID and password
Enter a password
Check the login ID and select OK
275
276
Enter the login ID or password
Select the item to change
277
Check the details if the terms of use have been updated
Check the Lumix Club terms of use
278
Delete your login ID and account from the Lumix Club
Select Yes in the login ID delete confirmation screen
Select Next
279
Configuring the external AV device settings
Change or delete information on registered AV device
280
About Connections
Direct Your device connects directly to this unit
Connecting from your house via the network
281
Select the network authentication type
Select the wireless access point you are connecting to
When connecting with Manual Input
282
283
Select item
Press Wi-Fi
284
Registering records as favorites
Editing the items registered to favorites
Save frequently-used Wi-Fi connection settings as favorites
285
Checking the connection detail of a record or favorite
Send Images While Recording
About settings for sending images
286
Send Images Stored in the Camera
Changing the settings for sending images
287
Wi-Fi Setup Menu
288
Displays the MAC address and IP address of this unit
289
Delete
Displays the certification number for radio regulations
Taking 3D pictures
Enjoying 3D pictures
290
You cannot record 3D pictures in vertical orientation
Recording functions
291
Functions that cannot be used during 3D recording
Rec menu
Playing back 3D pictures
292
Functions that cannot be set/do not work with 3D pictures
293
Connect the camera and a TV
Playing Back Pictures on a TV Screen
294
To connect with an Hdmi mini cable optional
295
296
Using Viera Link Hdmi
What is the Viera Link Hdmi Hdavi Control?
Preparations Set the Viera Link to ON. P61
297
Automatic input switching
Other linked operations Turning this unit off
298
Saving still pictures and motion pictures on your
PC that can be used
PHOTOfunSTUDIO 9.2 PE Windows XP/Vista/7/8
299
About the supplied software
LoiLoScope 30 day full trial version Windows XP/Vista/7/8
300
Click on the Recommended Installation
Installing supplied software
Check the environment of your PC
301
Copy the images to a PC using PHOTOfunSTUDIO
Preparations Install PHOTOfunSTUDIO to the PC
Touch PC on the screen of this unit
For Windows
Copying to a PC without using PHOTOfunSTUDIO
302
For Mac Drive Noname is displayed on the desktop
Connection in the PTP Mode Set USB Mode to PictBridgePTP
303
304
Saving still pictures and motion pictures on a Recorder
Dubbing with non-compatible equipment
305
Printing the Pictures
Touch PictBridgePTP
Touch Print start
306
Selecting a single picture and printing it
Selecting multiple pictures and printing them
Print with Date
Print Settings
307
Num.of prints
Paper Size
308
Layout Layouts for printing that can be set with this unit
When printing different pictures on 1 sheet of paper
309
310
Optional accessories
External Flash optional
311
External Microphone optional
312
Remote Shutter optional
Conversion lens optional
313
AC adaptor optional/DC coupler optional
Filters optional
314
Recording Recording in Program AE Mode
Monitor Display/Viewfinder Display
On-monitor recording information
Simultaneous recording indicator P216 Peaking P172
Recording after settings
315
316
Display
317
Detailed information Histogram display
This picture is protected
Message Display
318
Cannot be set on this picture
Insert SD card again/Try another card
Read Error/Write Error Please check the card
319
Folder cannot be created
320
This battery cannot be used
No picture to send
Connection failed
Login failed. Please check Login ID and Password
321
Cannot connect to server
322
Menu list
Rec
323
324
325
Motion Picture
326
Custom
327
Setup
328
329
330
Playback
Battery and power source
Troubleshooting
331
332
Recording
333
Taking pictures using White Balance Bracket is not possible
Recorded picture looks rough Noise appears on the picture
334
335
Motion pictures
Flash is not activated
336
Lens
Flash is activated 2 times
Monitor/Viewfinder
Monitor and viewfinder do not switch when LVF is pressed
337
Monitor/Viewfinder is too bright or dark
Color tone of the viewfinder differs from the actual tone
338
Noise appears on the monitor
Picture is not played back There are no recorded pictures
Thumbnail is displayed appears on the screen
339
Playback sound or operation sound is too low
Red part of the recorded image has changed color to black
Wi-Fi function
340
It takes time to transmit an image to the web service
Have forgotten the login ID or password for the Lumix Club
Images cannot be transmitted to the web service
341
There is an image that could not be transmitted
Have forgotten the password for the Wi-Fi
342
Transmission of the image fails midway
343
TV, PC and printer
344
345
Others
346
347
Optimal use of the camera
Cleaning
348
About the Monitor/Viewfinder
349
About the Lens
350
Battery
Charger
351
About 3D
Card
352
Do not bend or drop the card
About the personal information
353
Disclaimer
About the picture data
When not using the camera for a long period of time
354
About tripods or unipods
355