Operating Instructions
Dear Customer
Information for Your Safety
FCC Note U.S. only
About the Lens
About The Mode Dial
About illustrations in these operating instructions
About indications in these operating instructions
About illustrations of the cursor Button
Contents
Setting color effects for
Setting a picture size and quality that matches your use
Continuously focusing
Focusing in low light conditions
SD Memory Cards are optional
Standard Accessories
Strap Lens Cap/Lens Cap String Battery Carrying Case
Names Components
13 14 15
Turn the camera on to take pictures
Charge the battery. P12
Insert the battery and the card. P14
Quick Guide
Detach the battery after charging is complete
Charging the Battery with the Charger
Charging/number of recordable Pictures
About the Battery
Inserting/Removing the Battery
Inserting/Removing the Card
SD Memory Card
About the Built-in Memory/the Card
Icons displayed on the screen
SD Memory Card optional and MultiMediaCard optional
Strap supplied
Attaching the Lens Cap/Strap
Pass the strap through the strap eyelet
Http//panasonic.co.jp/pavc/global/cs
Initial setting
Setting Date/Time Clock Set
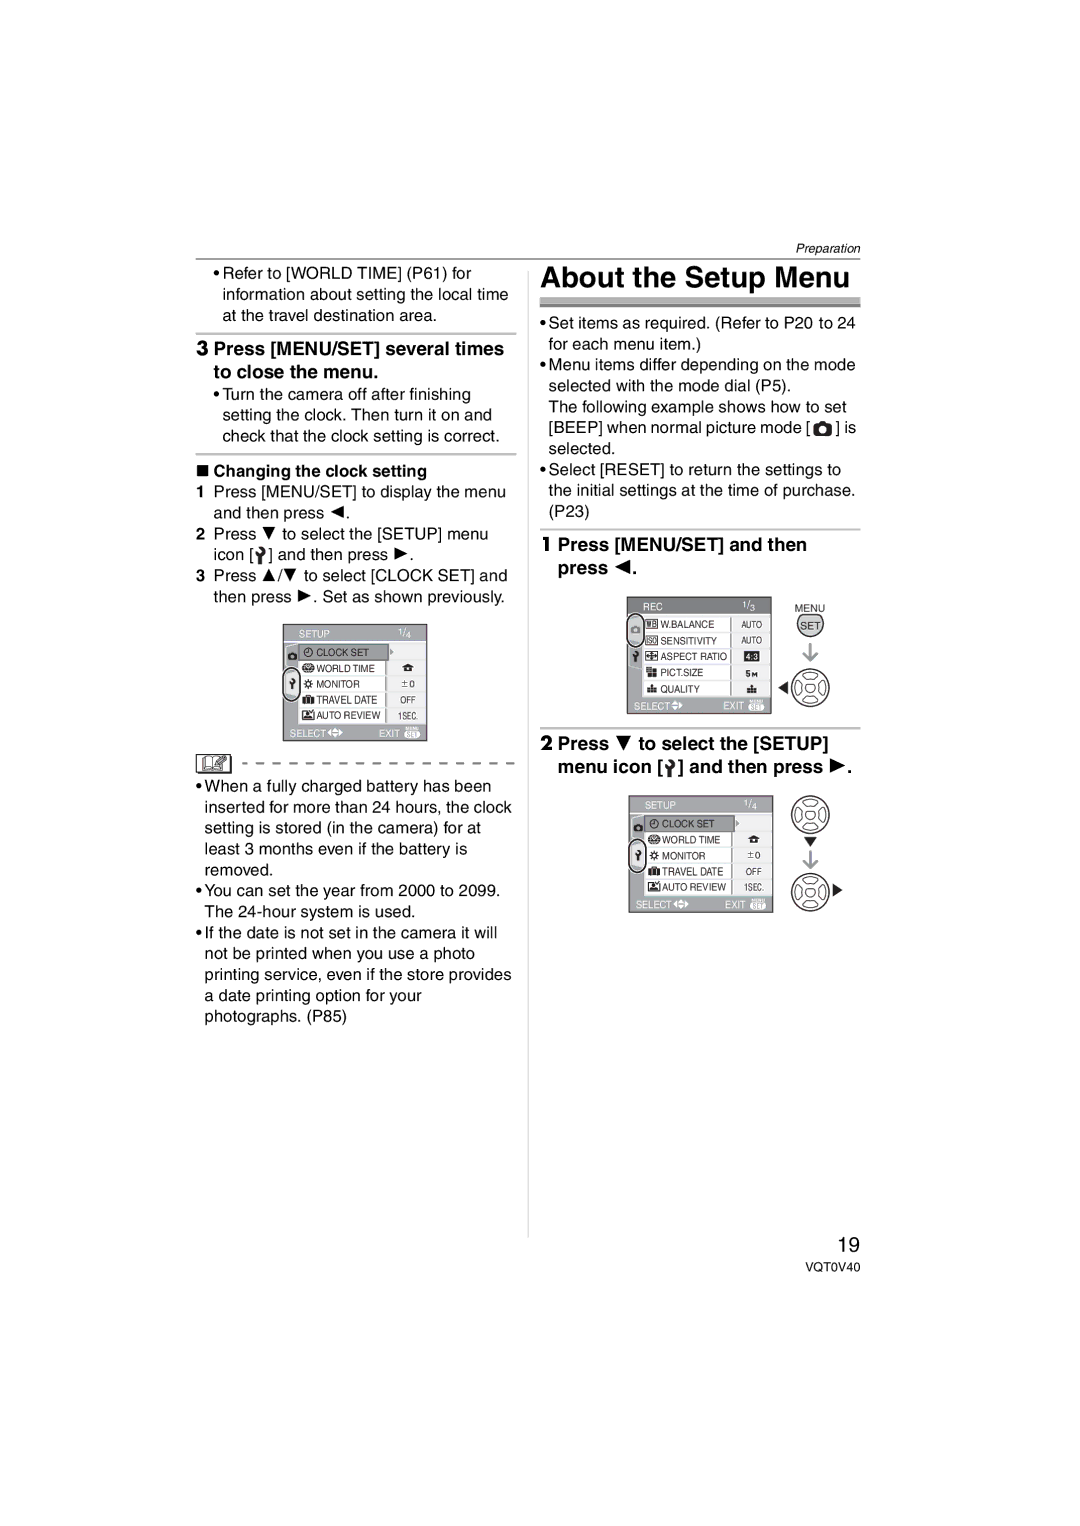
Press MENU/SET several times to close the menu
About the Setup Menu
Press 4 to select the Setup menu icon and then press
Changing the clock setting
World Time
Press 3/4 to select the menu item
Press MENU/SET to close the menu
Clock SET
1MIN./2MIN./5MIN./10MIN
Power Save
Travel Date
Auto Review
Economy
Volume
Shutter
Video OUT
Reset
Select on Connection
Highlight
Français
Language
English
Deutsch
P75
Turn the camera on Select normal picture mode
Taking Pictures
Take a picture
Tips for taking good pictures
Focus indication lights when the subject is focused
Press the shutter button fully
Party P54
Preventing jitter camera shake
Exposure
PICT.MODE
Taking Pictures in Simple Mode
Beep
Recording guide line
You cannot set the following items in simple mode
Burst speed P48 Low speed 2 frames/second Balance P71 Auto
Zoom
To make subjects appear closer use Tele
Taking Pictures with the Zoom
Rotate the zoom lever towards Tele
Rotate the zoom lever towards Wide
± Available, Not available
Picture size and maximum zoom magnification
Extended optical zoom mechanism
Further extending the zoom
Press MENU/SET
Menu operation
Press 3/4/2/1 to move the position
Checking the Recorded Picture Review
Press 4 REV
Rotate the zoom lever towards T to enlarge the picture
Press and hold 2/1 during playback
Playing Back Pictures
Press 2/1 to select the picture
Fast forwarding/Fast rewinding
Press 2/1 to select the picture and then press 4 to set
Deleting Pictures
Select the picture with 2/1
Press Press 3 to select YES and then press MENU/SET
Press Press 3 to select YES and then press MENU/SET to set
Screen when selecting Multi Delete
About the LCD Monitor
Simple mode
Recording mode
Playback mode
With highlight display
Recording guide line
Highlight display
No highlight display
Press 3/4 to select a mode
Press LCD Mode for one second
Power LCD/High angle mode
Press 1 to switch the flash setting
Flash is not activated in any recording conditions
Available flash settings by recording Mode
Forced on
Forced OFF
ISO80
Auto
Night Scenery P53
Press 2 to select the self-timer mode
Taking Pictures with the Self-timer
Self-timer cannot be used in Under Water P58 in scene mode
Compensate the exposure towards positive
Compensating the Exposure
Press MENU/SET to finish
Under exposed
Taking Pictures using Auto Bracket
During photo composition
This mode detects jitter and compensates for it
Optical Image Stabilizer
Stabilizer operates
When the burst mode setting is set to Unlimited
Taking Pictures using Burst Mode
Max pictures 4qk6q/10k15cm/ E-MAIL
Focus range
Taking Close-up Pictures
There are 6 menu screens 1/6, 2/6, 3/6, 4/6, 5/6 and 6/6
Scene Mode
Press 3/4 to select the scene mode
Setting frequently used scenes to Mode dials
Technique for Portrait mode
Portrait mode
Technique for Night portrait mode Use the flash
Technique for Sports mode
Technique for Night scenery mode
Night scenery mode
Technique for Candle light mode
Technique for Party mode
Setting the shutter speed
Technique for Fireworks mode
Take pictures
Technique for Aerial photo mode
Technique for Starry sky mode
Turn the camera off when taking off or landing
Birthday setting
Age display setting
Press 2 again to cancel AF lock
Adjusting the white balance
Fixing the focus underwater AF Lock
Press 3/4/2/1 to select the date
Recording which day of the vacation you take the picture
Press 3/4 to select Travel Date and then press
Press 4 to select SET and then press MENU/SET
Canceling the travel date
Press 2/1 to select your home area and then press MENU/SET
Setting the home area Home
Finishing setting the home area
Press 3/4 to select World Time and then press
Original time
If you are setting the home area for
Setting the travel destination area
Setting the home area Home
Location candidates for World Time settings
Zoom or operation sounds may be recorded
Motion Picture Mode
Press the shutter button fully to stop recording
Press 3/4 to select the item and then press MENU/SET
Picture size Fps 30fps169 848 k480 pixels 10fps169
Rotate the zoom lever towards W to display multiple screens
Displaying Multiple
Press 3/4/2/1 to select a picture
Screen
Displaying pictures by recording date
Rotate the zoom lever towards W to display the calendar
Press 3/4/2/1 to select a picture and then press MENU/ SET
Rotate the zoom lever towards W or press MENU/SET
Using the Playback Zoom
1k2k4k8k16k When you rotate the zoom lever
To stop using the playback zoom
Pictures with audio
Playing Back Motion Pictures/Pictures with Audio
Motion pictures
To pause
Press MENU/SET Press 3/4 to select the menu item
Using the REC Mode Menu
There are 3 menu screens 1/3, 2/3 and 3/3
Balance
Adjusting the hue for a more natural picture
Sensitivity
Setting the light sensitivity
Number of pixels
Setting the aspect ratio of pictures
Aspect Ratio
PICT.SIZE/QUALITY
Recording still pictures with audio
Audio REC
Deciding the method to measure brightness
Metering Mode
AF Mode
Setting the focus method
Continuously focusing on a subject
About 3-area-focusing High speed 1-area-focusing High speed
CONT.AF
Recording bright pictures in dark places
Focusing in low light conditions becomes easier
AF Assist Lamp
Slow Shutter
PICT.ADJ
COL.EFFECT
Flip Anim
Press 3/4 to select 5fps or 10fps and then press MENU/ SET
Press 3/4 to select Flip ANIM. and then press
Select Picture Capture and then press
Select Frame Rate and then press
Press
Using the Play mode menu
Deleting all still images used to create flip animation
Press 4 to finish
Slide Show
Press 3/4 to select ALL or and then press MENU/SET
Press 3 to select Start and then press MENU/SET
Printed remain on the card
Setting your favorite pictures
Favorite
Deleting all favorites
To display the picture rotated
Example When rotating clockwise
Rotate DISP./ROTATE
Press 2/1 to select the picture and then press
Dpof Print
Setting the picture to print and the number of prints
Single setting
Multi setting
Date print icon Date appears
To cancel all settings
Protect
To print the date
Adding audio after taking pictures
Cancel The protect icon disappears
Audio DUB
Press 4 to stop recording
Making the picture smaller
Resize
Press 3/4 to select YES or no and then press MENU/SET
Press 2/1 to select the size and then press
Press shutter button
Trimming
Changing the aspect ratio of a 169 picture
Aspect Conv
Press 3/4 to select or and then press MENU/ SET
Press 2/1 to select a picture and then press
Press 3/4 to select the copy destination and then press
Copy
Copying the picture data
Initializing the card
Format
This message appears during data transfer
Connecting to a PC
Press 3 to select PC and then press MENU/SET
USB connection cable supplied AC adaptor DMW-AC5 optional
Misc
Dcim
PRIVATE1
Conditions under which a different Folder number is used
Press 4 to select PictBridge PTP and then press MENU/ SET
Printing the Pictures
Press 3 to select Print Start and then press MENU/SET
Press 3 to select Single Picture and then press MENU/SET
Disconnect the USB connection cable after printing
Layout
Setting the date printing with Dpof print in advance
When printing different pictures on
Press 4 to select Dpof Picture and then press MENU/SET
Turn the TV on and select external input Turn the camera on
Playing back pictures using the AV cable supplied
Playing back pictures on a TV with an SD Memory Card slot
Recording
Screen Display
100
Recording in simple mode
Playback
P69
Simple mode P28
Motion picture mode
101
Do not bend or drop the card
102
103
Message Display
104
105
Troubleshooting
LCD monitor turns off while the camera is turned on
106
107
Motion pictures cannot be played back on a TV
108
109
Picture is displayed in black
110
File numbers are not recorded consecutively
File numbers are recorded in ascending order
111
Number of recordable pictures and available recording time
Number of recordable pictures
Available recording time
112
113
Specifications
Burst speed
DIGITAL/AV OUT
114
115
Digital Camera Accessory System
116
Digital Camera Accessory Order Form
For USA Customers
117
Request for Service Notice For USA Only
Limited Warranty Coverage
Limited Warranty For USA Only
118
119
Carry-In or Mail-In Service
Centralized Factory Servicenter
Customer Services Directory For USA Only
120
121
Index
122
Picture Quality Setting Motion Picture
Picture Quality Setting Simple Mode
USB Mode 23, 92
123
Spanish Quick Use Guide/Guía rápida en español
Ambler Drive, Mississauga, Ontario, L4W 2T3
One Panasonic Way, Secaucus, NJ
Panasonic Puerto Rico, Inc
Panasonic Canada Inc

 ] and then press 1.