Warranty can be found on
RQT9058-P
Region number supported by this unit
If you have any questions contact
Precautions
Risk of Electric Shock Do not Open
When the unit is not to be used for a long time
Maintenance
Unit Care
Table of Contents, Accessories
Accessories
Remote Control Information
About batteries Using the remote control
To order accessories, refer to Accessory Purchases on
Control Reference Guide
Main Unit
Unit’s Display
Unit’s display
Remote Control
Rear Panel
Connecting to a Television and a Set Top Box
Basic Connection
Rear of TV
Regarding Hdavi Control function
Hdmi cable Audio/video cable
Setting the Set Top Box Control and Clock
, to select Test, then OK
11 , to change the setting
Acquiring the setting information from the TV Viera
To confi rm new date and time
Repeat steps 10-11 to change other items
Media Handling
Stopping Play Pausing Play
To turn the unit on
To select the DVD drive
Playing a Disc
Playing a Video Cassette
VHS indicator lights up on the unit
Press Stop Press Pause Press again to restart play
To select the recording mode
To start recording Pausing Recording
Recording Set Top Box Programs
To select desired channel
Scheduled Recording
When you have fi nished programming
Unit is turned off
− If you press STOP, you can cancel copying
Copying Recordings
Seconds
− or −
Press and hold for about 3 seconds
Copying Recordings DVD VHS
Important Once deleted, contents cannot be recovered
Deleting Recordings
to select Delete then OK
Delete Navigator
Yes
Important Notes for Recording
12 cm 5
DVD Recording Modes and Estimated Disc Recording Time
Advanced Recording
VHS Recording Modes and Estimated Recording Time
When removing a recorded disc
When the format confirmation screen is displayed
to select Yes, then OK
Repeatedly until the desired time is reached
, , , to select Start, then OK
Play at least 20 seconds after recording starts
, , , to select the recording to play, then OK
To cancel a scheduled recording Progress
Advanced Scheduled Recording
To select the drive
to select Stop recording, then OK
Recording from an External Device
When DV camcorder connection screen does not appear
When recording finishes
to select Record to DVD then
Recording from a DV Camcorder
, to select Zoom In, then
Advanced Disc Playback
, , , to select an item, then
To select the audio
Play Press and hold
, to select the time, then
View Chapters
Playing Playlists
Playlist Properties
Playing MP3s
To select the DVD or USB drive
while a track is highlighted to display the tree screen
, to select a group, then
Playing Still Pictures Jpeg
, , , to select an album
, to select Start Slideshow, then OK
, , , to select an album, then OK
In, then OK
, to select Zoom
, to select Slideshow w/ SNDTRK, then OK
To fast-forward the tape To rewind the tape
Advanced Video Cassette Playback
Press and hold for about 2 seconds
Repeatedly, to select the audio option
Press and hold for about 5 or more seconds
Simultaneously
To display on-screen indicators
On-screen Display Indicators for Video Cassette Playback
Status Messages
Press Status to cycle through available displays
When you’ve fi nished Entering text
Functions Window
Entering Text
, to select a menu item, then OK
What is Viera Link Hdavi Control?
Press PLAY2, Direct NAVIGATOR, SCHEDULE, etc
Easy control only with Viera Remote Control
Using the Control Panel
When not using Hdavi Control
Then OK
Recordings−Editing
, , , to select a recording
To display the menu list
, to select Edit Name then
to select Yes, then
, to select Divide Recording
At the point you want to
, to select Change Divide
Still Pictures−Editing
Set Protection/Cancel Protection
, to select Yes or No, then
, to select Album Name, then OK
Delete Album/Delete Picture
Copying Still Pictures
Deleting Still Pictures
, to select Delete then OK
4a , , , to select the album, then Delete
Deleting an album
Chapters−Creating, Editing
DVD and Card Management
To select the drive DVD or
, select Disc Name, then
, to select DVD Management or Card Management, then OK
Message appears when deleting is fi nished
To complete
Deleting All Recordings
Formatting Discs or Cards
, to select Create DVD Top
Menu, then to select Start, then OK
Selecting Whether to Show the Top Menu First
Finalizing
Setting DVD On-Screen Menus
Accessing the DVD On-Screen Menus
Disc Menu
Play Menu
Language code list
Video Menu
Audio Menu
Other Menu
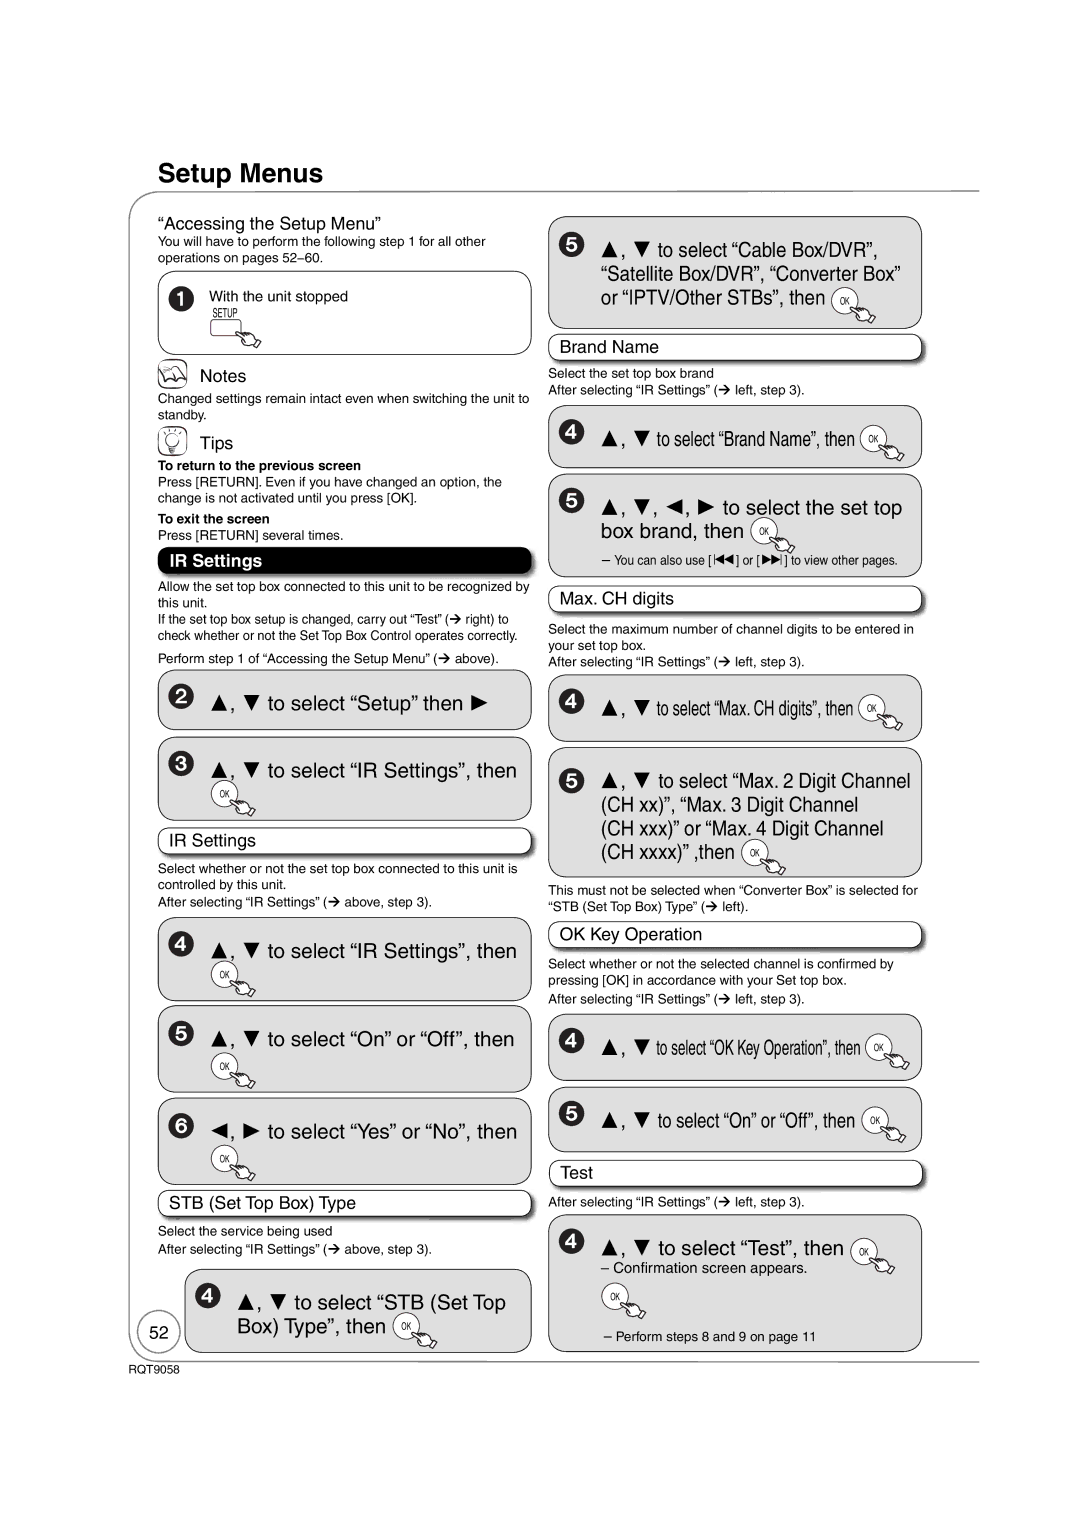
IR Settings
Setup Menus
Box Type, then OK
, to select Setup, then
Press
To confi rm new date and time and to initiate the clock
, to select Quick Start, then
Settings for Playback
, to select Subtitle Language, then OK
, to select Audio Language, then OK
, to select Menu Language, then OK
, to select Lighter or
, to select Output Level
Darker, then
, to select PCM Down Conversion, then OK
Digital Audio Output
Select Audio Channel For DV Input
Status Messages
, to select CC reset, then
, to select Automatic or Off, then OK
, to select Set, then OK , to select On, then OK
, to select Display, then
TV settings for DVD-RAM
TV settings for DVD-Video
Component Output Signal
TV Aspect
, to select Hdmi Priority, then OK
Functions of Hdmi
, to select VHS, then
, to select Select Tape
Length, then OK
T180, then OK
Other Settings
Point the remote control at the TV or Set Top Box
On the right using the numbered
Enter the code from the table
Remote Control Codes for the Set Top Box Cable Box
Satellite Receiver
Cable Box/Digital Video Recorder Combination
Satellite Receiver / Digital Video Recorder Combination
Connection Options for Improved Playback Quality
DVD output and DVD/VHS output
Terminal
Red WhiteYellowincluded
Component
RedWhiteYellow
Video cables
Rear of Amplifier or System Component
Using an Hdmi High Definition Multimedia Interface Cable
Rear of Amplifier or System Component Rear of TV
Disc Information
Usable Discs for Recording and Playback
Discs that Cannot be Played
Play-only Discs
Media Care
SD Card and USB Memory Information
USB memories you can use with this unit
SD Cards Usable with this Unit
Compatible USB memories
How to structure MP3 folders
MP3s and Still Pictures Jpeg
MP3 File Information
Still Picture Jpeg Information
Setup
Frequently Asked Questions
Discs
Recording
USB
Error Messages
On the Unit’s Display
On the TV
Troubleshooting Guide
Power Press and hold for more than 10 seconds
To open the disc tray
Press and hold both buttons for about 5 seconds
General Issues
Following does not indicate a problem with the unit
Operation
USB
Playback Issues
Picture
Sound
Tracks No subtitles
VHS
Troubleshooting Guide
Recording Issues
Editing Issues
Glossary
Specifications
DVD-RW
Product Service
Product information
Limited Warranty
Limited Warranty
Power para encender el aparato
Referencia rápida en español Spanish Quick Reference
Ajuste del control
Del aparato Integrando el Convertidor y el
, para seleccionar el elemento, luego OK
Para confi rmar una nueva fecha y hora
Reproducción de discos o videocasetes
Consejos prácticos
Deseado
Oprima y mantenga
Para copiar sin fi nalizar
para seleccionar Borrar, y luego OK
Copiar
Index
Panasonic Puerto Rico, Inc