This model is designed to be used in Australia and New Zealand
Operating Instructions
High Speed Laser Fax with Copier Function
Model No. KX-FL511AL
OPEN
How to use the operating instructions
Q R S T U
Location of controls
D E F G H
I J K L M N O P
Attach your sales receipt here
Things you should keep a record of
For Australian users
For New Zealand users
IMPORTANT NOTICE
Instructions to customer
Important information for Australian users
SAVE THESE INSTRUCTIONS
Important safety instructions
Safety Instructions
INSTALLATION
Fuser unit
OTHER INFORMATION
FOR BEST PERFORMANCE
Laser radiation
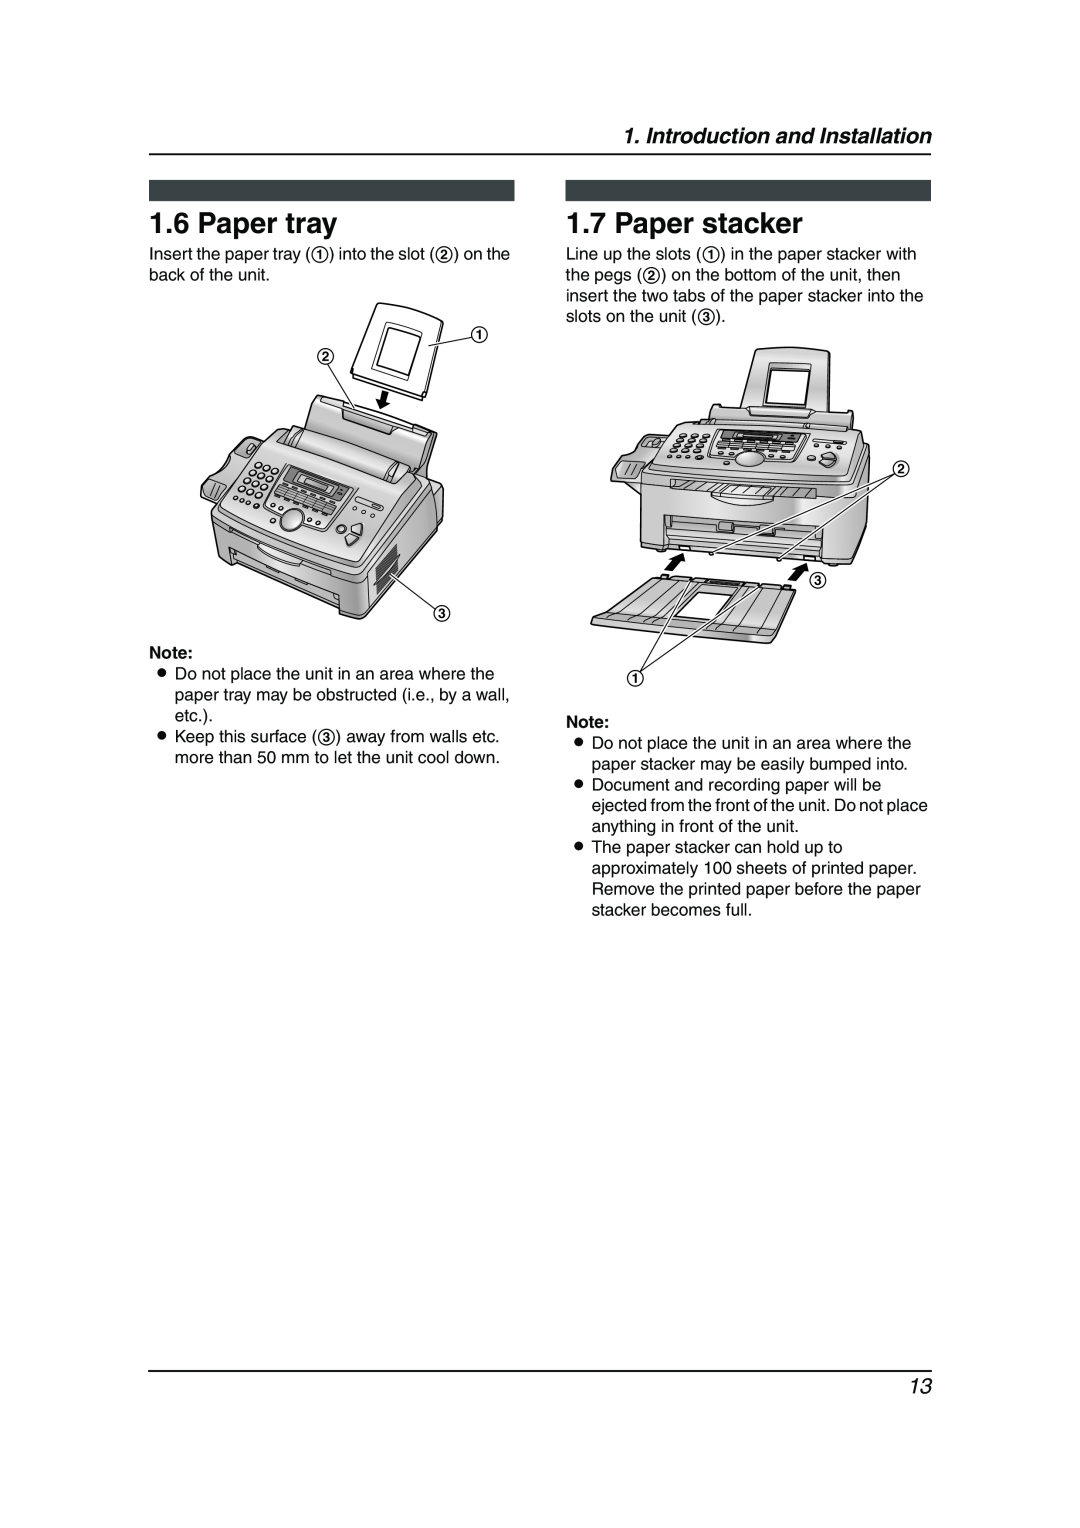
1. Introduction and
1. Introduction and Installation
1.1 Included accessories
1.2 Accessory information
1.3 Description of buttons
1.2.1 Available accessories
1 2 3 4 5 7 8 9 j k l
1.4 Overview
1.5 Toner cartridge and drum unit
Toner save feature
1.7 Paper stacker
1.6 Paper tray
1.8 Document stacker
1.9 Handset cord
1.10 Recording paper
L The paper should not be over the tabs
Correct
Incorrect
2. Preparation
2.1 Connections
2.3.2 Handset receiver volume
2.3 Adjusting volume
2.2 Help function
2.3.1 Ringer volume
2.4 Date and time
RECALL AB SET
2.5 Your logo
2.6 Your fax number
RECALL
Press *64#9#1234
3.1 Storing names and telephone numbers into one-touch dial
3.2 Storing names and telephone numbers into the navigator directory
3. Telephone
3.5.1 Using one-touch dial
3.5 Making a phone call using one-touch dial and navigator directory
3.3 Editing a stored entry
3.4 Erasing a stored entry
3.6 Caller ID service
3.7 Viewing and calling back using caller information
3.6.1 How Caller ID is displayed
3.9.1 Erasing all caller information
3.8 Printing the Caller ID list
3.9 Erasing caller information
3.7.1 Editing a caller’s telephone number before calling back
3.9.2 Erasing specific caller information
3.10 Storing caller information
4. Fax
4.1 Sending a fax manually
3. Press QUICK SCAN START or FAX START
4.3 Sending a fax using one touch dial and navigator directory
4.2 Documents you can send
Document weight
4.4 Broadcast transmission
4.4.1 Programming entries into the broadcast memory
4.4.2 Adding a new entry into the broadcast memory
4.4.4 Sending the same document to pre-programmed parties
4.4.3 Erasing a stored entry from the broadcast memory
4.5.3 With answering machine
4.5 Selecting the way to use your fax machine
4.5.1 Use only as a fax
4.5.2 Mostly phone calls
4.7.1 Activating FAX ONLY mode
4.6 Receiving a fax manually
4.7 Receiving a fax automatically
4.6.1 Activating TEL mode
4.8 Using the unit with an answering machine
4.9 Receive polling retrieving a fax placed on another fax machine
4.8.1 Setting up the fax machine and an answering machine
4.10.1 Activating the junk fax prohibitor
4.10.2 Programming undesired callers
LIGHT
5. Distinctive Ring
5.1 Using with the ring detection feature
6.1 Making a copy
6.1.1 More copying features
6. Copy
Example Making 2 copies of a 4-page original document
L After copying, the collating feature will turn OFF automatically
7.1.2 Programming advanced features
7.2 Basic features
7.1 Programming
7.1.1 Programming basic features
Code #17 Setting the ringer pattern
7.3 Advanced features
Code #06 Changing the ring setting in FAX ONLY mode
Code #13 Setting the dialling mode For Australian users only
Code #31 Activating the Distinctive Ring feature
7.4 Direct commands for programming features
#31 Distinctive Ring
8.1 Error messages - Reports
8.2 Error messages - Display
8. Help
L The inside of the unit is extremely cold and cannot be operated. Use the unit in a warmer area. While the unit cannot be operated, the received documents are temporarily stored into the memory, and will be printed out automatically when the unit warms up
8.3 When a function does not work, check here
8.3.1 General
8.3.2 Fax - sending
8.3.3 Fax - receiving
8.3.4 Copying
A B C
8.3.6 If a power failure occurs
8.3.5 Using an answering machine
TONER LOW TONER EMPTY
8.4 Replacing the toner cartridge and the drum unit
L If you replace the toner cartridge and the drum unit at the same time, skip to step
8.5.1 When the recording paper has jammed in the unit
8.5 Recording paper jam
When the recording paper has jammed near the recording paper exit
When the recording paper has jammed near the drum and toner unit
8.5.2 When the recording paper is not fed into the unit properly
8.6 Document jams - sending
8.7 Cleaning the inside of the unit
L Be careful when handling the drum and toner unit
See the caution for the drum unit on page 47 for details
8. Help
11 Reconnect the power cord and the telephone line cord
9. General Information
9.1 Reference lists and reports
9.2 Technical data about this product
Note for recording paper
Paper specifications
Drum life
Toner life
10. Index
10.1 Index
Recording paper Recording paper size Redialling 26
Page
Page
Page
PFQX1925ZA CM1003MN0
1-62, 4-chome, Minoshima, Hakata-ku, Fukuoka 812-8531, Japan