Name and function of parts
Remote control
ON POWER OFF
|
| AUTO |
|
| SETUP |
RGB | RGB | AUX |
1 | 2 | |
|
| SHUTTER |
VIDEO | SHUT |
![]() MENU FREEZE
MENU FREEZE
PAGE UP |
ENTER |
PAGE DOWN
ON SCREEN
1 STD 2 OSD 3 SYSTEMSEL
|
| D.ZOOM | ||
4 | FUNC | 5 | 6 | |
1 | ||||
|
| BRIGHT | CONTRAST | |
7 LENS | 8 | 9 | ||
| NEXT | ASPECT | 0 USER | |
| LIGHT | ID ALL | ID SET | |
Computer | LASER ON/OFF | |||
Projector | ||||
| Numetric | |||
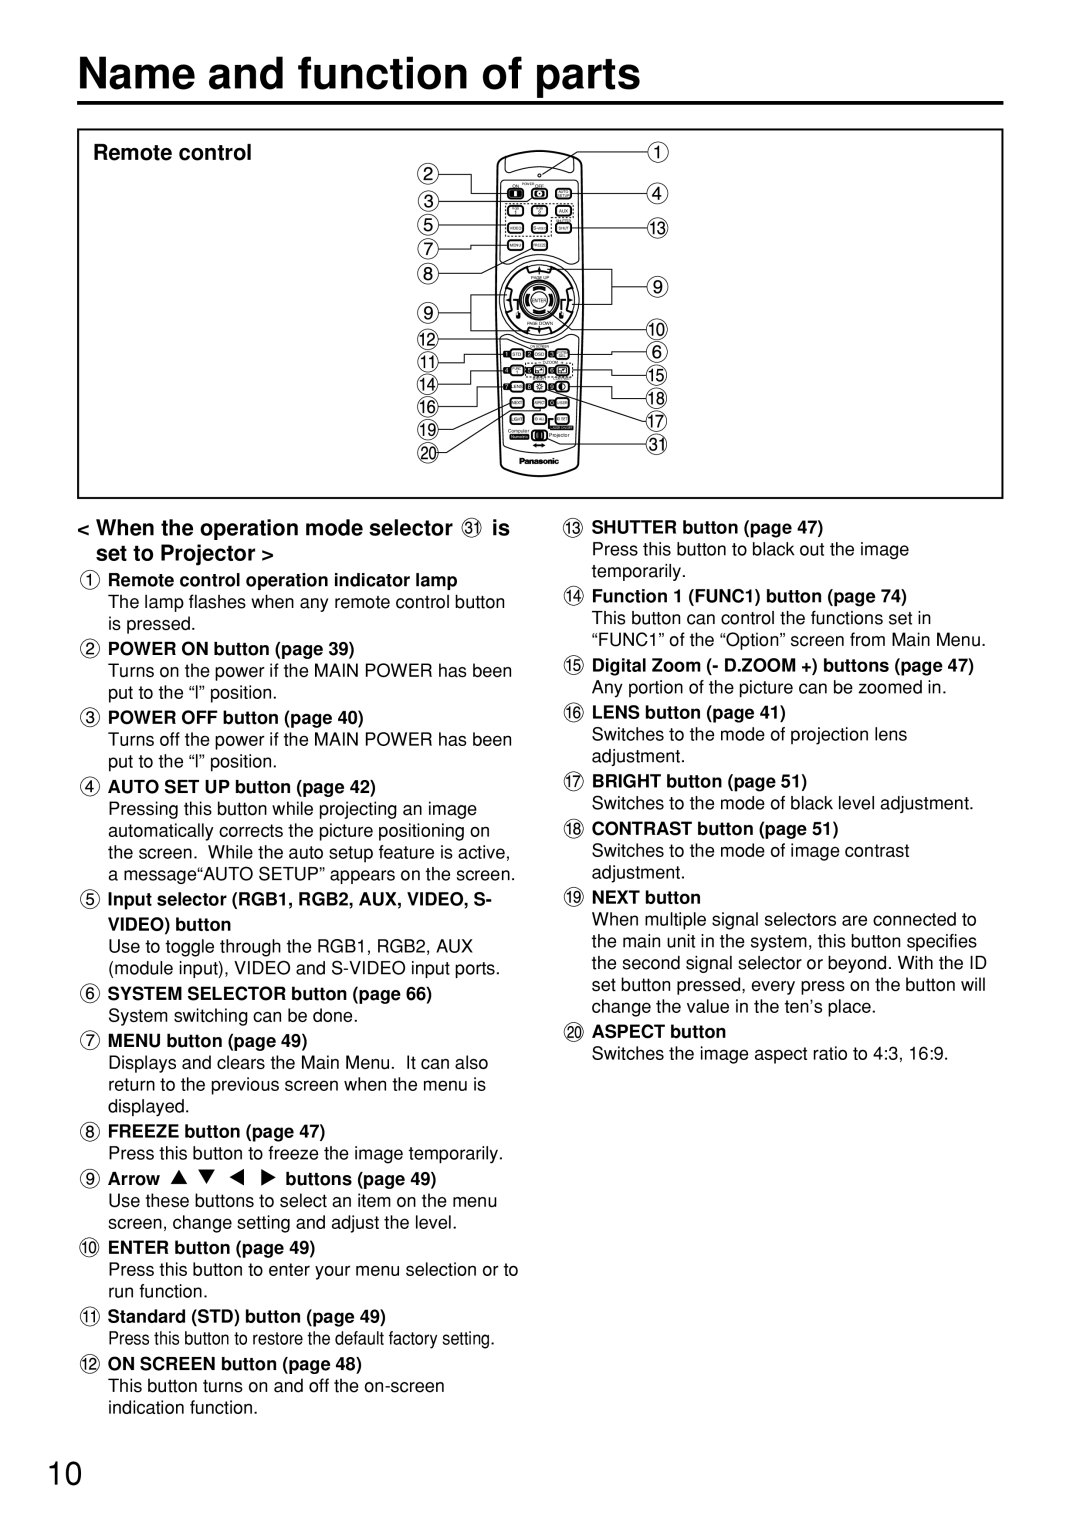
< When the operation mode selector  is set to Projector >
![]() Remote control operation indicator lamp
Remote control operation indicator lamp
The lamp flashes when any remote control button is pressed.
![]() POWER ON button (page 39)
POWER ON button (page 39)
Turns on the power if the MAIN POWER has been put to the “l” position.
![]() POWER OFF button (page 40)
POWER OFF button (page 40)
Turns off the power if the MAIN POWER has been put to the “l” position.
 AUTO SET UP button (page 42)
Pressing this button while projecting an image automatically corrects the picture positioning on the screen. While the auto setup feature is active, a message“AUTO SETUP” appears on the screen.
![]() Input selector (RGB1, RGB2, AUX, VIDEO, S- VIDEO) button
Input selector (RGB1, RGB2, AUX, VIDEO, S- VIDEO) button
Use to toggle through the RGB1, RGB2, AUX (module input), VIDEO and
![]() SYSTEM SELECTOR button (page 66) System switching can be done.
SYSTEM SELECTOR button (page 66) System switching can be done.
![]() MENU button (page 49)
MENU button (page 49)
Displays and clears the Main Menu. It can also return to the previous screen when the menu is displayed.
![]() FREEZE button (page 47)
FREEZE button (page 47)
Press this button to freeze the image temporarily.
 Arrow
Arrow 


 buttons (page 49)
Use these buttons to select an item on the menu screen, change setting and adjust the level.
ENTER button (page 49)
Press this button to enter your menu selection or to run function.
![]() Standard (STD) button (page 49)
Standard (STD) button (page 49)
Press this button to restore the default factory setting.
![]() ON SCREEN button (page 48)
ON SCREEN button (page 48)
This button turns on and off the
SHUTTER button (page 47)
Press this button to black out the image temporarily.
![]() Function 1 (FUNC1) button (page 74) This button can control the functions set in
Function 1 (FUNC1) button (page 74) This button can control the functions set in
“FUNC1” of the “Option” screen from Main Menu.
![]() Digital Zoom (- D.ZOOM +) buttons (page 47)
Digital Zoom (- D.ZOOM +) buttons (page 47)
Any portion of the picture can be zoomed in.
![]() LENS button (page 41)
LENS button (page 41)
Switches to the mode of projection lens adjustment.
![]() BRIGHT button (page 51)
BRIGHT button (page 51)
Switches to the mode of black level adjustment.
![]() CONTRAST button (page 51) Switches to the mode of image contrast adjustment.
CONTRAST button (page 51) Switches to the mode of image contrast adjustment.
![]() NEXT button
NEXT button
When multiple signal selectors are connected to the main unit in the system, this button specifies the second signal selector or beyond. With the ID set button pressed, every press on the button will change the value in the ten’s place.
 ASPECT button
Switches the image aspect ratio to 4:3, 16:9.
10