■Preset Menu
●Preset Menu Display
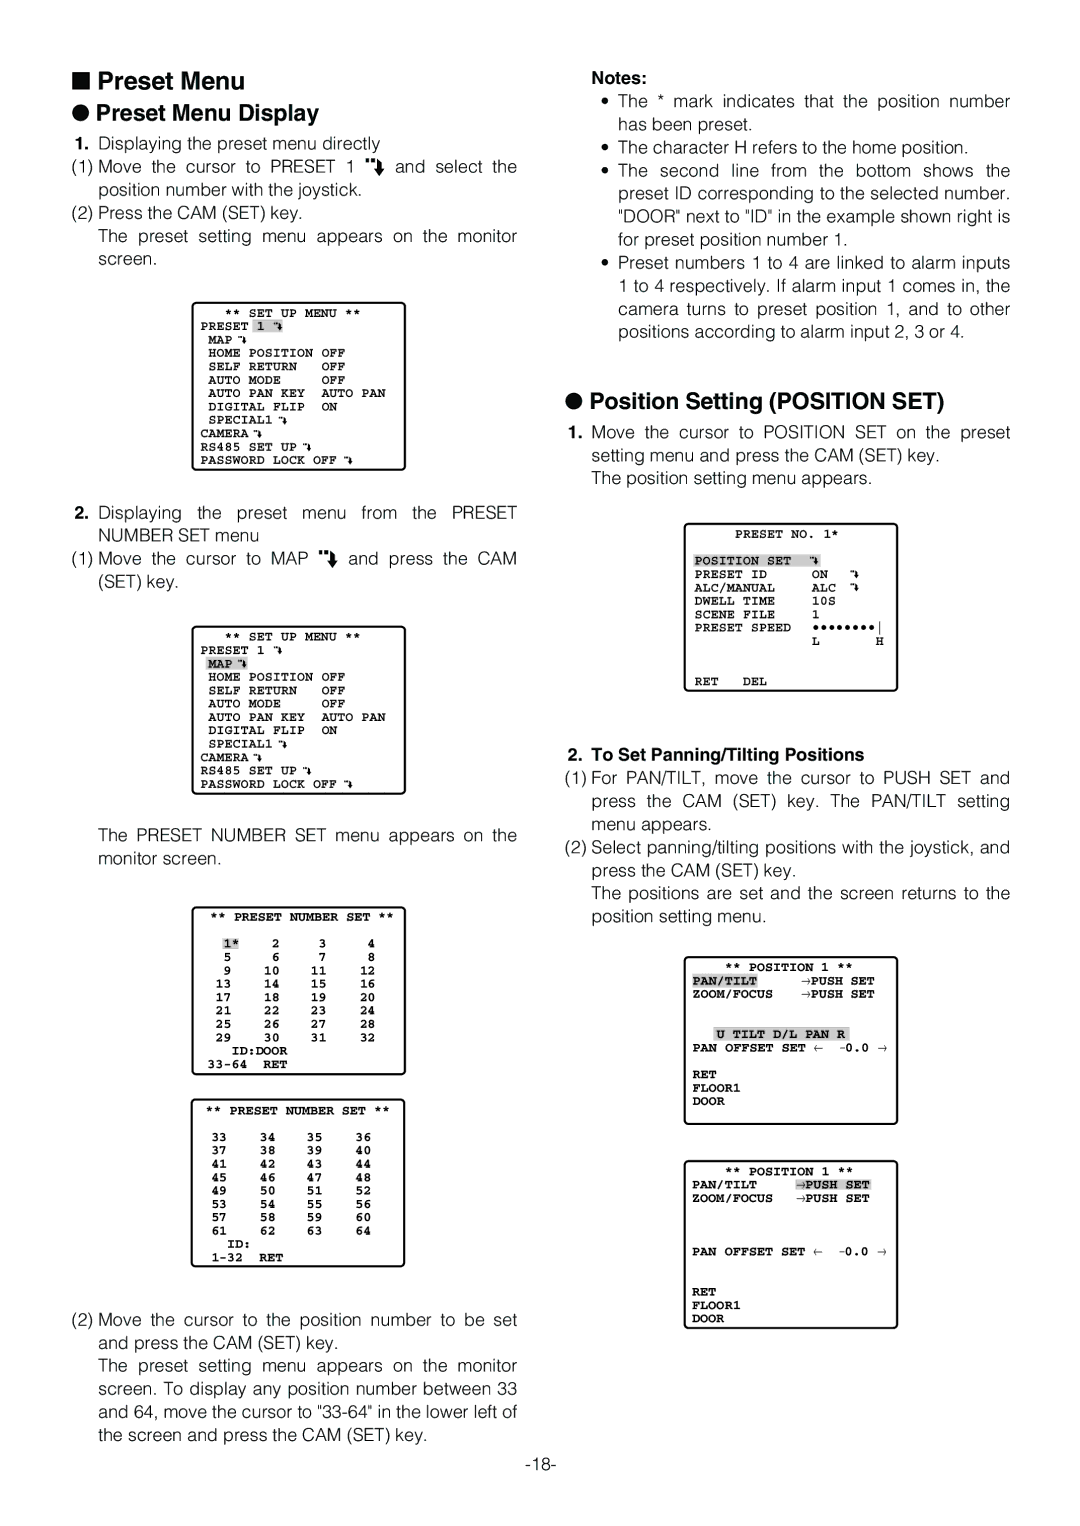
1.Displaying the preset menu directly
(1)Move the cursor to PRESET 1 O and select the position number with the joystick.
(2)Press the CAM (SET) key.
The preset setting menu appears on the monitor screen.
** SET UP MENU **
PRESET 1
MAP ![]()
HOME POSITION OFF
SELF RETURN OFF
AUTO MODE OFF
AUTO PAN KEY AUTO PAN
DIGITAL FLIP ON
SPECIAL1 ![]()
CAMERA ![]()
RS485 SET UP ![]()
PASSWORD LOCK OFF
2.Displaying the preset menu from the PRESET NUMBER SET menu
(1)Move the cursor to MAP O and press the CAM (SET) key.
** SET UP MENU **
PRESET 1 MAP ![]()
HOME POSITION OFF
SELF RETURN OFF
AUTO MODE OFF AUTO PAN KEY AUTO PAN DIGITAL FLIP ON SPECIAL1 ![]()
CAMERA ![]()
RS485 SET UP ![]()
PASSWORD LOCK OFF
The PRESET NUMBER SET menu appears on the monitor screen.
** PRESET NUMBER SET **
| 1* |
| 2 | 3 | 4 |
5 |
| 6 | 7 | 8 | |
9 |
| 10 | 11 | 12 | |
13 |
| 14 | 15 | 16 | |
17 |
| 18 | 19 | 20 | |
21 |
| 22 | 23 | 24 | |
25 |
| 26 | 27 | 28 | |
29 |
| 30 | 31 | 32 | |
| ID:DOOR |
|
| ||
RET |
|
| |||
** PRESET NUMBER SET **
33 | 34 | 35 | 36 |
37 | 38 | 39 | 40 |
41 | 42 | 43 | 44 |
45 | 46 | 47 | 48 |
49 | 50 | 51 | 52 |
53 | 54 | 55 | 56 |
57 | 58 | 59 | 60 |
61 | 62 | 63 | 64 |
ID: |
|
|
|
RET |
|
|
(2)Move the cursor to the position number to be set and press the CAM (SET) key.
The preset setting menu appears on the monitor screen. To display any position number between 33 and 64, move the cursor to
Notes:
•The * mark indicates that the position number has been preset.
•The character H refers to the home position.
•The second line from the bottom shows the preset ID corresponding to the selected number. "DOOR" next to "ID" in the example shown right is for preset position number 1.
•Preset numbers 1 to 4 are linked to alarm inputs 1 to 4 respectively. If alarm input 1 comes in, the camera turns to preset position 1, and to other positions according to alarm input 2, 3 or 4.
●Position Setting (POSITION SET)
1.Move the cursor to POSITION SET on the preset setting menu and press the CAM (SET) key.
The position setting menu appears.
PRESET NO. 1* |
| ||
|
|
|
|
POSITION SET |
|
|
|
PRESET ID | ON |
| |
ALC/MANUAL | ALC |
| |
DWELL TIME | 10S |
| |
SCENE FILE | 1 |
|
|
PRESET SPEED | •••••••• | ||
| L | H | |
RET DEL
2. To Set Panning/Tilting Positions
(1)For PAN/TILT, move the cursor to PUSH SET and press the CAM (SET) key. The PAN/TILT setting menu appears.
(2)Select panning/tilting positions with the joystick, and press the CAM (SET) key.
The positions are set and the screen returns to the position setting menu.
| ** POSITION 1 ** |
| ||
PAN/TILT | →PUSH | SET |
| |
ZOOM/FOCUS | →PUSH | SET |
| |
|
|
|
| |
PAN | U TILT D/L PAN R | 0.0 | → | |
OFFSET SET ← − | ||||
RET
FLOOR1
DOOR
** POSITION 1 **
PAN/TILT →PUSH SET ZOOM/FOCUS →PUSH SET
PAN OFFSET SET ← −0.0 →
RET
FLOOR1
DOOR
