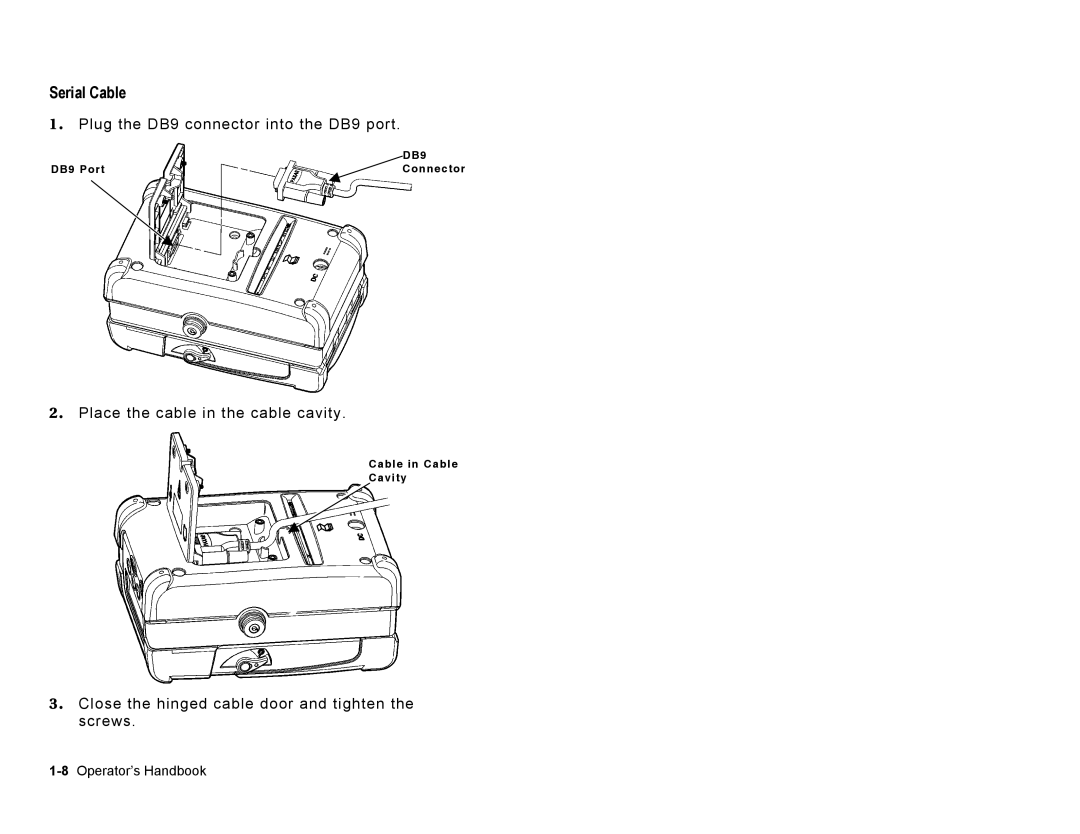
Manuals
/
Paxar
/
Computer Equipment
/
Printer
Paxar
Sierra Sport3 Serial Cable, Plug the DB9 connector into the DB9 port, DB9 Port, Connector
Models:
Sierra Sport3
1
12
46
46
Download
46 pages
33.59 Kb
9
10
11
12
13
14
15
16
<
>
Troubleshooting
Specification
Maintenance
Error
Insert the connector end of the battery into the printer
Use any of the following items to clean the printhead
How to
Accessories
Plug the DB9 connector into the DB9 port
Page 12
Image 12
Serial Cable
1 .
Plug the DB9 connector into the DB9 port.
DB9
DB9 Port
Connector
2 .
Place the cable in the cable cavity.
Cable in Cable
Cavity
3 .
Close the hinged cable door and tighten the screws.
1-8
Operator’s Handbook
Page 11
Page 13
Page 12
Image 12
Page 11
Page 13
Contents
Operator’s Handbook
Monarch 9433 Sierra Sport3 Printer
TC9433OH Rev. AD 12/07
All rights reserved
CANADIAN D.O.C. WARNING
Trademarks
T A B L E O F C O N T E N T S
CARE & MAINTENANCE
TROUBLESHOOTING
SPECIFICATIONS
ACCESSORIES
PRINTER OPTIONS
G E T T I N G S TA R T E D
U s i n g T h i s M a n u a l
A u d i e n c e
A d d i t i o n a l D o c u m e n t a t i o n
P r i n t e r U t i l i t i e s
U n p a c k i n g t h e P r i n t e r
I n s t a l l i n g t h e B a t t e r y
2 . Insert the connector end of the battery into the printer
3 . Close the supply door until the release levers click into place
Ready p 1-4 Operator’s Handbook
Battery and Safety Information
Do not let the battery get wet or come into contact with metal objects
C o n n e c t i n g t h e C o m m u n i c a t i o n s C a b l e s
Screws
Serial Cable
1 . Plug the DB9 connector into the DB9 port
Connector
2 . Place the cable in the cable cavity
USB Cable
1 . Plug the USB cable into the USB port
3 . Closed the hinged cable door and tighten the screws
USB Port USB Cable Cable in Cable Cavity
U s i n g t h e D i s p l a y a n d B u t t o n s
Navigation
Display
Buttons
P r i n t i n g
1-12 Operator’s Handbook
L O A D I N G S U P P L I E S
This chapter describes how to load supply for
The printer may be on or off when loading supplies
non-peel mode prints a continuous strip of supply
L o a d i n g f o r N o n - P e e l M o d e
Supply Holder Tabs
Exit Chute
Tearing the Supplies
L o a d i n g f o r P e e l M o d e
2-6 Operator’s Handbook
Peel bar
Peel roller
6. Close the supply door until the release levers click into place
7. Lightly tug on the liner to remove the slack
The liner separates from the label
Label Liner
L o a d i n g F a n - F o l d S u p p l i e s
2-8 Operator’s Handbook
8. Close the supply door until the release levers click into place
Loading Supplies
Tearing the Supplies
2-10 Operator’s Handbook
Tear Edge
C A R E
M A I N T E N A N C E
C l e a n i n g
Use any of the following items to clean the printhead
Printhead On-Demand Sensor
Turn the platen roller with your finger to clean the entire surface
C l e a r i n g L a b e l J a m s
3-6 Operator’s Handbook
T R O U B L E S H O O T I N G
Problem
Solution
“Care and Maintenance” for more
C o m m o n E r r o r s
Error
Description
2710
Error
Description
Error
Description
P r i n t e r S p e c i f i c a t i o n s
S P E C I F I C AT I O N S
Battery and Printer 5% to 90% non-condensing
Operating Limits 32 to 109 F 0 to 43 C
PrinterStorage 14 to 122 F -10 to 50 C
Relative Humidity
S u p p l y S p e c i f i c a t i o n s
C a b l e P i n - o u t s
Supply Types Labels, tags, or receipt paper
Supply Widths 0.5 13 mm minimum 2.99 76 mm maximum
A-4 Operator’s Handbook
A C C E S S O R I E S
S i n g l e S t a t i o n B a t t e r y C h a r g e r
F o u r S t a t i o n B a t t e r y C h a r g e r
C a r r y i n g A c c e s s o r i e s
B-2 Operator’s Handbook
P R I N T E R O P T I O N S C
L i n e r l e s s
B l u e t o o t h
C-2 Operator’s Handbook