DEH-P900HDD
Contents
Music Server Play Multi-CD Player
DAB Tuner
Memory Stick Player
Initial Settings
Audio Adjustments
TV Tuner
Other Functions
Volume
Steering remote controller
Key Finder
Head unit
Features
About this product
Precaution
About this manual
Case of trouble
Reverse mode
Resetting the microprocessor
Feature demo
About the demo modes
Installing the lithium battery
Remote controller and care
Replacing the lithium battery
Remove the lithium battery Precaution
Press Audio to select the desired mode
Using the steering remote con- troller
Function button operation
Audio button operation
Setting the time display on or off
Displaying and setting the clock
Setting the date
Setting the time
Theft protection
Detaching and replacing the front panel
Replacing the front panel
Detaching the front panel
Basic Operation
Press Volume to extend the Volume outward
Turning a source on or off
Soft KEY operation
Example of multi-function button opera- tion
Switching the function of the multi-func- tion buttons
Difference between the Band button and the Back button
Band button
Display example e.g., built-in CD player
Key guidance indicator
Tuner
Display and indicators
Basic operation
Storing and recalling broadcast stations
Tuner function menu
Tuning in strong signals
Storing the strongest broadcast stations
Recalling broadcast stations
Program service name = PTY information = Frequency
What is RDS?
Program service name = Frequency
RDS Functions
Using the PI seek function
Using alternative frequency AF
Auto PI seek for preset station
Limiting stations to regional pro- gramming
Adjusting the TA volume
Canceling traffic announcements
TP alarm
Receiving traffic announcements
PTY alarm
Using the PTY function
Setting the news program interruption
Searching the PTY
Wide Narrow Details
PTY List
Recalling preset radio text
Using radio text
Displaying the radio text
Storing radio text
Built-in CD Player
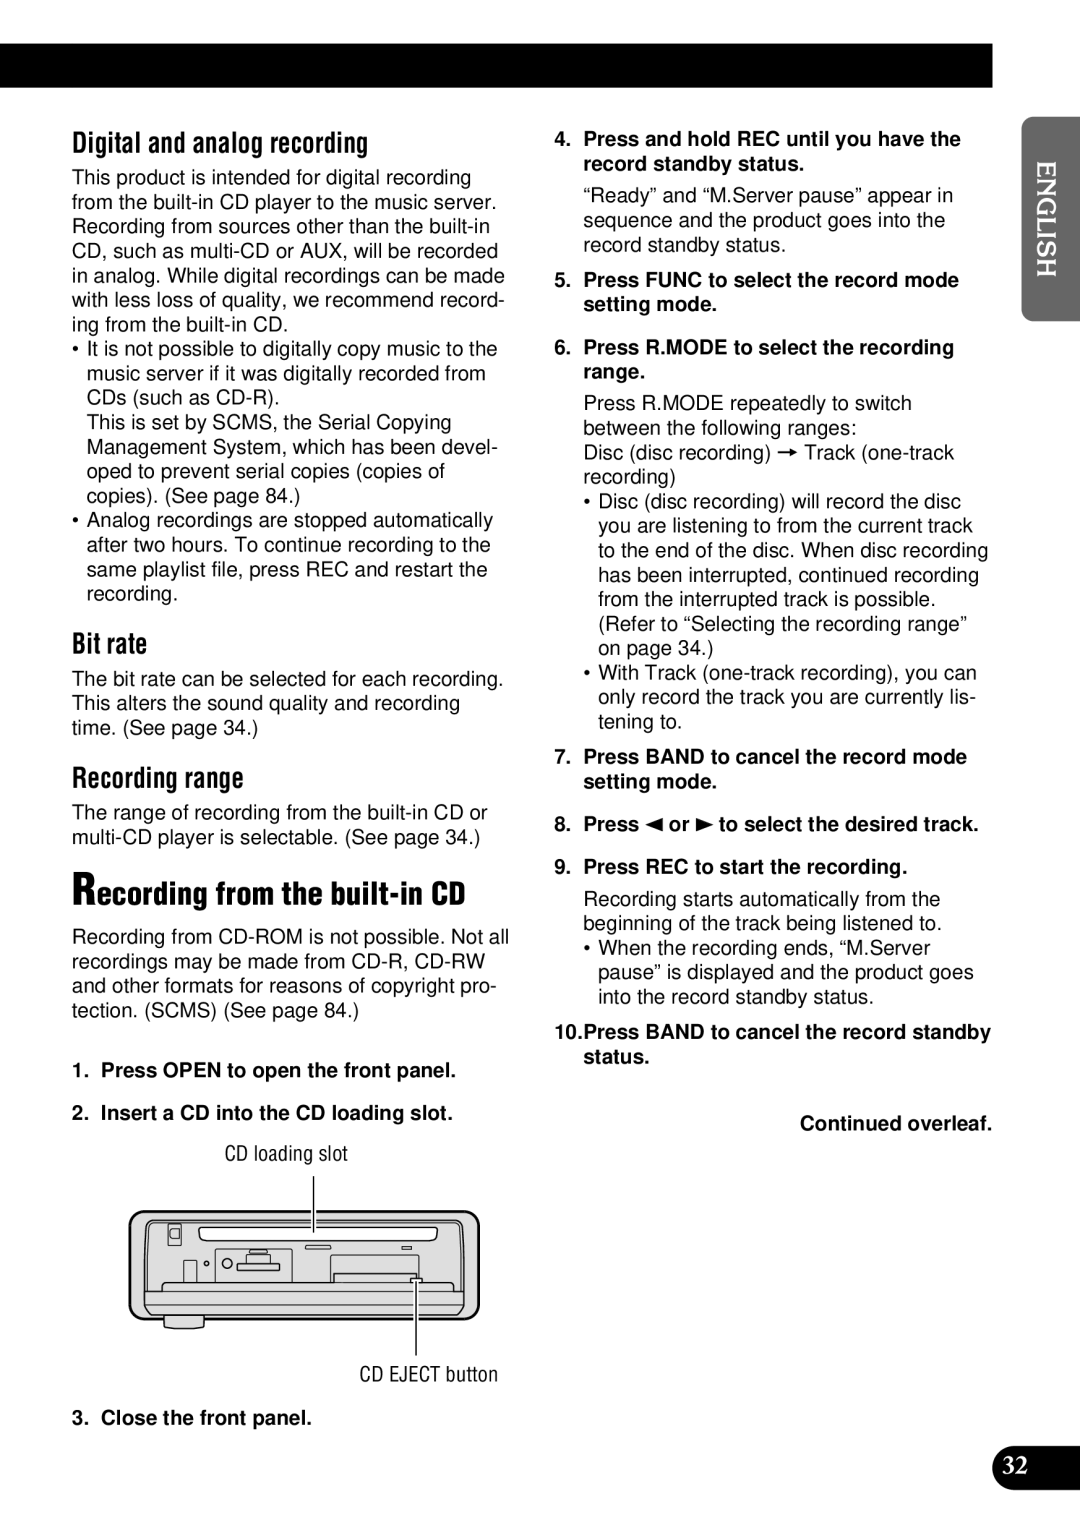
CD Eject button
Press Open and then press CD Eject to eject the CD
Repeating play
Switching and scrolling the title
Built-in CD player function menu
Button Operation
Scanning tracks of a CD
Playing tracks in random order
Selecting tracks from the track title list
Press Next until the desired track title appears
Pausing CD playback
Entering disc titles
Pause lets you temporarily stop playback of the CD
Press Open and then press CD Eject to eject the CD-ROM
MP3 Play
Overleaf
MP3 function menu
Scanning folders and tracks
Select the repeat range
Refer to Repeating play on
Pause lets you temporarily stop playback of the MP3
Pausing MP3 playback
Before recording
Music Server Recording
During record standby
During recording
Recording from the built-in CD
Press Band to cancel the record standby status Overleaf
Digital and analog recording
Bit rate
Recording from a source other than the built-in CD
Switching CD information
Recording function menu
Recording range Disc and Continue
Selecting the recording quality
Selecting the recording range
Built-in CD recording
Multi-CD Recording
Press Band to select the desired playlist mode
Selecting the playlist mode
Music Server Play
Press Source to select the music serv- er
Playlist files
Using the custom playlist mode
Deleting a track from a custom playlist file
Selecting a custom playlist file directly
Displays playlist file title
Gracenote Cddb
+TTL
Track title
Scanning files and tracks
Music server function menu
Music server function menu has the follow- ing functions
Refer to Repeating play on this
Press Func and then press Pause to select the pause mode
Pausing music server playback
Selecting files from the playlist file title list
Press Next to display the desired playlist file title
Entering playlist file titles
Entering titles
Entering track titles
Entering track artist names
Transferring tracks to the Memory Stick
When selecting All When selecting other than All
Deleting tracks and track infor- mation
MS loading slot MS Eject button
Erasing a track from playlist file
Erasing a playlist file from playlist mode
Memory Stick Player
MS loading slot Access lamp
Scrolls the displayed title
Memory Stick player function menu
Scanning tracks of a Memory Stick
Pausing Memory Stick play- back
Erasing tracks from the Memory Stick
Returning tracks to the music server
Erasing all tracks from the Memory Stick
Erasing a track from the Memory Stick
Disc multi-CD player
Multi-CD Player
Selecting a disc directly
Press Source to select the multi-CD player
Multi-CD player function menu has the fol- lowing functions
Multi-CD player function menu
Scanning CDs and tracks
Press 5 or ∞ to select letters, numbers and symbols
Press ABC to switch the character mode
Selecting discs from the disc title list
Press 5 or ∞ to play a disc you want to enter the title
Using compression and dynamic bass emphasis
Using ITS memory
Programming tracks in ITS memory
Erasing a track from ITS memory
Playback from ITS memory
Erasing a CD from ITS memory
Press ITS.P to turn ITS play on
Indicator Function
Indications that light when function is switched on
Indicator Status
DAB Tuner
Switching the display
Storing and recalling services
Storing services
Recalling services
DAB tuner function menu
Dynamic label function
Displaying dynamic labels
Storing a dynamic label
Selecting services from the pre- set service list
Setting the announcement sup- port interruption
Selecting services from the avail- able service list
Searching the available PTY
TV Tuner
QBand WPreset number eChannel
TV tuner function menu
ChLIST preset channel list
Selecting channels from the pre- set channel list
Bssm best stations sequential memory
Adjusting the audio easily
Audio Adjustments
Adjusting the audio finely
Extra functions
Using loudness
Using balance adjustment
Using sound field control, octaver and Bber sound
Press 2 or 3 to adjust left/right speaker balance
Adjusting 13-band graphic equal- izer
Adjusting equalizer curves
Switching the octaver setting
Adjusting BBE sound level
Using position selector
Using automatic sound levelizer
Recall the equalizer curve you want to adjust
Press 5 or ∞ to adjust the level of the equalizer band
Using subwoofer output
Using time alignment
Adjusting time alignment
Button Type of car
Adjusting subwoofer settings
Using the high pass filter
Setting the high pass filter for front speakers
Setting the high pass filter for rear speakers
Using the auto-equalizer
Adjusting source levels
Switching the digital attenuator
Creating the auto-equalizer curve
Carrying out auto-equalizing
Before operating the auto-equalization function
Press any button to cancel the auto- equalizer mode
Turn the ignition switch to on or ACC
Initial settings menu
Initial Settings
Using reverse mode
Using the feature demo
Formatting the Memory Stick
Switching the telephone muting/attenuation setting
Setting the FM tuning step
Setting the warning tone
Button Tuning step
Switching the auto PI seek
Setting the DAB priority function
With DAB priority on
With DAB priority OFF
Other Functions
Setting the background visual
Setting the ASL display
Setting the background still picture
Canceling the entertainment display
Using the telephone muting/ attenuation
Using the AUX source
Selecting AUX as the source
Entering the AUX title
Additional Information
CD player and care
CD-R and CD-RW discs
About folders and MP3 files
MP3 files
Memory Stick player and care
Understanding auto-equalizing error messages
Understanding built-in CD player error messages
Display Cause Remedy
Server Error
Understanding music server error messages
Server ERROR- 30, A0
Remain
Understanding music server error messages when recording
Stick Error
Understanding Memory Stick player error messages
Stick Write Error
Format Error
Stick Read Error
Terms
Memory Stick
Multi-session
Packet write
Audio/DSP
Specifications General
CD player
ATRAC3
FM tuner
MW tuner
LW tuner
Contenido
Sintonizador
Funciones RDS
Reproductor Memory Stick
Reproducción con Music Server
Reproductor de múltiples CD
Sintonizador DAB
Otras funciones
Ajustes de audio
Ajustes iniciales
Sintonizador de TV
Guía de botones
Unidad principal
Control remoto en el volante
Características
Antes de utilizar este producto
Acerca de este producto
Si se presenta algún problema
Acerca de este manual
Precaución
Acerca de las visualizaciones básicas
Reinicialización del microproce- sador
Acerca de los modos de demostración
Demostración de las características
Instalación de la pila de litio
Control remoto y cuidados
Sustitución de la pila de litio
Retire la pila de litio Precaución
Botón Function y botón Audio
Uso del control remoto en el volante
Operación del botón Function
Operación del botón Audio
Para activar o desactivar la visualización de la hora
Visualización y ajuste del reloj
Ajuste de la fecha
Ajuste de la hora
Protección anti-robo
Extracción y colocación del panel frontal
Extracción del panel frontal
Reinstalación del panel frontal
Operación Soft KEY
Operación básica
Activación o desactivación de una fuente
Importante
Ejemplo de operación del botón multifunción
Conmutación de la función de los botones multifunción
Diferencia entre el botón Band y el botón
Botón Band
Indicador de guía de las teclas
Operación básica
Sintonizador
Pantalla de visualización e indicadores
Memorización y llamada de las emisoras de radiodifusión
Sintonización de señales potentes
Menú de funciones del sintonizador
Para llamar las emisoras de radiodifusión
MW/LW
¿Qué es el RDS?
Funciones RDS
Visualización de la frecuencia de una emisora RDS
Nombre del servicio de programa = Frecuencia
Búsqueda PI
Uso de la función de búsqueda PI
Búsqueda PI automática para la emisora preajustada
Limitación de emisoras para programación regional
Alarma de TP
Ajuste del volumen de TA
Cancelación de los anuncios de tráfico
Recepción de anuncios de tráfico
Uso de la función PTY
Alarma PTY
Búsqueda de PTY
Ajuste de la interrupción de un programa de noticias
Ancho Angosto Detalles
Lista de PTY
Visualización de Radiotexto
Uso de Radiotexto
Almacenamiento del Radiotexto en la
Memoria
Ranura de carga de CD Botón CD Eject
Reproductor de CD incorporado
Presione Open y luego presione CD Eject para expulsar el CD
Asegúrese de cerrar el panel frontal después de sacar el CD
Cambio y desplazamiento de títulos
Reproducción de repetición
Menú de funciones del reproductor de CD incorporado
Botó n Operació n
Exploración de pistas de un CD
Reproducción de pistas en orden aleatorio
Selección de pistas de la lista de títulos de pistas
Presione Next hasta que aparezca el título de pista deseado
Para poner la reproducción del CD en pausa
Para ingresar títulos de discos
Presione Pause para activar la pausa
Reproducción de MP3
Continú a al dorso
Menú de funciones MP3
Exploración de carpetas y pistas
Seleccione el margen de repetició n
Consulte Reproducción de repetición en la página
Para poner la reproducción de MP3 en pausa
Antes de la grabación
Durante la espera de grabación
Durante la grabación
Velocidad de bitios
Grabación digital y analógica
Margen de grabación
Grabación desde el CD incorporado
Cambio de la información del CD
Menú de la función de grabación
Grabación desde una fuente distinta del CD incorporado
Margen de grabación Disc y Continue
Selección de la calidad de grabación
Selección del margen de grabación
Grabación de CD incorporado
Grabación de múltiples CD
Selección del modo playlist
Reproducción con Music Server
Presione Source para seleccionar el music server
Presione Source hasta que aparezca Music Server
Archivos playlist
Utilización del modo playlist personalizado
Grabación de pistas en un archivo playlist personalizado
Personalizado
Se visualiza el título del archivo
Playlist
Playlist y el título de pista
Menú de funciones del music server
Exploración de archivos y pistas
Consulte Reproducción de repetición en esta misma página
Se empezará a reproducir el archivos selec- cionada
Para poner la reproducción del music server en pausa
Entrada de los títulos de los archivos playlist
Entrada de títulos
Entrada de los títulos de pistas
Entrada de los nombres de artistas de las pistas
Borrado de las pistas y de información de las pistas
Traslado de pistas al Memory Stick
Presione 5 otra vez Nota
41 6. Cierre el panel frontal
Borrado de un archivo playlist del modo playlist
Borrado de una pista del archivo playlist
Para evitar borrar la pista, presione 3 y 5 y seleccione no
Ranura de carga de MS Lámpara de acceso
Reproductor Memory Stick
Botón Operación
Menú de funciones del reproductor Memory Stick
Botón Operation
Presione RDM para activar la reproduc- ción aleatoria
Exploración de pistas de un Memory Stick
Para poner la reproducción de Memory Stick en pausa
Presione Scan para activar la reproducción con exploración
Borrado de las pistas del Memory Stick
Retorno de las pistas al music server
Borrado de todas las pistas del Memory Stick
Borrado de una pista del Memory Stick
Reproductor de múltiples CD de 50 discos
Reproductor de múltiples CD
Selección directa de un disco
Presione Next para visualizar 1 6 o 7
Reproductor de múltiples CD
Menú de funciones del
Presione Func para seleccionar el modo
De repetición Presione RPT para seleccionar el margen
Exploración de discos CD y pistas
Presione RDM para activar la reproducción aleatoria
Seleccione el margen de repetición
Para poner la reproducción del CD en pausa
Selección de discos de la lista de títulos de discos
Presione 5 o ∞ para seleccionar letras, números y símbolos
Continúa al dorso
Uso de compresión y del realce de bajos dinámicos
Presione Band para cancelar el modo de memoria ITS Nota
Uso de la memoria ITS
Programación de pistas en la memoria
Reproducción desde la memoria ITS
Borrado de un CD de la memoria ITS
Borrado de una pista de la memoria ITS
Indicadores del estado de DAB
Sintonizador DAB
Indicador Función
Indicador Estado
Cambio de banda
Almacenamiento y llamada de los servicios
Almacenamiento de los servicios
Llamada de los servicios
Menú de funciones del sin- tonizador DAB
Función de etiqueta dinámica
Almacenamiento de una etiqueta dinámi- ca
Llamada de una etiqueta dinámica
Selección de servicios de la lista de servicios disponibles
Ajuste de la interrupción de soporte de anuncio
Búsqueda de los PTY disponibles
Botón Anuncio
Almacenamiento y llamada de emisoras de radiodifusión
Sintonizador de TV
Para almacenar las emisoras de radiodi- fusión
Presione Source para seleccionar el sintonizador de TV
Para llamar las emisoras de radiodi- fusión
Menú de funciones del sin- tonizador de TV
Selección de canales de la lista de canales preajustados
Bssm memoria secuencial de las mejores emisoras
Ajuste fácil de audio
Ajustes de audio
Ajuste fino de audio
Funciones adicionales
Uso del ajuste de balance
Menú de audio
Uso del control de sonoridad
Presione Audio para seleccionar el modo fader/balance
Ajuste del ecualizador gráfico de 13 bandas
Ajuste de las curvas del ecual- izador
Para llamar los programas del campo sonoro
Conmutación del ajuste del procesador de octavas
Uso del selector de posición
Uso del nivelador automático de sonido
Llame la curva de ecualizador que usted desea ajustar
Cionar
Uso de la salida del subwoofer
Uso de la alineación del tiempo
Ajuste de la alineación del tiempo
Botón Tipo de coche
Uso del filtro pasa-alto
Configuración de los ajustes del sub- woofer
Ajuste del filtro pasa-alto para los altavo- ces delanteros
Ajuste del filtro pasa-alto para los altavo- ces traseros
Uso del ecualizador automático
Ajuste de los niveles de fuente
Conmutación del atenuador digital
Creación de la curva del ecualizador automático
Para realizar la ecualización automática
Antes de operar la función de ecualización automática
Consulte Uso del selector de posición en la página
Gire el interruptor de encendido a on o ACC
Menú de ajustes iniciales
Ajustes iniciales
Uso del modo de inversión
Uso de la demostración de carac- terísticas
Ranura de carga de MS Botón MS Eject
Cómo formatear el Memory Stick
Aparecerá la pantalla de confirmación
Presione 2 y luego presione 5 para seleccionar Y
Ajuste del tono de advertencia
Ajuste del paso de sintonía de
Botón Paso de sintonía
50K 50 kHz 100K 100 kHz
Conmutación de la búsqueda PI automática
Ajuste de la función de prioridad de DAB
Con la prioridad DAB activada
Con la prioridad DAB desactivada
Otras funciones
Ajuste de la visualización del analizador de espectros
Cancelación de la visualización de entretenimiento
Ajuste de la visualización de ASL
Ajuste de la imagen fija de fondo
Selección de AUX como fuente
Uso de la fuente AUX
Para ingresar el título AUX
Uso del enmudecimiento/ate- nuación de teléfono
Información adicional
Reproductor de CD y cuidados
Discos CD-R y CD-RW
Acerca de las carpetas y archivos MP3
Archivos MP3
Reproductor Memory Stick y cuidados
Visualización Causa Solución
Ajuste el micrófono correctamente
El reproductor de CD
Cómo interpretar los mensajes de error del music server
Server Read Error
Server Write Error
Server Writer ERR
Reset
El Memory Stick ha sido Saque el Memory Stick, alinéelo
Hay alguna anomalía en el Reemplace el Memory Stick
Insertado boca abajo o invertido
Cierta información de pista no
Stick Read Error
Formato ISO9660
Términos
Nivel
Formatos extendidos
MP3
Especificaciones General
Sintonizador MW
Sintonizador FM
Sintonizador LW
87,5 108 MHz
Page
Page
KMMUF/01I00001
Meguro 1-CHOME, MEGURO-KU, Tokyo 153-8654, Japan