RCS-606H
Operating Environment
Thank you for buying this Pioneer product
Radiation at least 10 cm at top, 10 cm at rear,
Ventilation Caution Receiver subwoofer
Ventilation Caution DVD Recorder
Contents
Speaker Setup Guide Chapter
Speaker Setup Guide
Safety precautions when setting up
Home theater sound setup RCS-606H
Home theater sound setup RCS-404H/RCS-505H
Speaker Setup Guide
Standard surround setup
Connect the speaker system
Attach the surround speakers to the speaker stands
Front surround setup
Make sure the Front Surround mode is switched Off
Precautions
Additional notes on speaker placement
Wall mounting the center speaker
Wall mounting the speakers RCS-404H/RCS-505H
Speaker Setup Guide
Basic connections
Connecting up
Connecting up Chapter
Connecting up
To AC outlet Receiver subwoofer SX-SW606
Receiver subwoofer SX-SW404
Listening position
Center Green
OUT
Antenna
Connecting up Using this system for TV audio
Remote control Chapter
Remote control
Remote control
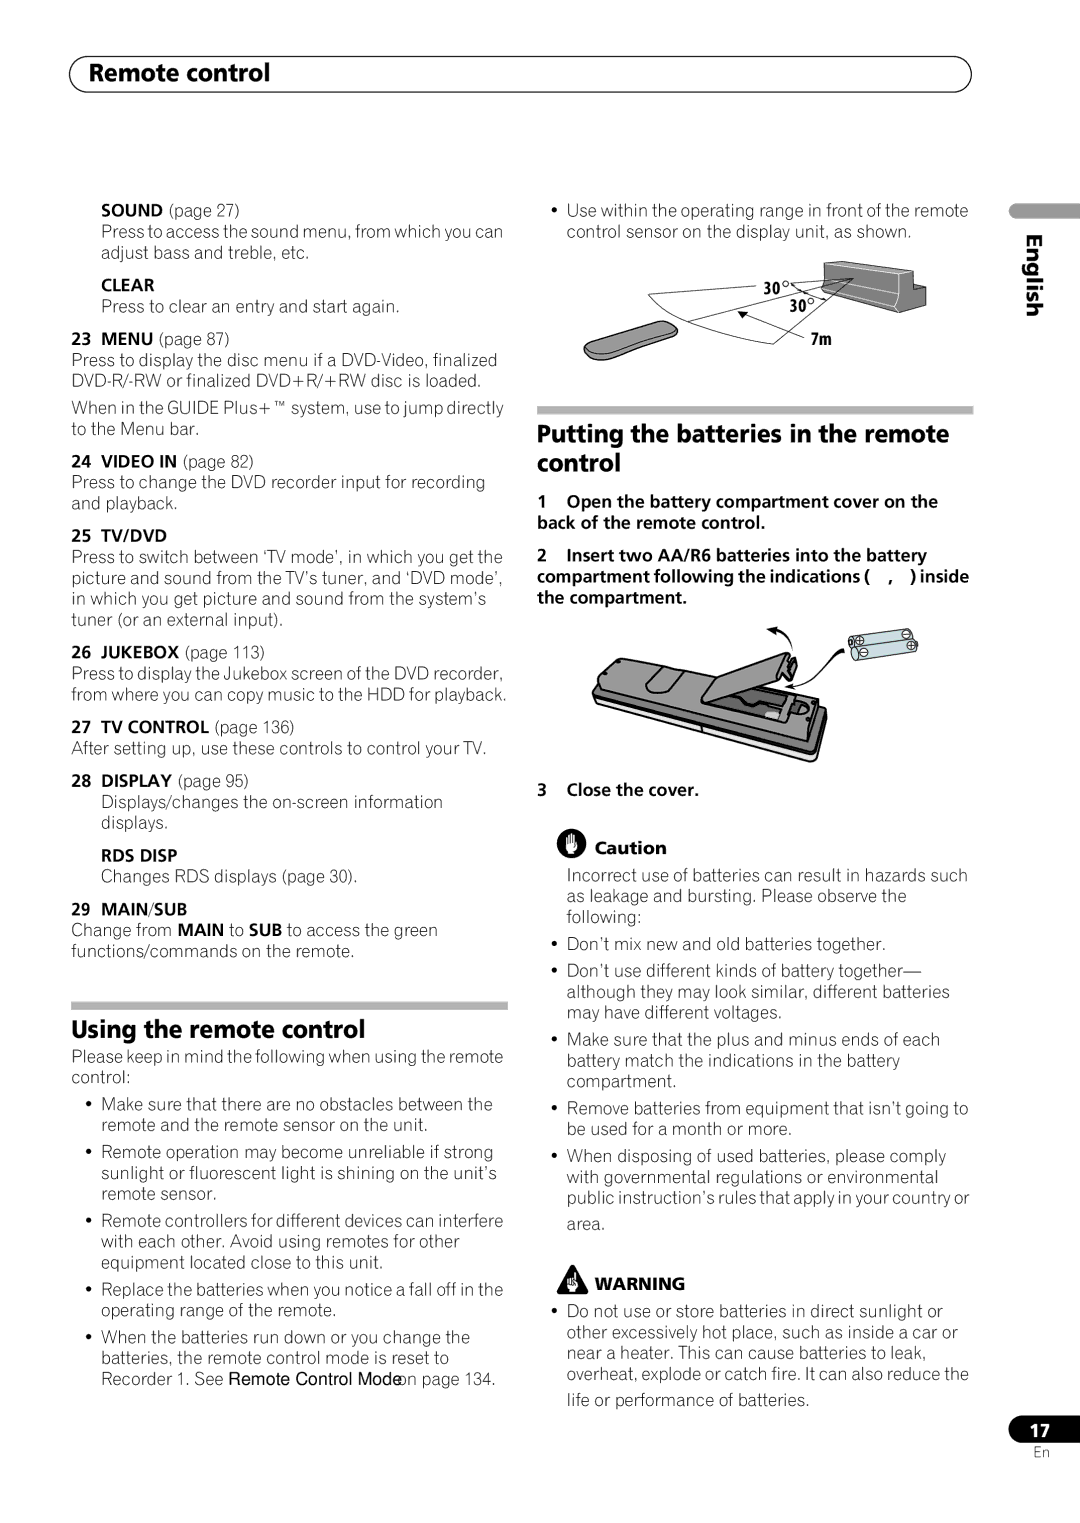
Putting the batteries in the remote control
Using the remote control
Setting up
Switching on
Before you start
Before you start Chapter
Watching a DVD
Before you start Basic operation
Listening to a CD
Watching a title recorded on the HDD
SX-SW606 SX-SW404 ST606 ST404
Section Two
Controls and displays Chapter
Controls and displays
Display unit
Display
Using the Auto Mcacc setup for optimal surround sound
System demo setting
Getting started
Getting started Chapter
Getting started
Listening to your system
Auto listening mode
Listening to your system Chapter
Listening in surround sound
Using Advanced Surround
Using Front Surround
Listening to your system
Listening in stereo
Using Quiet and Midnight listening modes
Listening to your system Using the Sound Retriever
Adjusting the bass and treble
Listening with Acoustic Calibration
Select between OFF, Music or Cinema
Listening to your system Boosting the bass level
Listening to the radio
Listening to the radio
Listening to the radio Chapter
Listening to station presets
Using RDS
Memorizing stations
Displaying RDS information
Surround sound settings Chapter
Surround sound settings
Using the Setup menu
Channel level setting
Adjusting the channel levels using the test tone
Surround sound settings
Dual mono setting2
Dynamic Range Control1
When you’re done, press Enter to exit test tone setup
Connecting external antennas
Connecting auxiliary components
Other connections
Other connections Chapter
SR+ Setup for Pioneer plasma displays
Using this unit with a Pioneer plasma display
Press SR+ Use Buttons to choose SETUP, then Press Enter
Want to adjust
Automatic plasma display volume muting
Using the SR+ mode with a Pioneer plasma display
Automatic plasma display input switching
Press SR+ on the remote Use
Additional information
Troubleshooting
Additional information Installation and maintenance
Hints on installation
General
Tuner
Error Messages
Additional information
SX-SW606 / SX-SW404
Specifications
Additional information Glossary
ST404 Speaker system
ST606 Speaker system
Front speakers x2, surround speakers x2, center speaker
Front/surround speakers
DVR-640H-AV DVR-440H-AV
Section Three
Video Adjust menu
Disc Setup menu
Initial Setup menu
Setting the picture quality for TV and external
Model Playable
Disc / content format playback compatibility
Compatible media
Before you start
WMA Windows Media Audio compatibility
DivX VOD content
DivX video compatibility
DivX
Jpeg file compatibility
About the internal hard disk drive
PC-created disc compatibility
Dolby Digital
Optimizing HDD performance
Symbols used in this manual
Front panel connections
Rear panel connections
Antenna
Connecting up Easy connections
Using the S-video or component video output
Connecting up Using other types of audio/video output
Plug the supplied G-LINK cable to the G-LINK jack
Connecting an external decoder box
Connect RF antenna cables as shown
Scart AV Antenna
Connecting a USB device
Connecting up Connecting other AV sources
Connecting a VCR or analog camcorder
Connecting a DV camcorder
Plugging
Using a USB printer
Jpeg file storage devices
WMA/MP3 file storage devices
OPEN/CLOSE
Front panel
HDD/DVD
REC
Ntsc
Controls and displays Display
LP / SLP
EP / SEP
Select ‘Auto’ for automatic time setting
Switching on and setting up
Manual clock setting
Auto clock setting
‘Standard 43’
Select whether or not your TV is
Guide Display the Guide Plus+ setup menu
Getting started Setting up the Guide Plus+ system
Checking the downloaded data the following day
About EPG download
Identify the host channel for your country
Country Host Comments Region Channels
Like
Using the Guide Plus+ electronic program guide Chapter
Using the Guide Plus+ electronic program guide
Using the Guide Plus+ system
Guide Plus+ system
Guide Plus+ navigation
Using the Guide Plus+ electronic program guide
One-Button-Record
Lock / Unlock video window
Channel mosaic screen
Areas
Grid Area
Search Area
Searching
Using My Choice keywords for a search
My TV Area
Setting up a profile
Schedule Area
Channels is now highlighted
Highlight the left tile of a scheduled recording
Editing a scheduled recording
Press the Green Action button Edit
Enter a name for the scheduled recording
Press cursor right to access the extended recording options
Setting a ShowView recording
Deleting a scheduled recording
Select ‘Schedule’ from the Menu bar
Editor Area
Setting a manual recording
Info Area
Switching a channel on/off
Setup Area
Making changes to your Guide Plus+ setup
Changing the source and program number
Manual Host Channel setup
Guide Plus+ FAQ and troubleshooting
FAQ
There are several possibilities
TV listings information doesn’t update
Recording Chapter
Recording
About DVD recording
Recording to DVD-R DL/DVD+R DL discs
Recording About HDD recording
HDD Video mode compatibility
Recorded audio
Restrictions on video recording
Setting the picture quality/recording time
Recording Using the built-in TV tuner
Switching between TV and DVD
Changing audio channels
Basic recording from the TV
Recording
Live TV Start recording the current TV channel
Recording Pause Live TV Setting a timer recording
Recording continues with playback paused
Press to start playback You can also use the scan buttons
Home Menu Select ‘Easy Timer’ from the Home
Easy Timer Recording
Prev Next Set the TV channel to record
Set the recording quality
Canceling or extending the timer
Extending a timer recording in progress
Stopping a timer recording
Frequently Asked Questions
Recording Timer recording FAQ
Simultaneous recording and playback Chase Play
Recording from an external component
Also, set the camcorder to VTR mode
REC Mode Set the recording quality
Recording from a DV camcorder
Press to start recording
Finalizing a disc
Playing your recordings on other DVD players
DVD VR DVD Video DVD+R DVD+RW
Select ‘Finalize’ ‘Finalize’ ‘Next
Initializing recordable DVD discs
Home Menu Select ‘Disc Setup’ from the Home
DVD-R DVD-RW DVD+RW DVD-RAM
Select ‘Initialize’ ‘Video Mode’, ‘VR
Playback Chapter
Playback
Introduction
Basic playback
Playing DVD discs
Playback
Playing from the HDD
DVD+R/DVD+RW only
Playing Video CD/Super VCDs
Playing in PBC mode
Playing CDs and WMA/MP3 discs
Using the Disc Navigator to browse the contents of a disc
Changing the display style of the Disc Navigator
Using the Disc Navigator with playback-only discs
DVD-Video CD Video CD Super VCD WMA/MP3 DivX
Select ‘Disc Navigator’
Play Mode
Play Mode menu
Playback Scanning discs
Frame advance/frame reverse
Repeat play
Search Mode
Repeat
Program play
Displaying and switching subtitles
Switching audio channels
Playback Switching DVD and DivX soundtracks
Switching camera angles
HDD DVD VR DVD-RAM
HDD and removable disc activity display
Playback Displaying disc information on- screen
Recording time Relative playback position
Indicates the data transfer rate
Editing Chapter
Editing
Editing options
Original Play List
Editing accuracy
Editing Disc Navigator screen
HDD genres
Select the HDD or DVD
Create
Editing
Play
Erase
Title Name
Set Thumbnail Erase Section
DVD VR DVD-RAM HDD
Divide
Chapter Edit
Highlight the title you want to assign a
Set Genre
Genre to
Select ‘Edit’ ‘Set Genre’ from
Move
Lock
Title to move
Insert position
Genre Name
Combine
Select ‘Undo’ from the command menu panel
Select ‘Multi-Mode’ from the command menu panel
Multi-Mode
Undo
Copying and backup Chapter
Copying and backup
One Touch Copy
Restrictions on copying
Using Copy Lists
Copying and backup
Canceling One Touch Copy
Copying from HDD to DVD
To edit a title, highlight it using
Press to display the command menu panel
Select ‘HDD DVD’
Title and press Enter to add
There are several options available from the next screen
Copying from DVD to HDD
Select ‘Next’ to proceed
Bilingual
Recording Mode
Copying and backup Using disc backup
112
Using the Jukebox Chapter
Using the Jukebox
Copying music to the HDD
Playing music from the Jukebox
Changing the album view
Using the Jukebox
Editing Jukebox albums
PhotoViewer DVR-640H-AV Chapter
PhotoViewer DVR-640H-AV
Locating Jpeg picture files
Playing a slideshow
Importing files to the HDD
PhotoViewer DVR-640H-AV
Zooming an image
Rotating an image
Selecting multiple files or folders
Importing files from a USB device
Erasing a file or folder
Editing files on the HDD
Creating a new folder
Copying files
Select ‘Yes’ to confirm, or ‘No’ to cancel
Naming files and folders
Locking/Unlocking files
Select ‘Print’ from the menu
Printing files
Sideshow
Select a thumbnail from which to start
PhotoViewer DVR-440H-AV
Disc Setup menu Chapter
Disc Setup menu
Basic settings
Initialize settings
Finalize settings
Disc Setup menu
Optimize HDD
Initialize HDD
Video Adjust menu Chapter
Video Adjust menu
Setting the picture quality for TV External inputs
Creating your own set
Choosing a preset
Video Adjust menu
Setting the picture quality for disc playback
127
Initial Setup menu Chapter
Initial Setup menu
Using the Initial Setup menu
Setting Options Explanation
RGB
Initial Setup menu
Nicam
Setting Options
Mpeg PCM
Mpeg
DVD+R/+RW
Parental Lock Set Password
Mode Play List
Angle Indicator
Playback TV Screen Size Letter Box
About the input line system
Additional information about the TV system settings
About Ntsc on PAL TV
PAL
Additional information about component video output
Selecting other languages for language options
About the input colour system
PAL Secam
Using the TV remote control buttons
Setting up the remote to control your
TV Volume
Input
Frontech /PROTECH
Additional information TV Preset code list
DVD disc type Rec
Additional information Minimum copying times
Mode
SEP
Additional information Manual recording modes
Resolution *1 Level Rec. time
Problem
Additional information Troubleshooting
Timer program doesn’t
Using this recorder on
After a power failure
‘LOCK’ when a button is Pressed
ProblemRemedy
Message Explanation/Action
Message
When viewing on a widescreen TV or monitor
When viewing on a standard TV or monitor
Additional information About DV
Screen sizes and disc formats
Country/Area code list
Additional information Language code list
Language Language code letter, Language code
Country/Area, Country/Area code, Code letter
Hints on installation
Cleaning the pickup lens
Additional information Handling discs
Condensation
Moving the recorder
Resetting the recorder
Recorder turns off with all settings reset
Input/Output
Timer
AV Connectors 21-pin connector assignment
Supplied accessories
151
Pioneer Corporation