07The System Setup menu

FRONT ALIGN – All speakers are set in accordance with the front speaker settings (no equalization is applied to the front left and right channels).

You return to the Acoustic Cal EQ setup menu after the Acoustic Calibration Equalization is set.

Copying your Acoustic Calibration EQ settings

If you want to manually adjust the Acoustic Calibration EQ (see Setting the Acoustic Calibration EQ manually below), we recommend copying the ALL CH ADJUST or the FRONT ALIGN settings from the EQ Auto setup above (or from Automatically setting up for surround sound (MCACC) on page 8) to one of the custom settings. Instead of just a flat EQ curve, this will give you a reference point from which to start.

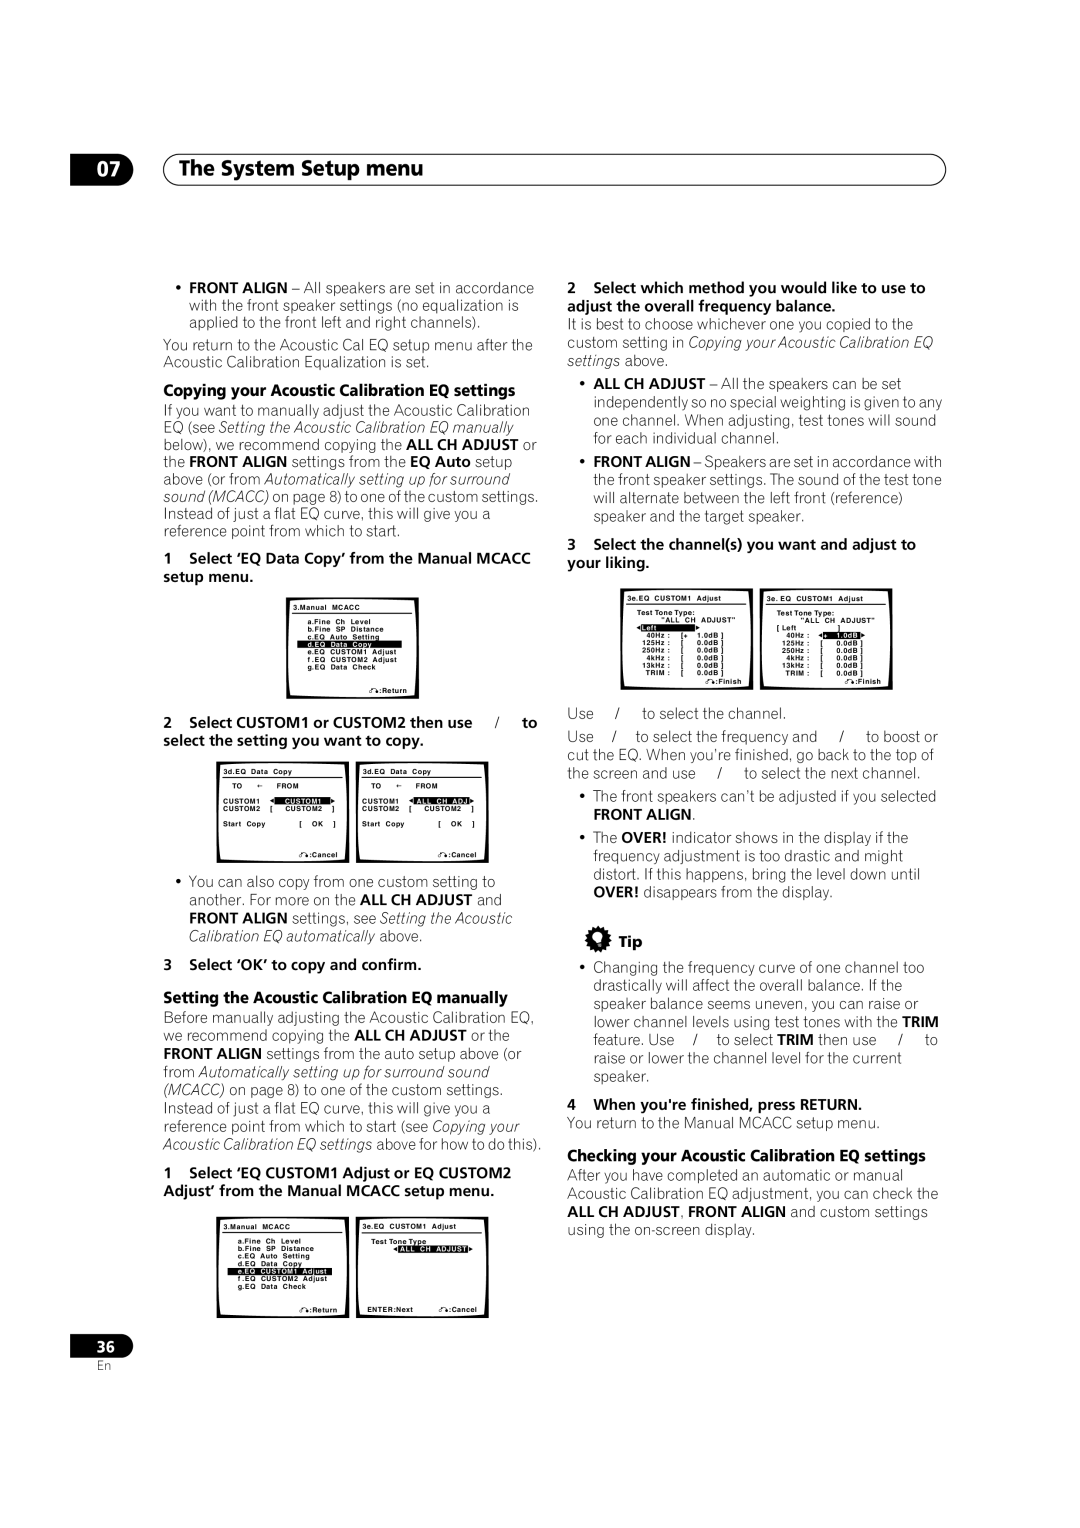
1Select ‘EQ Data Copy’ from the Manual MCACC setup menu.


3.Manual

MCACC


a.Fine

Ch Level


b.Fine

SP Distance


c.EQ

Auto Setting


d.EQ

Data Copy


e.EQ

CUSTOM1

Adjust


f .EQ

CUSTOM2

Adjust


g.EQ

Data Check


:Return


2 Select CUSTOM1 or CUSTOM2 then use

to

select the setting you want to copy.


3d.EQ Data

Copy


3d.EQ Data


Copy


TO

FROM


TO


FROM


CUSTOM1


CUSTOM1


CUSTOM1


ALL CH ADJ


CUSTOM2 [


CUSTOM2

]


CUSTOM2

[ CUSTOM2

]


Start Copy


[ OK

]


Start Copy


[ OK

]


:Cancel


:Cancel


You can also copy from one custom setting to another. For more on the ALL CH ADJUST and FRONT ALIGN settings, see Setting the Acoustic Calibration EQ automatically above.

3 Select ‘OK’ to copy and confirm.

Setting the Acoustic Calibration EQ manually

Before manually adjusting the Acoustic Calibration EQ, we recommend copying the ALL CH ADJUST or the FRONT ALIGN settings from the auto setup above (or from Automatically setting up for surround sound (MCACC) on page 8) to one of the custom settings. Instead of just a flat EQ curve, this will give you a reference point from which to start (see Copying your Acoustic Calibration EQ settings above for how to do this).

1Select ‘EQ CUSTOM1 Adjust or EQ CUSTOM2 Adjust’ from the Manual MCACC setup menu.


3.Manual

MCACC


3e.EQ CUSTOM1

Adjust


a.Fine

Ch

Level


Test Tone Type


b.Fine SP

Distance


ALL CH

ADJUST


c.EQ

Auto

Setting


d.EQ

Data

Copy


e.EQ

CUSTOM1

Adjust


f .EQ

CUSTOM2

Adjust


g.EQ

Data

Check


:Return


ENTER:Next

:Cancel


36

2Select which method you would like to use to adjust the overall frequency balance.

It is best to choose whichever one you copied to the custom setting in Copying your Acoustic Calibration EQ settings above.

ALL CH ADJUST – All the speakers can be set independently so no special weighting is given to any one channel. When adjusting, test tones will sound for each individual channel.

FRONT ALIGN – Speakers are set in accordance with the front speaker settings. The sound of the test tone will alternate between the left front (reference) speaker and the target speaker.

3Select the channel(s) you want and adjust to your liking.

3e.EQ CUSTOM1

Adjust


3e. EQ CUSTOM1 Adjust

Test Tone Type:


Test Tone Type:


"ALL

CH

ADJUST"


"ALL


CH

ADJUST"


Left


1.0dB ]


[ Left


]


40Hz :

[+


40Hz :


+

1.0dB


125Hz :

[

0.0dB ]


125Hz :

[


0.0dB

]


250Hz :

[

0.0dB ]


250Hz :

[


0.0dB ]


4kHz :

[

0.0dB ]


4kHz :

[


0.0dB ]


13kHz :

[

0.0dB ]


13kHz :

[


0.0dB ]


TRIM :

[

0.0dB ]


TRIM :

[


0.0dB ]


:Finish

:Finish

Use

to select the channel.


Use

to select the frequency and

to boost or

cut the EQ. When you’re finished, go back to the top of

the screen and use

to select the next channel.

The front speakers can’t be adjusted if you selected

FRONT ALIGN.

The OVER! indicator shows in the display if the frequency adjustment is too drastic and might distort. If this happens, bring the level down until OVER! disappears from the display.

Tip

Changing the frequency curve of one channel too drastically will affect the overall balance. If the speaker balance seems uneven, you can raise or lower channel levels using test tones with the TRIM

feature. Use to select TRIM then use to raise or lower the channel level for the current speaker.

4When you're finished, press RETURN. You return to the Manual MCACC setup menu.

Checking your Acoustic Calibration EQ settings

After you have completed an automatic or manual Acoustic Calibration EQ adjustment, you can check the ALL CH ADJUST, FRONT ALIGN and custom settings using the on-screen display.

En

Page 36
Image 36
Pioneer VSX-1016TXV-K Copying your Acoustic Calibration EQ settings, Setting the Acoustic Calibration EQ manually

VSX-1016TXV-K specifications

The Pioneer VSX-1016TXV-K is a versatile and powerful A/V receiver that brings a wealth of features and technologies to enhance your home entertainment experience. Built with the audiophile in mind, it combines high-performance sound quality with modern connectivity and smart functionality.

One of the main features of the VSX-1016TXV-K is its robust amplification system, which delivers an impressive 7.1-channel surround sound experience. With a total output of 110 watts per channel, this receiver is capable of driving a variety of speakers, ensuring that every audio detail is crisp and immersive. This makes it an ideal choice for both movie watchers and music enthusiasts.

The receiver supports numerous audio formats, including Dolby TrueHD and DTS-HD Master Audio, providing lossless audio quality for high-definition content. This commitment to audio excellence is complemented by its use of advanced technologies such as the Pioneer MCACC (Multi-Channel Acoustic Calibration System), which automatically adjusts the receiver's settings based on the acoustics of your room, ensuring optimal sound performance.

In terms of connectivity, the VSX-1016TXV-K is equipped with multiple HDMI inputs, which support 1080p video pass-through and are compatible with the latest HDMI standards. This makes it easy to connect various devices such as Blu-ray players, gaming consoles, and streaming devices, allowing seamless switching between sources. The unit also includes component and composite video inputs, as well as optical and coaxial digital audio inputs for greater flexibility.

Additionally, the receiver features an integrated AM/FM tuner, allowing listeners to enjoy their favorite radio stations. The user-friendly on-screen display and menu system enable easy navigation through different settings and offers access to a wide range of features, including preset equalizer settings and listening modes.

The VSX-1016TXV-K is designed with aesthetics in mind, featuring a sleek black finish that fits well in any home theater environment. Its robust build quality ensures durability while providing an attractive addition to your audio setup.

In conclusion, the Pioneer VSX-1016TXV-K A/V receiver stands out in the crowded market of home audio equipment with its exceptional sound performance, extensive connectivity options, and thoughtful user features. Whether you're hosting movie nights or enjoying your favorite music, this receiver delivers an impressive and engaging listening experience.