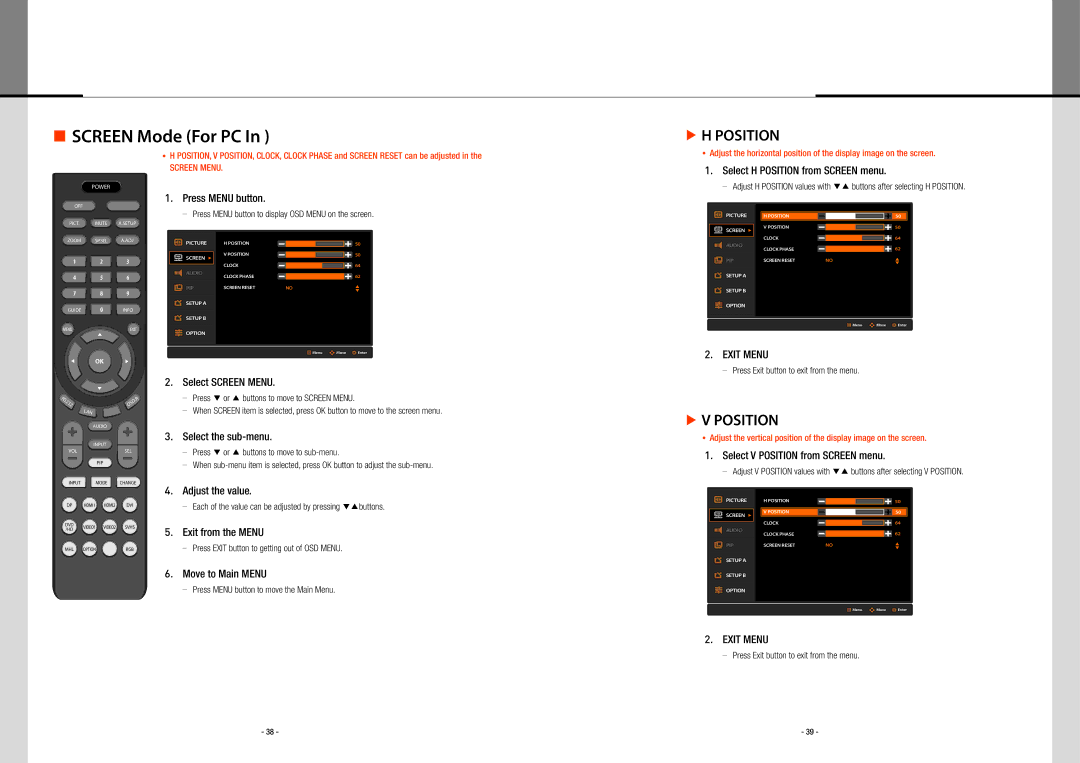
SCREEN Mode (For PC In )
H POSITION, V POSITION, CLOCK, CLOCK PHASE and SCREEN RESET can be adjusted in the
SCREEN MENU.
POWER
▶H POSITION
Adjust the horizontal position of the display image on the screen.
1. Select H POSITION from SCREEN menu.
Adjust H POSITION values with ▼▲ buttons after selecting H POSITION.
OFF
PICT. MUTE A.SETUP
1. Press MENU button.
Press MENU button to display OSD MENU on the screen.
PICTURE
SCREEN u
H POSITION |
|
|
| 50 |
|
|
| ||
V POSITION |
| |||
|
|
| 50 | |
ZOOM SP.SEL A.ADJ
1 2 3
4 5 6
7 8 9
GUIDE 0 INFO
PICTURE
SCREEN u
AUDIO
PIP
SETUP A
SETUP B
H POSITION |
|
|
|
|
| 50 |
|
|
|
|
| ||
V POSITION |
|
|
|
|
| 50 |
CLOCK |
|
|
|
|
| 64 |
CLOCK PHASE |
|
|
|
|
| 62 |
SCREEN RESET |
| NO | p | |||
|
|
|
|
|
| q |
AUDIO
PIP
SETUP A
SETUP B
OPTION
CLOCK |
|
|
|
| 64 |
CLOCK PHASE |
|
|
|
| 62 |
SCREEN RESET |
| NO | p | ||
|
|
|
|
| q |
MENU | EXIT |
▲
OPTION
![]()
![]() Menu
Menu ![]()
![]()
![]() Move
Move ![]() Enter
Enter
|
| Menu | Move Enter |
▲ | OK | ▲ |
|
| ▲ |
| 2. Select SCREEN MENU. | |
|
|
|
| |
RS232 |
| .R |
| Press ▼ or ▲ buttons to move to SCREEN MENU. |
| OSD |
| When SCREEN item is selected, press OK button to move to the screen menu. | |
| LAN |
| ||
|
|
| ||
| AUDIO |
| 3. |
|
| INPUT |
| Select the | |
|
|
| Press ▼ or ▲ buttons to move to | |
VOL |
| SEL |
| |
|
|
|
| |
| PIP |
|
| When |
|
|
|
| |
INPUT | MODE | CHANGE | 4. | Adjust the value. |
|
|
| ||
2. EXIT MENU
Press Exit button to exit from the menu.
▶V POSITION
Adjust the vertical position of the display image on the screen.
1. Select V POSITION from SCREEN menu.
Adjust V POSITION values with ▼▲ buttons after selecting V POSITION.
DP | HDMI1 | HDMI2 | DVI | Each of the value can be adjusted by pressing ▼▲buttons. | |
|
|
|
| ||
DVD | VIDEO1 | VIDEO2 | SVHS | 5. Exit from the MENU | |
/HD | |||||
|
|
| |||
|
|
|
| ||
MHL | OPTION |
| RGB | Press EXIT button to getting out of OSD MENU. |
6. Move to Main MENU
Press MENU button to move the Main Menu.
PICTURE
SCREEN u
AUDIO
PIP
SETUP A
SETUP B
OPTION
H POSITION |
|
|
|
|
| 50 |
|
|
|
|
| ||
|
|
|
|
|
|
|
V POSITION |
|
|
|
|
| 50 |
|
|
|
|
| ||
CLOCK |
|
|
|
|
| 64 |
CLOCK PHASE |
|
|
|
|
| 62 |
SCREEN RESET |
| NO | p | |||
|
|
|
|
|
| q |
![]()
![]() Menu
Menu ![]()
![]()
![]() Move
Move ![]() Enter
Enter
2. EXIT MENU
Press Exit button to exit from the menu.
- 38 - | - 39 - |
