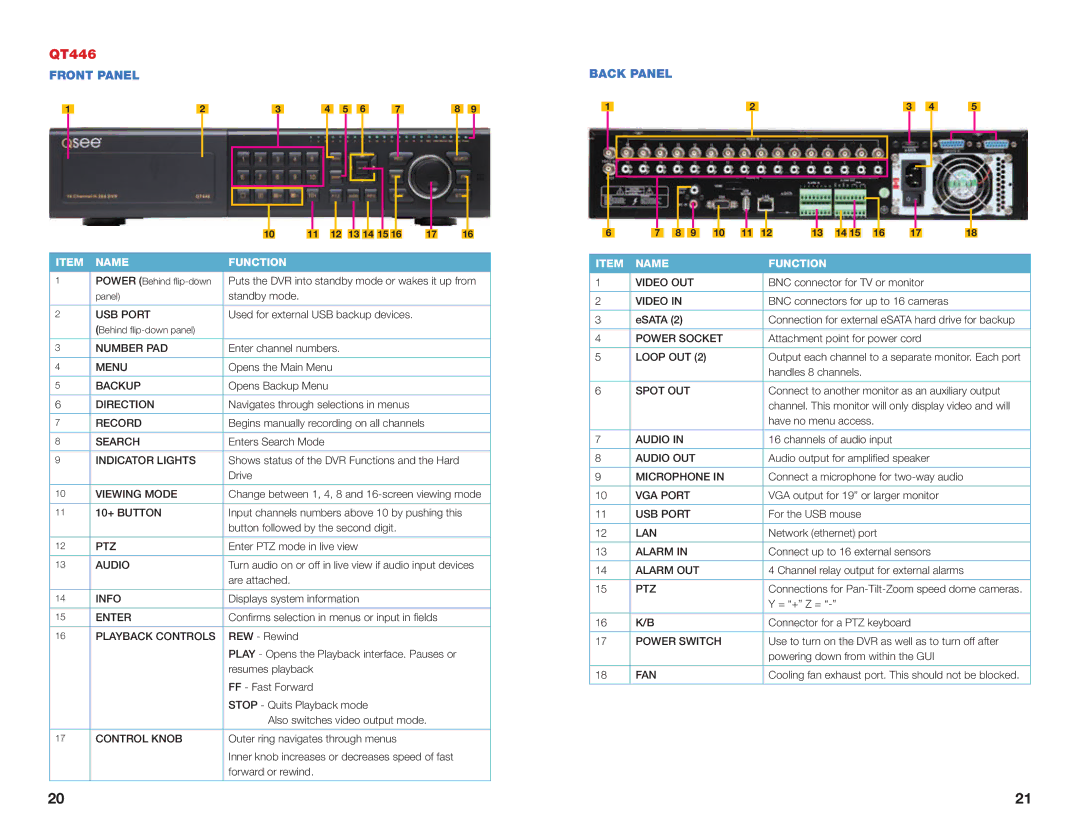
QT446
FRONT PANEL
|
|
|
|
|
|
|
|
|
|
|
|
|
|
|
|
|
|
|
|
| ||||||||
2 |
|
| 4 |
|
|
|
| 6 |
|
| 8 | |||||||||||||||||
1 | 3 | 5 | 7 | 9 | ||||||||||||||||||||||||
|
|
|
|
|
|
|
|
|
|
|
|
|
|
|
|
|
|
|
|
|
|
|
|
|
|
|
|
|
|
|
|
|
|
|
|
|
|
|
|
|
|
|
|
|
|
|
|
|
|
|
|
|
|
|
|
|
|
|
|
|
|
|
|
|
|
|
|
|
|
|
|
|
|
|
|
|
|
|
|
|
|
|
|
|
|
|
|
|
|
|
|
|
|
|
|
|
|
|
|
|
|
|
|
|
|
|
|
|
|
|
|
|
|
|
|
10 | 11 | 12 | 13 14 15 16 | 17 | 16 |
ITEM NAME | FUNCTION |
1POWER (Behind
| panel) | standby mode. |
|
|
|
2 | USB PORT | Used for external USB backup devices. |
| (Behind |
|
|
|
|
3 | NUMBER PAD | Enter channel numbers. |
|
|
|
4 | MENU | Opens the Main Menu |
|
|
|
5 | BACKUP | Opens Backup Menu |
|
|
|
6 | DIRECTION | Navigates through selections in menus |
|
|
|
7 | RECORD | Begins manually recording on all channels |
|
|
|
8 | SEARCH | Enters Search Mode |
9INDICATOR LIGHTS Shows status of the DVR Functions and the Hard Drive
10 | VIEWING MODE | Change between 1, 4, 8 and |
|
|
|
11 | 10+ BUTTON | Input channels numbers above 10 by pushing this |
|
| button followed by the second digit. |
|
|
|
12 | PTZ | Enter PTZ mode in live view |
|
|
|
13 | AUDIO | Turn audio on or off in live view if audio input devices |
|
| are attached. |
|
|
|
14 | INFO | Displays system information |
|
|
|
15 | ENTER | Confirms selection in menus or input in fields |
16PLAYBACK CONTROLS REW - Rewind
|
| PLAY - Opens the Playback interface. Pauses or |
|
| resumes playback |
|
| FF - Fast Forward |
|
| STOP - Quits Playback mode |
|
| Also switches video output mode. |
|
|
|
17 | CONTROL KNOB | Outer ring navigates through menus |
|
| Inner knob increases or decreases speed of fast |
|
| forward or rewind. |
BACK PANEL
|
|
|
|
|
|
|
|
|
|
|
|
| |||||
1 | 2 | 3 | 4 | 5 | |||||||||||||
|
|
|
|
|
|
|
|
|
|
|
|
|
|
|
|
|
|
|
|
|
|
|
|
|
|
|
|
|
|
|
|
|
|
|
|
|
|
|
|
|
|
|
|
|
|
|
|
|
|
|
|
|
|
|
|
|
|
|
|
|
|
|
|
|
|
|
|
|
|
|
|
|
|
|
|
|
|
|
|
|
|
|
|
|
|
|
|
|
|
|
|
|
|
|
|
|
|
|
|
|
|
|
|
|
|
|
|
|
|
|
|
|
|
|
|
|
|
|
|
|
|
|
|
|
|
|
|
|
|
|
|
|
|
|
|
|
|
|
|
|
|
|
|
|
|
|
|
|
|
|
|
|
|
|
|
|
|
|
|
|
|
|
|
|
|
|
|
|
|
|
|
|
|
|
|
|
|
|
|
|
|
|
|
|
|
|
|
|
|
|
|
|
|
|
|
|
|
|
|
|
|
|
|
|
|
|
|
|
|
|
|
|
|
|
|
|
|
| 6 |
|
| 7 |
| 8 |
| 9 |
| 10 |
| 11 |
| 12 |
| 13 |
| 14 |
| 15 |
|
| 16 |
| 17 |
| 18 |
| ||||||||||||
|
|
|
|
|
|
|
|
|
|
|
|
|
|
|
|
|
|
|
|
|
|
|
|
|
|
|
|
|
|
| ||||||||||
ITEM | NAME |
|
|
|
|
|
|
|
|
|
|
|
| FUNCTION |
|
|
|
|
|
|
|
|
|
|
|
|
|
|
|
| ||||||||||
|
|
|
|
|
|
|
|
|
|
|
|
|
|
|
| |||||||||||||||||||||||||
1 |
|
|
| VIDEO OUT |
|
|
|
|
|
|
| BNC connector for TV or monitor |
|
|
| |||||||||||||||||||||||||
|
|
|
|
|
|
|
|
|
|
|
|
|
|
|
|
|
| |||||||||||||||||||||||
2 |
|
|
| VIDEO IN |
|
|
|
|
|
|
|
|
| BNC connectors for up to 16 cameras |
|
|
| |||||||||||||||||||||||
|
|
|
|
|
|
|
|
|
|
|
|
|
|
| ||||||||||||||||||||||||||
3 |
|
|
| eSATA (2) |
|
|
|
|
|
|
|
|
| Connection for external eSATA hard drive for backup | ||||||||||||||||||||||||||
|
|
|
|
|
|
|
|
|
|
|
|
|
| |||||||||||||||||||||||||||
4 |
|
|
| POWER SOCKET |
|
|
|
|
| Attachment point for power cord |
|
|
| |||||||||||||||||||||||||||
|
|
|
|
|
|
|
|
|
|
|
|
| ||||||||||||||||||||||||||||
5 |
|
|
| LOOP OUT (2) |
|
|
|
|
|
|
| Output each channel to a separate monitor. Each port | ||||||||||||||||||||||||||||
|
|
|
|
|
|
|
|
|
|
|
|
|
|
|
|
|
|
|
| handles 8 channels. |
|
|
|
|
|
|
|
|
|
| ||||||||||
|
|
|
|
|
|
|
|
|
|
|
|
|
|
| ||||||||||||||||||||||||||
6 |
|
|
| SPOT OUT |
|
|
|
|
|
|
|
|
| Connect to another monitor as an auxiliary output | ||||||||||||||||||||||||||
|
|
|
|
|
|
|
|
|
|
|
|
|
|
|
|
|
|
|
| channel. This monitor will only display video and will | ||||||||||||||||||||
|
|
|
|
|
|
|
|
|
|
|
|
|
|
|
|
|
|
|
| have no menu access. |
|
|
|
|
|
| ||||||||||||||
|
|
|
|
|
|
|
|
|
|
|
|
|
|
|
|
|
|
|
|
| ||||||||||||||||||||
7 |
|
|
| AUDIO IN |
|
|
|
|
|
|
|
|
| 16 channels of audio input |
|
|
|
|
|
| ||||||||||||||||||||
|
|
|
|
|
|
|
|
|
|
|
|
|
|
|
| |||||||||||||||||||||||||
8 |
|
|
| AUDIO OUT |
|
|
|
|
|
|
| Audio output for amplified speaker |
|
|
| |||||||||||||||||||||||||
|
|
|
|
|
|
|
|
|
|
|
|
|
| |||||||||||||||||||||||||||
9 |
|
|
| MICROPHONE IN |
|
|
|
|
| Connect a microphone for |
|
|
| |||||||||||||||||||||||||||
|
|
|
|
|
|
|
|
|
|
|
|
|
|
|
|
| ||||||||||||||||||||||||
10 |
|
| VGA PORT |
|
|
|
|
|
|
|
|
| VGA output for 19” or larger monitor |
|
|
| ||||||||||||||||||||||||
|
|
|
|
|
|
|
|
|
|
|
|
|
|
|
|
|
|
|
|
|
|
|
| |||||||||||||||||
11 |
|
| USB PORT |
|
|
|
|
|
|
|
|
| For the USB mouse |
|
|
|
|
|
|
|
|
|
| |||||||||||||||||
|
|
|
|
|
|
|
|
|
|
|
|
|
|
|
|
|
|
|
|
|
|
| ||||||||||||||||||
12 |
|
| LAN |
|
|
|
|
|
|
|
|
|
|
|
| Network (ethernet) port |
|
|
|
|
|
| ||||||||||||||||||
|
|
|
|
|
|
|
|
|
|
|
|
|
|
|
|
| ||||||||||||||||||||||||
13 |
|
| ALARM IN |
|
|
|
|
|
|
|
|
| Connect up to 16 external sensors |
|
|
| ||||||||||||||||||||||||
|
|
|
|
|
|
|
|
|
|
|
|
|
|
| ||||||||||||||||||||||||||
14 |
|
| ALARM OUT |
|
|
|
|
|
|
| 4 Channel relay output for external alarms |
|
|
| ||||||||||||||||||||||||||
|
|
|
|
|
|
|
|
|
|
|
|
|
|
|
|
| ||||||||||||||||||||||||
15 |
|
| PTZ |
|
|
|
|
|
|
|
|
|
|
|
| Connections for | ||||||||||||||||||||||||
|
|
|
|
|
|
|
|
|
|
|
|
|
|
|
|
|
|
|
| Y = “+” Z = |
|
|
|
|
|
|
|
|
|
| ||||||||||
|
|
|
|
|
|
|
|
|
|
|
|
|
|
|
|
|
|
|
| |||||||||||||||||||||
16 |
|
| K/B |
|
|
|
|
|
|
|
|
|
|
|
| Connector for a PTZ keyboard |
|
|
| |||||||||||||||||||||
|
|
|
|
|
|
|
|
|
| |||||||||||||||||||||||||||||||
17 |
|
| POWER SWITCH |
|
|
|
|
| Use to turn on the DVR as well as to turn off after | |||||||||||||||||||||||||||||||
|
|
|
|
|
|
|
|
|
|
|
|
|
|
|
|
|
|
|
| powering down from within the GUI |
|
|
| |||||||||||||||||
|
|
|
|
|
|
|
|
|
|
|
|
|
|
|
|
| ||||||||||||||||||||||||
18 |
|
| FAN |
|
|
|
|
|
|
|
|
|
|
|
| Cooling fan exhaust port. This should not be blocked. | ||||||||||||||||||||||||
|
|
|
|
|
|
|
|
|
|
|
|
|
|
|
|
|
|
|
|
|
|
|
|
|
|
|
|
|
|
|
|
|
|
|
|
|
|
|
|
|
20 | 21 |