Home Theater Master R LCD Screen
Remote Control
Preprogrammed and Learning
MX-500 Operating Manual
Table of Contents
Recalling the Preprogrammed
Table of Contents
1. Introduction
Universal Remote Control, Inc 500 Mamaroneck Avenue Harrison, NY Tel
You can also e-mail us at service@urcmx.com
1. Introduction
2. Batteries
A. Description of Devices
3. Summary of Operations
including Audio Receivers, Cable and Satellite Boxes
TV, DVD LD, VCR, DVR, CD, Tape and AUX
M1, M2, M3, POWER and SYSTEM OFF Buttons
C. Learning From Other Remote Controls
3. Summary of Operations
D. Macro Operations
Ten Device Buttons
3. Summary of Operations
E. Favorite Channel Buttons
F. Punch Through Operations
G. Editing LCD Text
3. Summary of Operations
H. Cloning The MX-500TM
I. All Other Operations
J. LCD Screen And Button Layout
3. Summary of Operations
K. System Settings
WHERE DO I START?
4.ProgrammingtheMX-500TMtoControlYourComponents
A. Using Preprogrammed Codes 1. Three-Digit Code Number
1. Manually turn on the device you wish to operate
4.ProgrammingtheMX-500TMtoControlYourComponents
11. You can press EXIT at any time if you do not wish to proceed
4.ProgrammingtheMX-500TMtoControlYourComponents
2. Auto Scan With Three-Digit Number
4.ProgrammingtheMX-500TMtoControlYourComponents
4. The remote will be flashing “SELECT BUTTON”. Press the device you wish to program. For example, to program TV, press the TV button
4.ProgrammingtheMX-500TMtoControlYourComponents
9. Continue to program other components by repeating from step 1 above
4.ProgrammingtheMX-500TMtoControlYourComponents
B. Learning Method
Points to Remember
1. Programming The Function Buttons
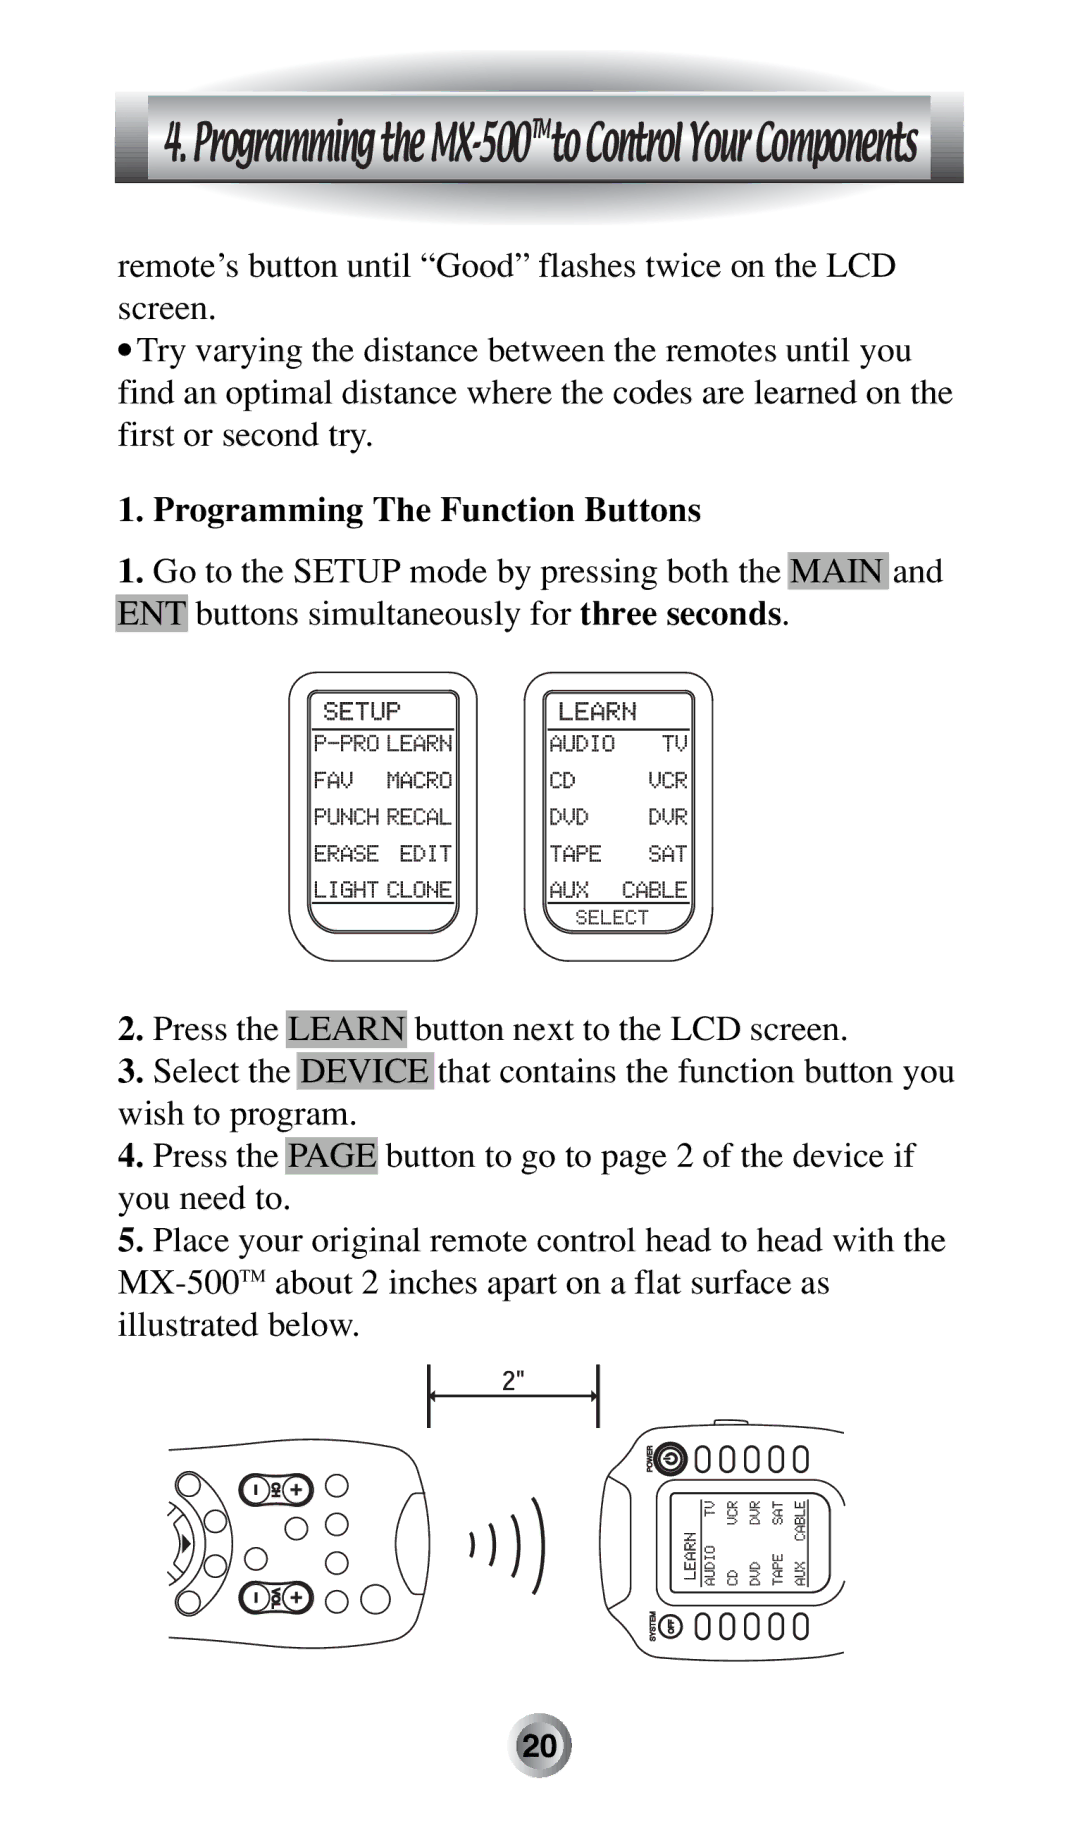
4.ProgrammingtheMX-500TMtoControlYourComponents
See “Programming Punch Through” functions on Page
4.ProgrammingtheMX-500TMtoControlYourComponents
If it flashes “Fail”, repeat from Step 4 until it learns successfully
2. Programming The Ten Device Buttons
4.ProgrammingtheMX-500TMtoControlYourComponents
5. Programming Favorite Channels
6. Return to Step #3 until you have programmed all of the FAV channel buttons that you require
5. Programming Favorite Channels
6. Programming Macro Buttons
3. Press one of the macro buttons, M1-M3, Power or System Off you wish to store your macro on
B. Programming Macro Functions To The Ten Device Buttons
6. Programming Macro Buttons
Sample Macro The following is a sample macro, to give you a quick idea of what a macro can do, in an easy step- by-step form. Please refer to “Programming Macro Buttons” above if you need to refresh your memory on programming macros. This example assumes you have not changed the names of the devices and that you have used “punch through” to assign the VOL to your receiver. If you have changed the labels, just insert your changed names in the example below
6. Programming Macro Buttons
4. Press AUDIO. Takes you to the Audio device page
5. Press POWER. The button on the top right of the remote
6. Press TV. This takes you to the TV device page
9. Press CABLE. This takes you to the Cable device page
15. Press MAIN
6. Programming Macro Buttons
7. Programming Punch Through Functions
6. Punch Through is saved when the second device is pressed
8. Erasing Existing Programming
B. Erasing Favorite Channel Buttons
8. Erasing Existing Programming
1. Erase M1, M2, M3, POWER and SYSTEM OFF Buttons
8. Erasing Existing Programming
C. Erasing Macro Functions
8. Erasing Existing Programming
2. Erase Macro Functions In The Ten Device Buttons
D. Erasing Punch Through Functions
4. Press the DEVICE button from which you wish to erase punch through
8. Erasing Existing Programming
A. To Create or Edit Text on Function and Device Buttons
9. LCD Button Editing
B. To Create Or Edit Text for Favorite Channel Buttons
9. LCD Button Editing
10. Recalling the Preprogrammed Three-Digit Number
11. Setting Backlight
12. Cloning MX-500
13. Adjustment of LCD Contrast
12. Cloning MX-500
7. Press the START button on both units to begin cloning. It will take about 40 seconds to complete the cloning and it will flash “ GOOD” upon completion of the cloning
14. Caution On Handling LCD Screen
15. Low Battery Message
16. Memory Lock
17. Glossary
Component See device
High frequency Indicates an infrared system that employs
17. Glossary
17. Glossary
frequencies higher than the industry standard. Some examples would be Bang & Olufsen, Kenwood 455KHz and older Pioneer Elite 1.125MHz. Such devices are never preprogrammed into off-the-shelf remote controls and can generally only be used with very specific learning remote controls
17. Glossary
control up, down, left, right and enter. The Joystick on the MX-500TM can be programmed with other commands as well. The Joystick on the MX-500TM is sometimes referred to as a Thumbpad
Pause See Delay
17. Glossary
17. Glossary
Signals See “ codes” or “ infrared.”
19. Specifications
18. Warranty
AUDIO
20. APPENDIX
Button Name
Functions
Button Name
20. APPENDIX
Functions
Button Name
CABLE
20. APPENDIX
DVD/LD
Button Name
TAPE
20. APPENDIX
Button Name
Functions
Button Name
20. APPENDIX
Functions
Button Name
B. Three-Digit Preprogrammed Code Table
Set-Up Code Table
AUDIO
Manufacturer/Brand
AUDIO
Set-Up Code Table
Manufacturer/Brand
Set-Up Code Number
Set-Up Code Table
Manufacturer/Brand
Set-Up Code Number
Set-Up Code Table
Manufacturer/Brand
Set-Up Code Number
Set-Up Code Table
Manufacturer/Brand
Set-Up Code Number
Set-Up Code Table
Manufacturer/Brand
Set-Up Code Number
Set-Up Code Table
Manufacturer/Brand
Set-Up Code Number
CABLE/WEBTV
Set-Up Code Table
Manufacturer/Brand
Set-Up Code Number
CABLE/WEBTV
Set-Up Code Table
Manufacturer/Brand
Set-Up Code Number
Set-Up Code Table
Manufacturer/Brand
Set-Up Code Number
Set-Up Code Table
Manufacturer/Brand
Set-Up Code Number
Set-Up Code Table
Manufacturer/Brand
Set-Up Code Number
Note These codes are stored in DVD
Set-Up Code Table
Manufacturer/Brand
Set-Up Code Number
TAPE
Set-Up Code Table
Manufacturer/Brand
Set-Up Code Number
Set-Up Code Table
Manufacturer/Brand
Set-Up Code Number
Set-Up Code Table
AUX - Light, Switch, etc
Manufacturer/Brand
Set-Up Code Number
Page
Page
Page
Page
Page
OCE-0016H Rev03