Controlling the Monitor Display
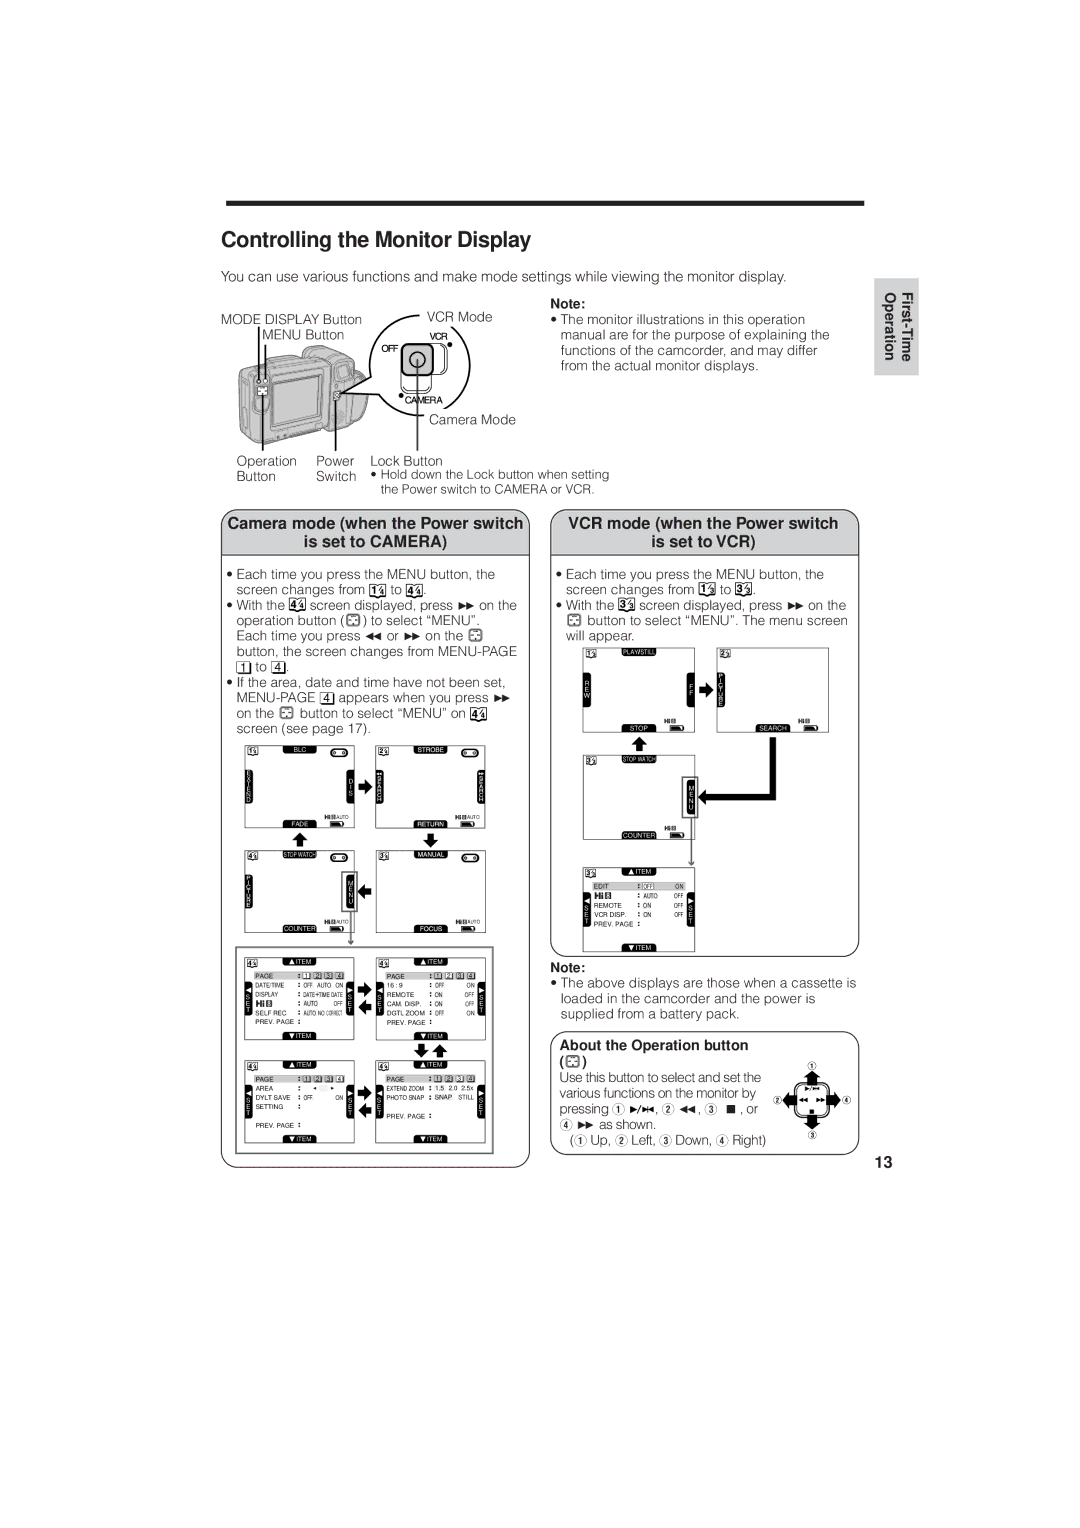
You can use various functions and make mode settings while viewing the monitor display.
|
| VCR Mode | Note: |
MODE DISPLAY Button | • The monitor illustrations in this operation | ||
MENU Button |
| manual are for the purpose of explaining the | |
|
|
| functions of the camcorder, and may differ |
|
|
| from the actual monitor displays. |
|
| Camera Mode |
|
Operation | Power | Lock Button |
|
Button | Switch | • Hold down the Lock button when setting | |
|
| the Power switch to CAMERA or VCR. | |
Camera mode (when the Power switch
is set to CAMERA)
•Each time you press the MENU button, the screen changes from ![]() to
to ![]() .
.
•With the ![]() screen displayed, press B on the operation button (
screen displayed, press B on the operation button (![]() ) to select “MENU”. Each time you press C or B on the
) to select “MENU”. Each time you press C or B on the ![]() button, the screen changes from
button, the screen changes from
1to 4 .
•If the area, date and time have not been set,
on the ![]() button to select “MENU” on
button to select “MENU” on ![]() screen (see page 17).
screen (see page 17).
| BLC |
|
E |
|
|
X | D | |
T |
| I |
E |
| |
N |
| S |
D |
|
|
| AUTO | AUTO |
| FADE |
|
| STOP WATCH |
|
| M | |
|
| E |
| N | |
| U | |
| AUTO | AUTO |
| COUNTER |
|
VCR mode (when the Power switch
is set to VCR)
•Each time you press the MENU button, the screen changes from ![]() to
to ![]() .
.
•With the ![]() screen displayed, press B on the
screen displayed, press B on the
![]() button to select “MENU”. The menu screen
button to select “MENU”. The menu screen
will appear.
PLAY STILL |
| |
R | F | |
E | ||
F | ||
W | ||
| ||
STOP | SEARCH |
STOP WATCH
|
|
|
| M |
|
|
|
| E |
|
|
|
| N |
|
|
|
| U |
| COUNTER |
|
| |
|
| ITEM |
|
|
| EDIT | OFF | ON |
|
|
| AUTO | OFF |
|
S | REMOTE | ON | OFF | S |
E | VCR DISP. | ON | OFF | E |
T | PREV. PAGE |
|
| T |
|
| ITEM |
|
|
![]() ITEM
ITEM
PAGE | 1 | 2 | 3 | 4 |
| DATE/TIME | OFF | AUTO ON |
| ||||
| DISPLAY |
|
|
|
| DATE |
| |
S | DATE | TIME | S | |||||
|
|
|
| |||||
E |
|
| AUTO |
| OFF | E | ||
T | SELF REC |
|
|
| NO CORRECT | T | ||
| AUTO | |||||||
PREV. PAGE
![]() ITEM
ITEM
![]() ITEM
ITEM
PAGE | 1 | 2 | 3 | 4 |
AREA
S | DYLT SAVE | OFF | ON S |
| |||
E | SETTING |
| E |
TT
PREV. PAGE
![]() ITEM
ITEM
![]() ITEM
ITEM
PAGE | 1 | 2 | 3 | 4 |
| 16 : 9 |
| OFF | ON |
| |
| REMOTE |
|
|
| OFF |
|
S |
| ON | S | |||
|
| |||||
E | CAM. DISP. |
| ON |
| OFF | E |
T | DGTL ZOOM |
|
|
| ON | T |
| OFF | |||||
| PREV. PAGE |
|
|
|
|
|
|
| ITEM |
|
| ||
![]() ITEM
ITEM
PAGE | 1 | 2 | 3 | 4 |
| EXTEND ZOOM |
| 1.5 | 2.0 | 2.5X | |
| PHOTO SNAP |
|
|
|
| STILL S |
S |
| SNAP | ||||
|
|
| ||||
E |
|
|
|
|
| E |
T | PREV. PAGE |
|
|
|
| T |
|
| ITEM |
| |||
Note: |
•The above displays are those when a cassette is loaded in the camcorder and the power is supplied from a battery pack.
About the Operation button (  )
)
Use this button to select and set the various functions on the monitor by
pressing Q ![]()
![]() , W C, E A, or R B as shown.
, W C, E A, or R B as shown.
(Q Up, W Left, E Down, R Right)
13